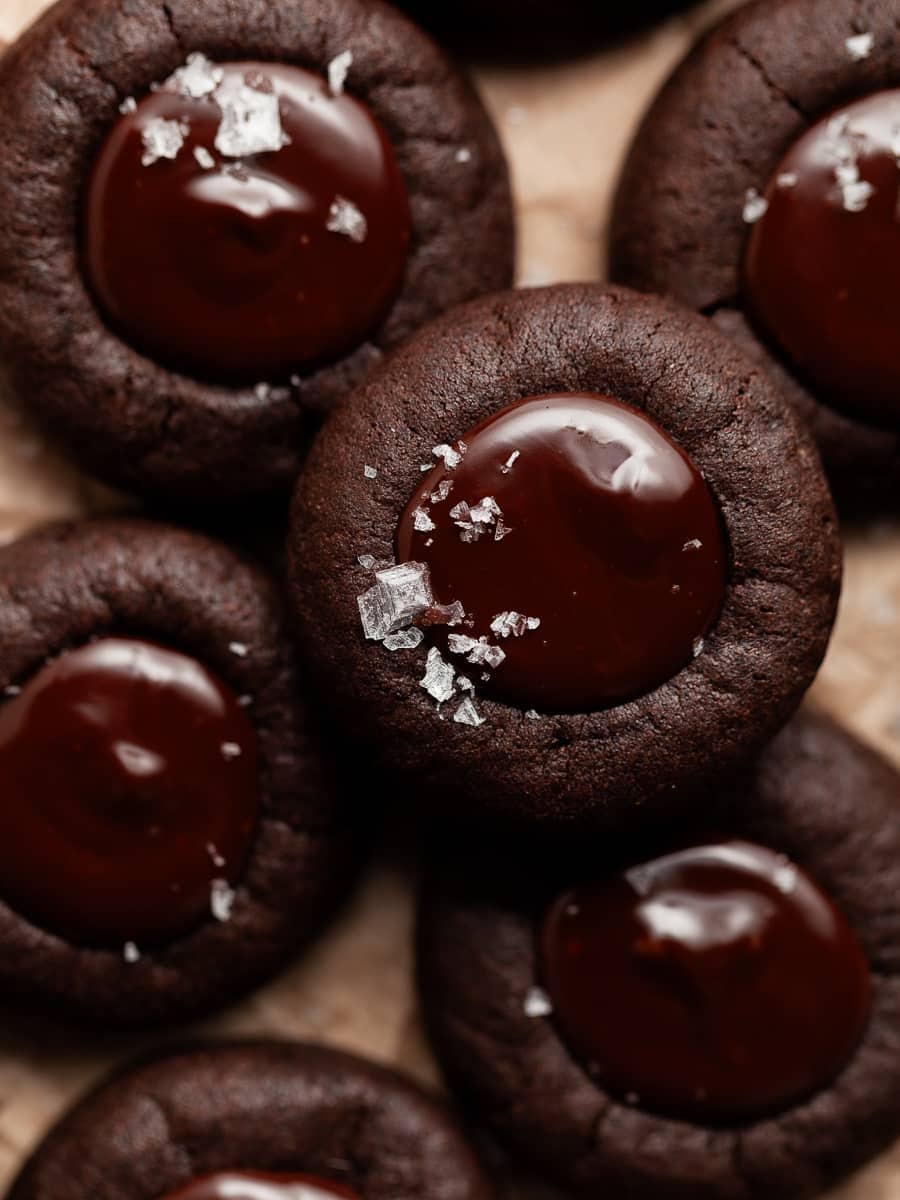
If you're a chocolate lover, you've got to try these Gluten-Free Chocolate Thumbprint Cookies! Imagine a decadent chocolate cookie with a creamy dark chocolate ganache center. Topped off with a sprinkle of flaky sea salt, these cookies will quickly become one of your favorite Christmas cookies to bake this Holiday Season.
Jump to:
- Recipe Ingredient Notes
- How to make Chocolate Thumbprint Cookie Dough
- How to shape Gluten Free Chocolate Thumbprint Cookies
- How to bake Chocolate Thumbprint Cookies
- Dark Chocolate Ganache Filling
- Variations of Chocolate Thumbprint Cookies
- Storage & Freezing
- FAQ - Chocolate Thumbprint Cookies
- Note about Salt in my Recipes
- Baking in grams
- Note about Ovens and Oven Temperatures
- Substitutions and Modifications
- More Gluten Free Cookie Recipes to try
- 📖 Recipe
- 💬 Comments
Recipe Ingredient Notes
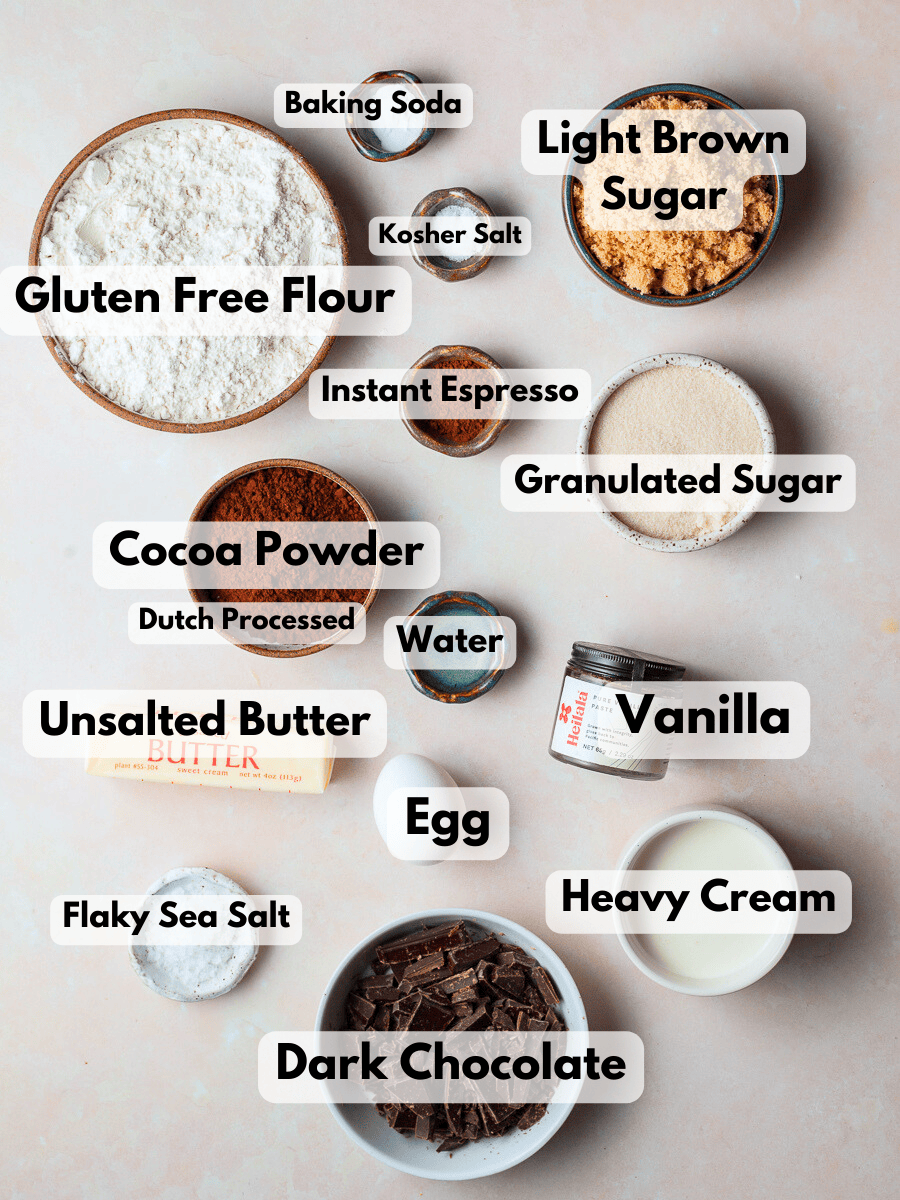
Gluten Free Flour: I tested this recipe for chocolate thumbprint cookies with King Arthur Measure for Measure, my own gluten free multi purpose flour blend and Bob's Red Mill 1-to-1. While all three gluten free flour blends worked great in this recipe, the cookies made with King Arthur Measure for Measure stayed soft the longest. All those blends do contain xanthan gum.
Cocoa Powder: I use dutch-processed cocoa powder in this recipe such as deZaan Crimson Red Dutch Processed Cocoa Powder. A great grocery store option is Hershey Special Dark Cocoa Powder. The dutch-process cocoa powder creates what some people consider a richer, fudgier flavor in baked goods. Natural cocoa will not only create a lighter colored cookie but also a cookie on the dry side without the chewiness you achieve from using high quality cocoa powder.
Instant Espresso: I love adding a little instant espresso to my chocolate desserts. Adding coffee to chocolate desserts enhances the overall flavor by complementing and intensifying the richness of chocolate. Coffee's natural bitterness and depth amplify the chocolate's complexity. If you don't have instant coffee at home, feel free to just substitute the water used in the recipe with some coffee.
Dark Chocolate: For the chocolate ganache filling, I recommend using a high quality dark chocolate (60% or darker) over semi-sweet chocolate. I like using a chocolate bar for this. Try to avoid chocolate chips which won't melt into a smooth ganache.
How to make Chocolate Thumbprint Cookie Dough
The dough for chocolate thumbprint cookies is very straightforward to make. Make sure the unsalted butter and the egg are at room temperature. The recipe can be made with a stand mixer or with an electric hand mixer.
Step 1: In a medium bowl sift together the gluten free multi purpose flour, cocoa powder, instant espresso (if using), baking soda and kosher salt. Set aside.
Step 2: To the bowl of the stand mixer, fitted with the paddle attachment, add the room temperature butter and both sugars . On medium-high speed cream until smooth and creamy, about 3-4 minutes. Scrape down the sides of your bowl.
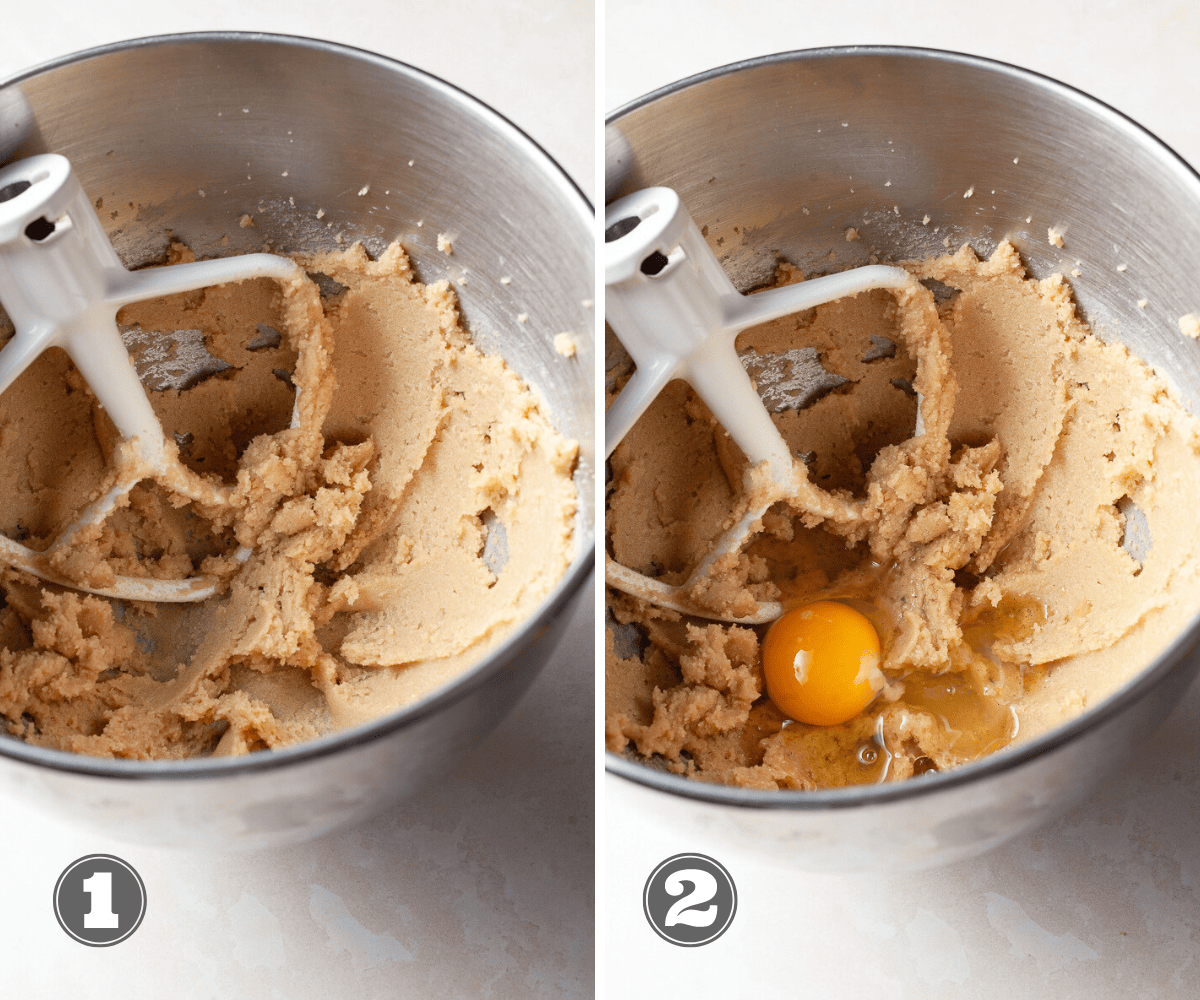
Step 3: Add the room temperature egg, vanilla extract and room temperature water and mix on high speed until combined for about 1 minute. Scrape down the sides and up the bottom of the bowl and mix for another 10-15 seconds. It is possible the mixture will look curdled.
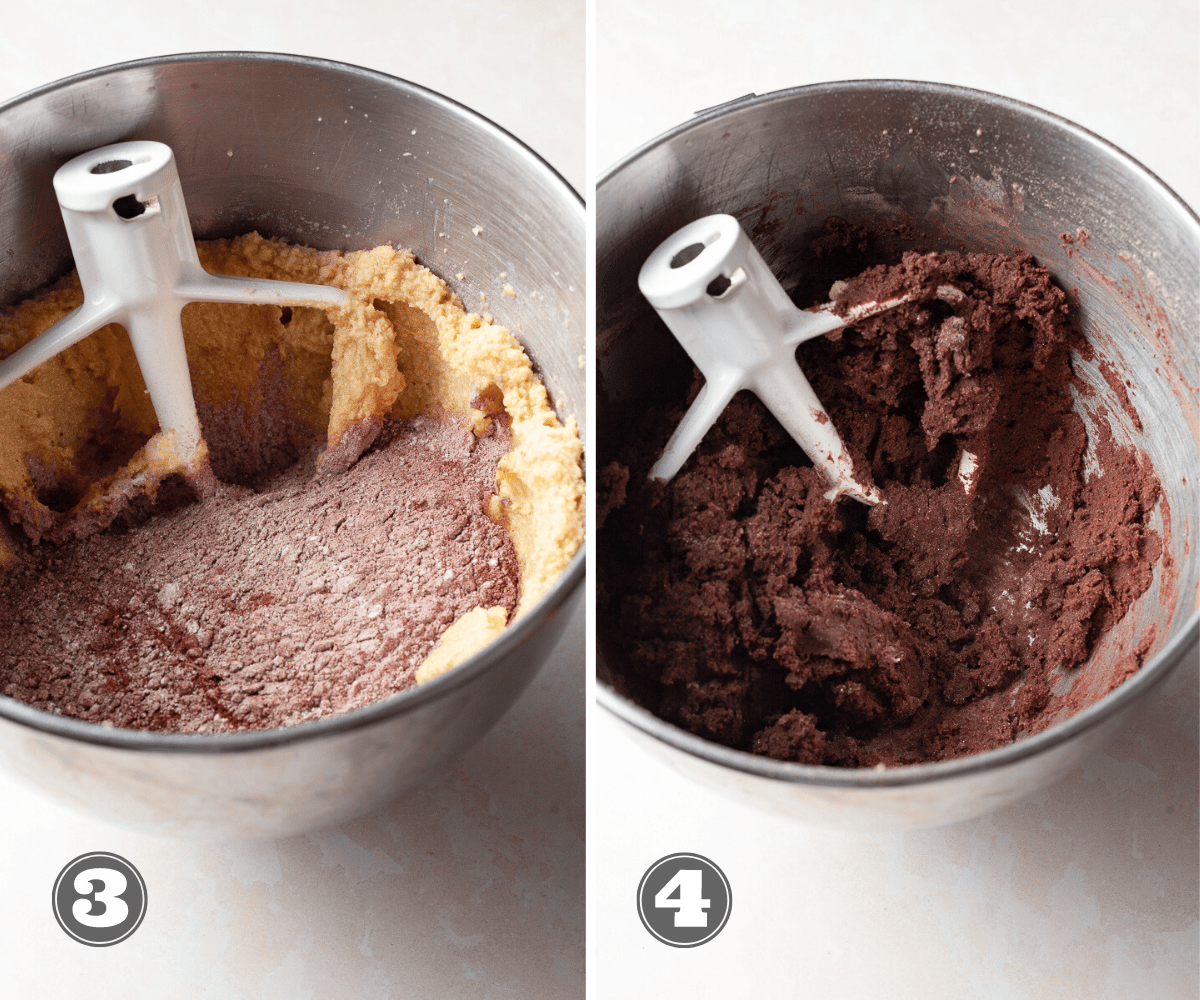
Step 4: Add the dry ingredients to the wet ingredients and mix on low speed until combined. The chocolate thumbprint cookie dough will be thick and sticky.
Step 5: Cover the bowl with some plastic wrap and refrigerate for 10-15 minutes before shaping the chocolate thumbprint cookies. Refrigerating helps to hydrate the flour and makes it easier to shape the cookies.
How to shape Gluten Free Chocolate Thumbprint Cookies
To avoid cracks in the thumbprint cookies, I recommend shaping the dough before allowing it to rest for in the fridge for at least another hour. Preferably overnight.
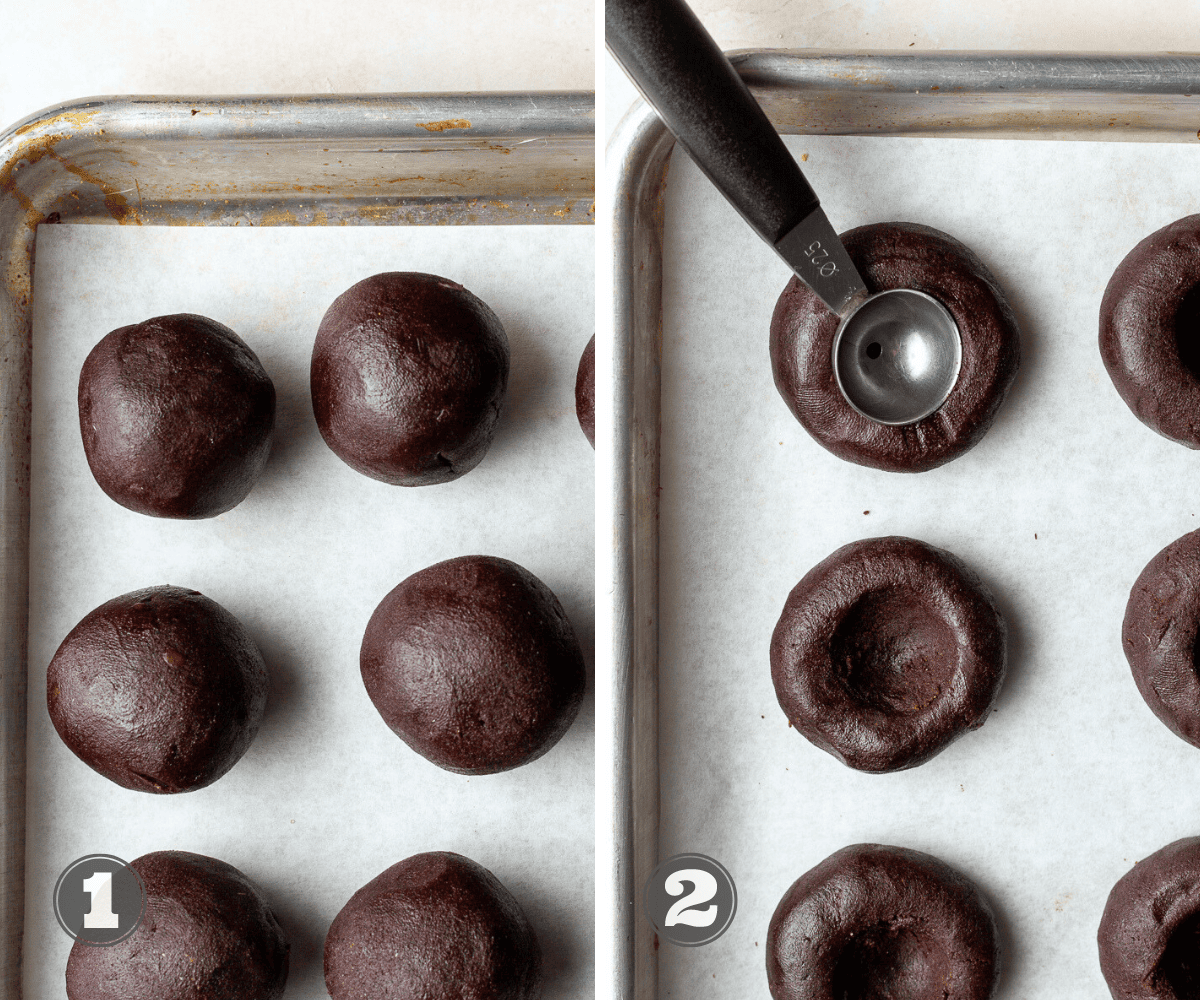
Step 1: With a small cookie scoop divide the gluten-free chocolate cookie dough into 20-24 equal size portions. The number of cookies is an estimate this it will depend on the size of cookie scoop you use.
Step 2: Roll the cookie dough balls between the palms of your hands into smooth balls with no cracks. This will help to keep the cracks in the finished cookies to a minimum.
Step 3: Using a melon baller, a round teaspoon measuring spoon, the end of a wooden spoon or your thumb (hence the name thumbprint cookies) to indent each cookie.
Step 4: Cover the indented chocolate dough and chill for at least 60 minutes (and up to 2 days) in the fridge. At this point, you may also freeze the shaped and indented thumbprint cookies and bake them at a later date.
How to bake Chocolate Thumbprint Cookies
Step 1: When ready to bake the thumbprint cookies, preheat the oven to 350 degrees. Line two baking sheets with parchment paper. Since the cookies should only spread very little you can bake at least 8-12 cookies per tray. Arrange them evenly on the parchment-lined baking sheet.
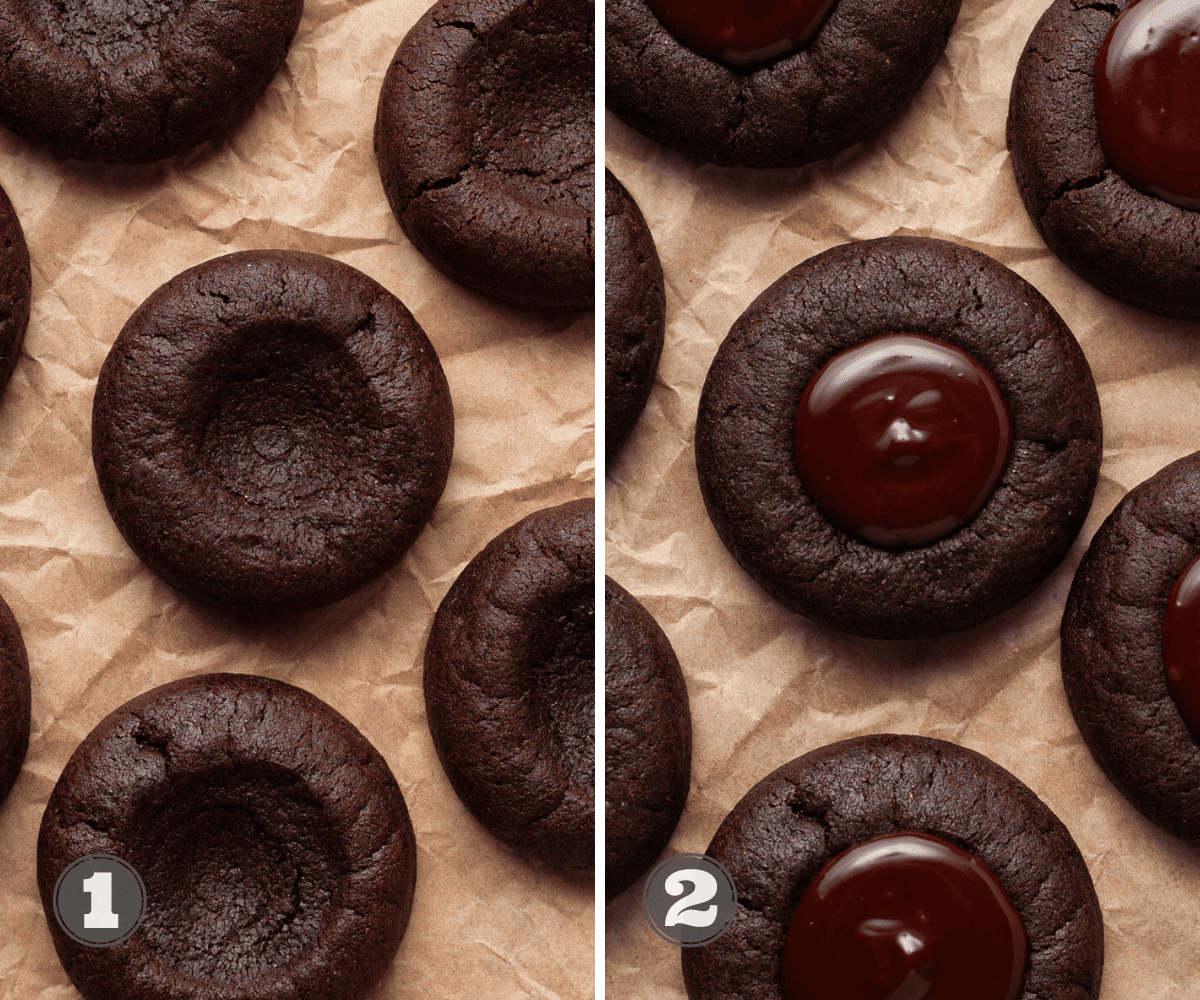
Step 2: Bake in a fully preheated oven for 9-11 minutes. The cookies will be puffy and most likely have lost their indent. I think 10 minutes was the perfect time for my gluten free chocolate thumbprint cookies.
Step 3: Remove the cookies from the oven and place the cookie sheet on a wire rack. With a cookie cutter or a glass scoot the cookies back into a perfect round shape and "Re-Indent" the cookies with the same tool you used when shaping them.
Step 4: Allow the cookies to cool for a few minutes on the sheet tray before transferring them to a cooling rack to cool completely.
Dark Chocolate Ganache Filling
While the chocolate thumbprint cookies are cooling, make the dark chocolate ganache filling.
Step 1: Finely chop the dark chocolate and place it in a small bowl. Make sure there are no big hunks of chocolate.
Step 2: In a small saucepan bring the heavy cream to a gentle boil. This can also be done in a microwave.
Step 3: Carefully pour the hot heavy cream over the chopped chocolate. Allow for it to sit for a few minutes before carefully stirring it together. Start in the center of the bowl and slowly work your way out in increasingly larger concentric circles.
Step 4: With a small cookie scoop or spoon, fill each indent of the chocolate thumbprint cookies with the dark chocolate ganache.
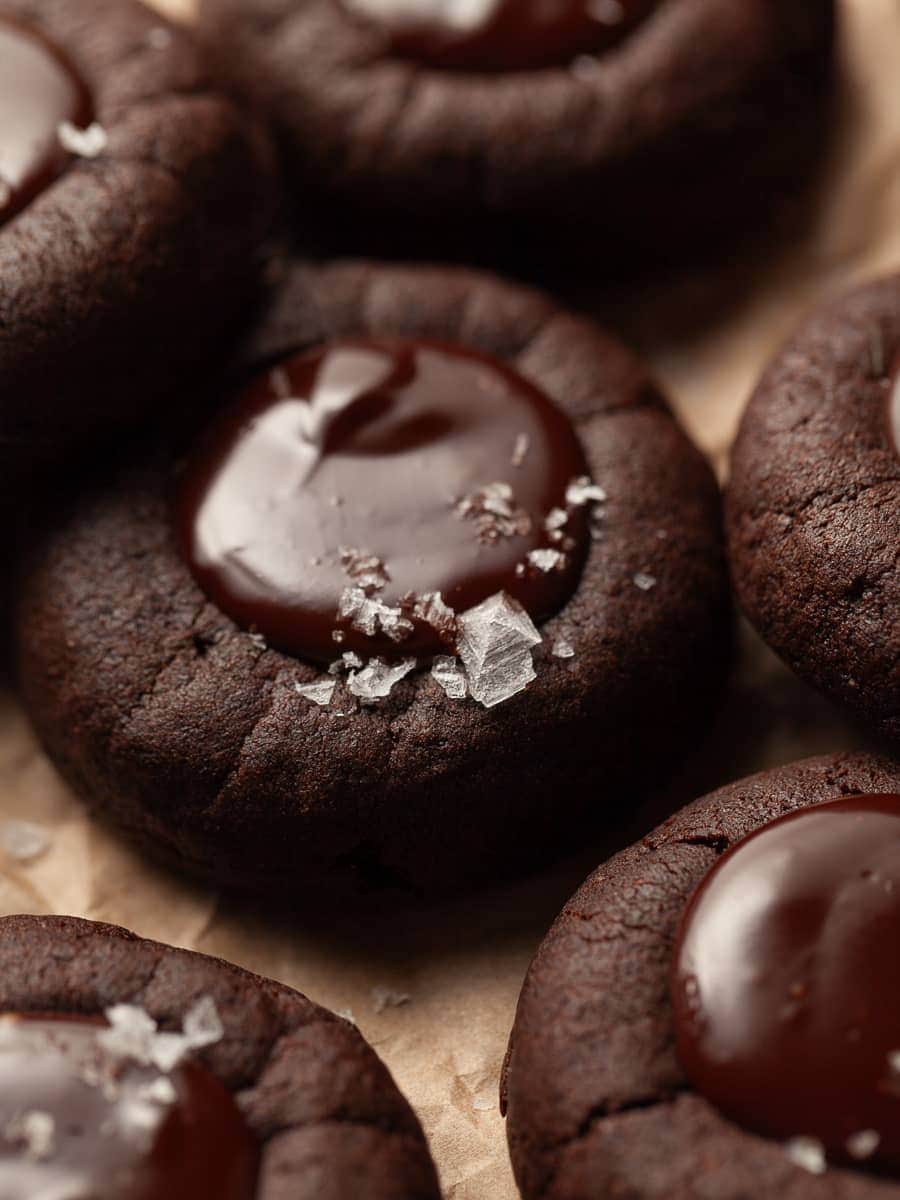
Step 5: Allow the ganache filling to set up before sprinkling it with some coarse sea salt, additional chopped chocolate or even sprinkles if you like.
Variations of Chocolate Thumbprint Cookies
While these chocolate thumbprint cookies are amazing with the dark chocolate ganache filling, feel free to play with the filling and personalize it to your liking. The cookies are delicious with a jam filling like a cherry jam or raspberry jam. Fill them into the indents after the cookies have been baked just like the ganache filling. Another delicious variation is adding some orange zest to the cookie dough for a classic dark chocolate orange flavor combination.
Storage & Freezing
Store Gluten Free Chocolate Thumbprint Cookies in an airtight container at room temperature up to 5 days. Keep them in a cool, dry place away from direct sunlight.
The best way to freeze thumbprint cookies is unbaked and unfilled. Make sure you shape them before freezing them in a single layer on a baking tray. Once fully frozen transfer them to an airtight container and keep them in the freezer for up to ONE month. This comes especially in handy during the holiday season. When ready to bake, arrange the frozen gluten-free cookies on a parchment-lined baking sheet and bake them from frozen. You may need to add a few minutes to the baking time.
FAQ - Chocolate Thumbprint Cookies
If your thumbprint cookies are spreading too much, check the butter temperature, avoid overmixing, and ensure the correct oven temperature. Making sure the dough has been chilled will also ensure that the cookies spread very little.
Thumbprint cookies are named for the method used to create their signature central indentation. The baker typically presses their thumb into the center of each cookie before baking, creating a well or "thumbprint" that is later filled with various toppings, such as jam, chocolate, or nuts. The name reflects the distinctive and personalized touch added by the baker's thumbprint.
Note about Salt in my Recipes
I use Diamond Kosher Crystal Salt in all of my recipes unless otherwise stated. If use use a different brand or kind of salt in your kitchen please adjust accordingly since some salts can be saltier. If you use Morton’s Kosher Salt please be aware that their salt granules are smaller in size, denser, and crunchier and twice as salty.
Baking in grams
I share my recipes in grams and by weight since baking by weight is the most accurate way to bake. Digital Scales are very affordable and easy to use. You can purchase them on Amazon for less than a set of measuring cups. For small amounts under 10 grams, I like to use this Precision Pocket Scale. Measuring cups are very inaccurate which can cause significant errors when it comes to gluten-free baking or baking in general. Especially since I bake with gluten-free flours which weigh differently than “regular” flours. I do provide some ingredients like spices and leavening agents in measuring spoons. To learn more about Baking with a digital scale, make sure to check out my post about Baking by weight.
Note about Ovens and Oven Temperatures
All my recipes are tested and developed with a conventional oven. I always bake my baked goods on the rack placed in the MIDDLE of my oven. This way the heat coming from the bottom will not burn my baked goods.
If you are baking with convection (fan-forced), please adjust the recipes accordingly. Be also prepared that the convection oven can cause your baked goods to dry out quickly and still be raw inside. Be aware that it takes at least 15-20 minutes for a standard American Oven to be fully preheated. I highly recommend investing in an Oven Thermometer.
Substitutions and Modifications
Any dietary or ingredient modifications/substitutions to this recipe may alter the end result in appearance and taste. I test my recipes several times as published in this post and The Gluten Free Austrian Blog is not responsible for the outcome of any recipe you find on our website.
More Gluten Free Cookie Recipes to try

📖 Recipe
Gluten Free Chocolate Thumbprint Cookies
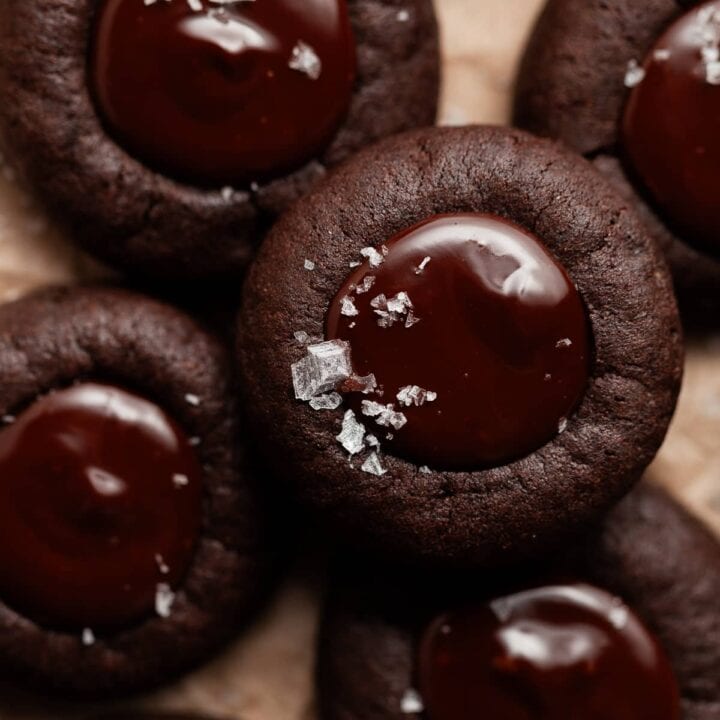
Gluten-Free Chocolate Thumbprint Cookies. A decadent chocolate cookie with a creamy dark chocolate ganache center. Topped off with a sprinkle of flaky sea salt, these chocolate thumbprint cookies will quickly become one of your favorite Christmas cookies to bake this Holiday Season.
Ingredients
For Gluten Free Chocolate Thumbprint Cookies
- 215 grams Gluten Free Multipurpose Flour
- 50 grams unsweetened cocoa powder, dutch processed
- ½ teaspoon baking soda
- ½ teaspoon kosher salt
- 1 teaspoon espresso powder (optional)
- 113 grams unsalted butter, at room temperature
- 115 grams light brown sugar
- 65 grams granulated white sugar
- 1 large egg, at room temperature
- 1 teaspoon vanilla extract
- 15 grams room temperature water
Dark Chocolate Ganache Filling
- 115 grams dark chocolate, high quality, finely chopped
- 60 grams heavy cream
For Garnish
- Flaky Sea Salt, Sprinkles, chopped chocolate
Instructions
Chocolate Thumbprint Cookie Dough
- In a medium bowl sift together the gluten-free flour, unsweetened cocoa powder, baking soda, espresso powder, and kosher salt and set aside.
- In the bowl of the stand mixer fitted with the paddle attachment, combine the room-temperature butter, granulated white sugar, and light brown sugar. On medium-high speed cream until smooth and creamy, about 3-4 minutes. Scrape down the sides of your bowl.
- Add the room temperature egg, vanilla extract, and water and beat on high speed until combined, about 1 minute. Scrape down the sides and up the bottom of the bowl and mix to combine. It is possible the mixture will look curdled. No reason to worry.
- Add the dry ingredients to the wet ingredients and mix on low speed until combined. The chocolate thumbprint dough will be thick.
- Cover the mixing bowl and refrigerate for 15 minutes.
Shaping Chocolate Thumbprint Cookies
- With a small cookie scoop divide the gluten-free chocolate cookie dough into 20-24 equal size portions.
- Roll the cookie dough balls between the palms of your hands into smooth balls with no cracks. This will help to keep the cracks in the finished cookies to a minimum.
- Using a melon baller, a round teaspoon measuring spoon, the end of a wooden spoon or your thumb (hence the name thumbprint cookies) to indent each cookie.
- Cover the indented chocolate dough and chill for at least 60 minutes (and up to 2 days) in the fridge. At this point, you may also freeze the shaped and indented thumbprint cookies and bake them at a later date.
How to bake Chocolate Thumbprint Cookies
- When ready to bake the thumbprint cookies, preheat the oven to 350 degrees. Line two baking sheets with parchment paper. Since the cookies should only spread very little you can bake at least 8-12 cookies per tray. Arrange them evenly on the parchment-lined baking sheet.
- Bake in the fully preheated oven for 9-11 minutes. The cookies will be puffy. I recommend to rather underbake than overbake these chocolate cookies.
- Remove the cookies from the oven and place the cookie sheet on a wire rack. With a cookie cutter or a glass scoot the cookies back into a perfect round shape and "Re-Indent" the cookies with the same tool you used when shaping them.
- Allow the cookies to cool for a few minutes on the sheet tray before transferring them to a cooling rack to cool completely.
Dark Chocolate Ganache Filling
While the chocolate thumbprint cookies are cooling, make the dark chocolate ganache filling.
- Finely chop the dark chocolate and place it in a small bowl.
- In a small saucepan bring the heavy cream to a gentle boil. This can also be done in a microwave.
- Carefully pour the hot heavy cream over the chopped chocolate. Allow for it to sit for a few minutes before carefully stirring it together.
- With a small cookie scoop or spoon, fill each indent of the chocolate thumbprint cookies with the dark chocolate ganache.
- Allow the ganache filling to set up before sprinkling it with some coarse sea salt, additional chopped chocolate or even sprinkles if you like.
Notes
Storage: To store gluten free chocolate thumbprint cookies, place them in an airtight container and keep them at room temperature up for 5 days.
Spreading: if the dough is not chilled long enough the cookies may spread during baking. No need to panic. Use a round cookie cutter or glass slightly bigger than the cookies and scoot them back into a round shape.
Recommended Products
As an Amazon Associate and member of other affiliate programs, I earn from qualifying purchases.
Nutrition Information:
Yield:
24Serving Size:
1Amount Per Serving: Calories: 144
Calories are a guestimate and randomly generated.
Linda K
I made these for part of my holiday cookie offerings and everyone has been absolutely delighted by them! I used a #100 foodservice size (~1 tsp) cookie scoop and it yielded 42 cookies. I didn’t have enough chocolate on hand to make ganache, so I filled some with chocolate hazelnut spread and some with raspberry jam. I may also test dulce de lèche and a few other fillings. A very light, yet tasty cookie that will become part of my regular baking. Thank you!
Daniela
Love the variety of fillings you came up with. Sounds like a delicious spread. Thank you for sharing and your kind review