
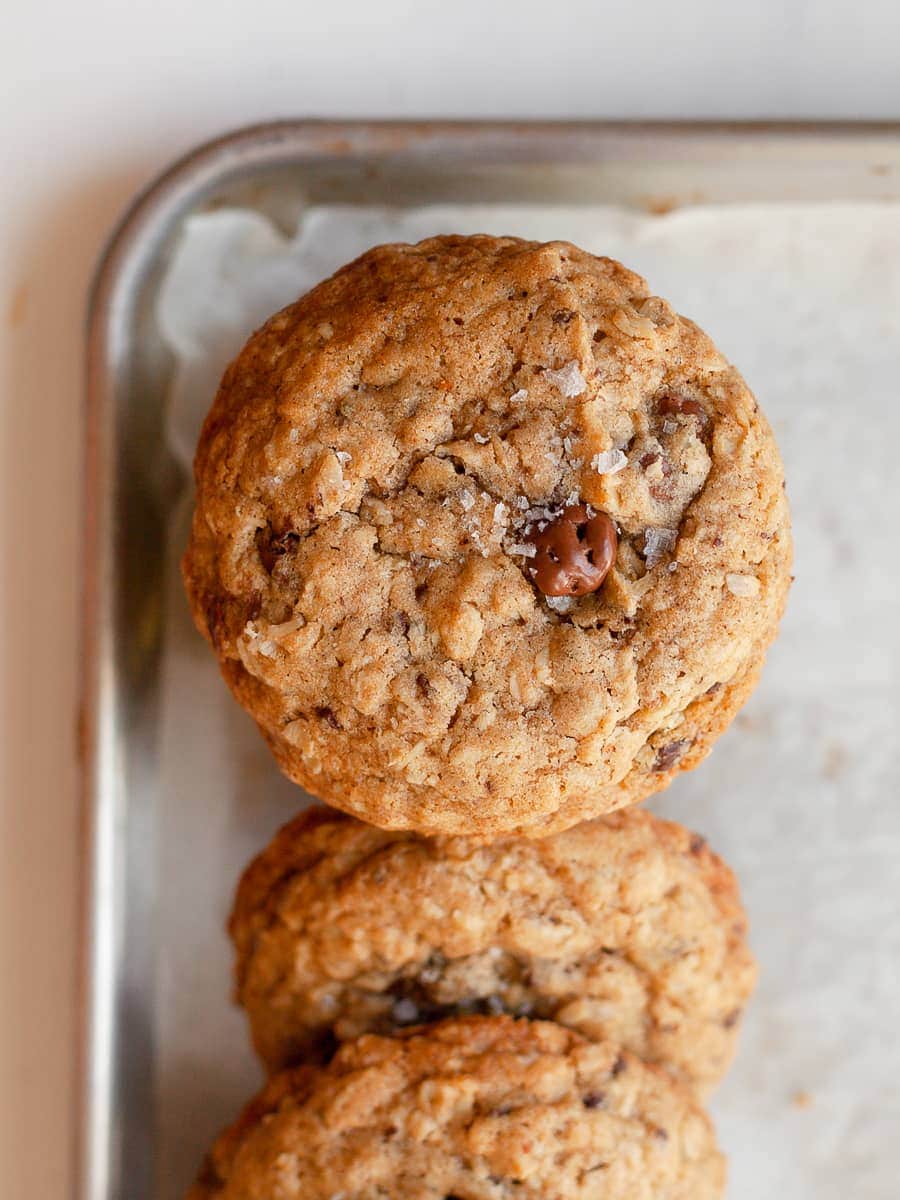
Allow me to introduce you to the irresistible realm of Gluten Free Brown Butter Oatmeal Cookies. Golden-brown, chewy cookies, each bite bursting with a medley of nutty, caramelized flavors. The secret behind these extraordinary cookies lies in a simple yet transformative ingredient: browned butter. With its distinct characteristics and unparalleled aroma, browned butter possesses the magical ability to elevate an ordinary oatmeal cookie to the status of a delectable masterpiece.

Jump to:
- Recipe Ingredient Notes
- How to make brown butter
- How to make Brown Butter Oatmeal Cookie Dough
- How to bake Brown Butter Oatmeal Cookies
- Storage & Freezing
- Dietary Adjustments Recommendations
- Gluten Free Brown Butter Oatmeal Cookies ADD-IN’S
- FAQ for Gluten-Free Brown Butter Oatmeal Cookies
- Baking in grams
- Note about Ovens and Oven Temperatures
- More delicious Gluten Free Cookie Recipes to try
- 📖 Recipe
- 💬 Comments
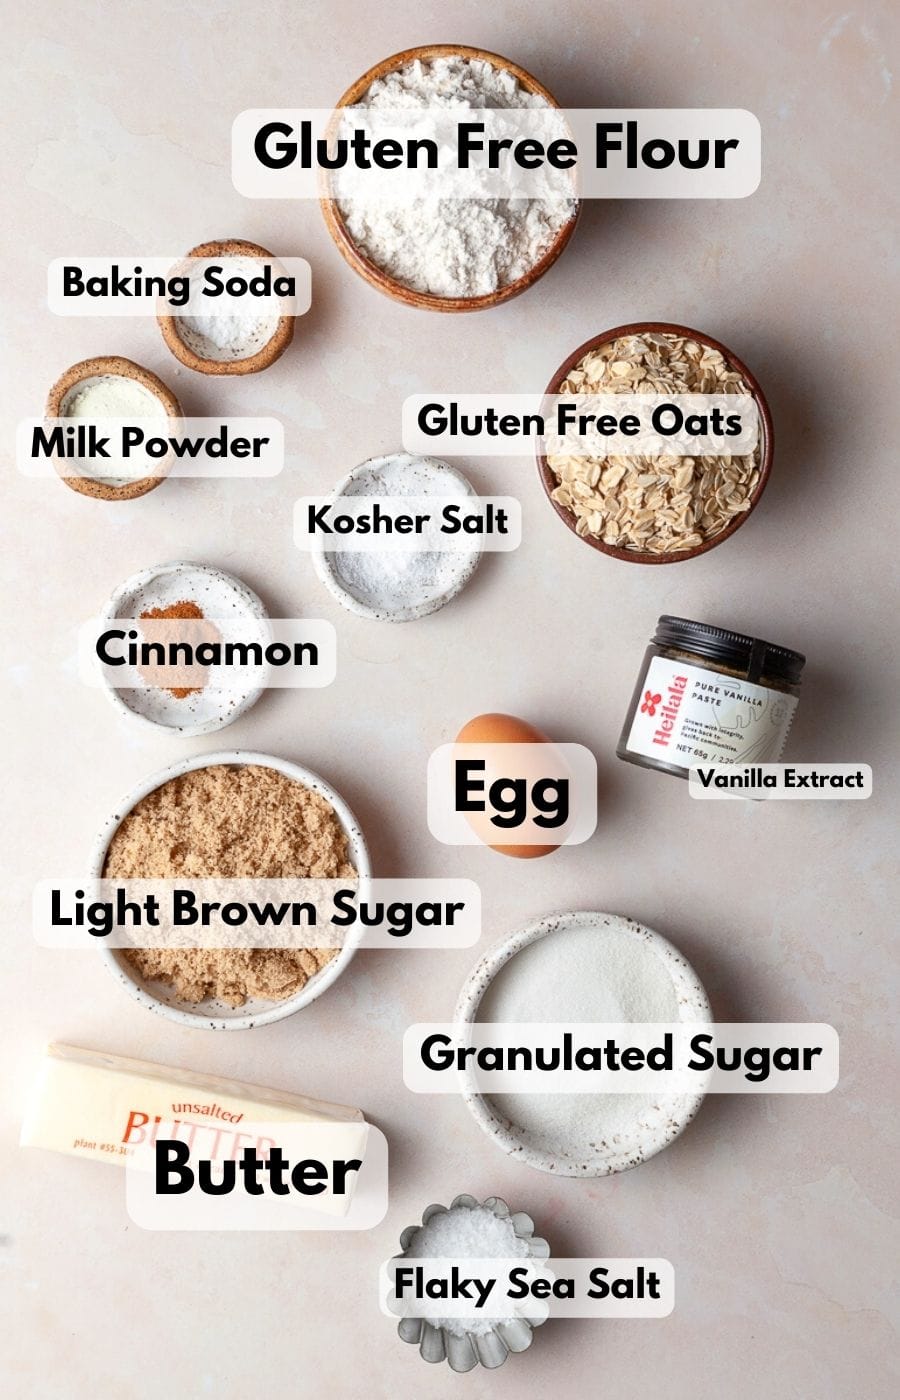
Recipe Ingredient Notes
Gluten-Free Flour: I use my own multi-purpose gluten free flour blend but you can also use a blend like Bob’s Red Mill 1-to-1. If you use a gluten-free flour blend without added xanthan gum, please add 4 grams (roughly 1.25 teaspoons)
Old Fashioned Oats: I recommend using rolled oats in this recipe for Brown Butter Oatmeal Cookies. Quick Oats are to thin and you will lose the texture of this cookie but in a pinch, feel free to use them.
VERY IMPORTANT REGARDING OATS: Please make sure to purchase certified gluten-free oats if you have celiac or a wheat allergy. Although oats are naturally gluten-free, manufacturers often process them in facilities that also handle wheat or other grains containing gluten. Personally, I buy my gluten free oats from Thrive Market or Bob’s Red Mill.
Salt: I use Diamond Crystal Kosher Salt in all my recipes and Maldon’s Flaky Sea Salt as my finishing salt (the flaky sea salt I put on almost all my baked goods). Not all salts are the same. If you use Morton’s Kosher Salt please be aware that their salt granules are smaller in size, denser, and crunchier. 1 teaspoon of Diamond Crystal Kosher salt weighs roughly 3 grams while 1 teaspoon of Morton’s Kosher Salt weighs almost 5 grams. Therefore if use another brand other than Diamonds Crystal Kosher Salt please be aware that this can throw off the entire recipe.
How to make brown butter
Beurre noisette, also known as brown butter, is the result of cooking butter beyond its melting point. During this process, the milk solids separate from the butterfat and settle at the pan's bottom. This transformation imparts a rich, nutty flavor and a deep brown color to the butter. The caramelization of the milk solids further enhances its taste, lending it a delightful nutty and caramel-like profile.
If you've never prepared brown butter before, I suggest taking your time and using a low temperature. Opt for a heavy-bottomed saucepan, preferably a light-colored non-stick one, and a heat-proof spatula or wooden spoon. Browned butter can be stored in the refrigerator for up to two weeks without any concerns. It not only adds an incredible touch to baked goods but also serves as a marvelous "finishing butter" for roasted vegetables.
Step 1: Place your unsalted butter, straight from the fridge or freezer, in a heavy-bottom saucepan. If you happen to have a pan or pot with white enamel, I recommend using that (makes it easier to see the milk solids caramelize).
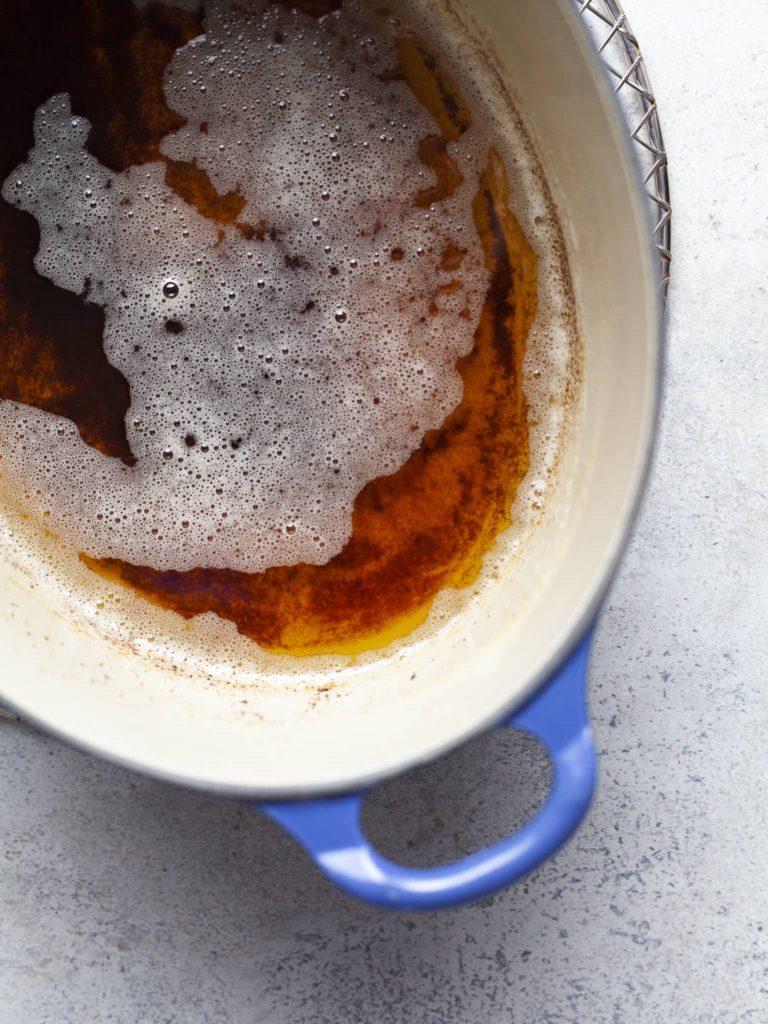
Step 2: Let the butter melt and allow it to simmer at medium heat. Once the butter has melted, it will start to get thick and foamy and within seconds can witch to a rapid bubble. Make sure to stir it with a heat-proof spatula and get to the bottom of the pan.
Step 3: Continue cooking and stirring until the butter starts to smell nutty and turns a medium amber color. You will start seeing the brown specs on the bottom of the pan and will have a nutty aroma. Brown butter can burn very quickly at this point.
Step 4: Remove the browned butter from the heat and transfer it into the bowl of your stand mixer or a heat-proof bowl (make sure to get all the brown bits) of your stand mixer. Allow cooling for 10-15 minutes before proceeding with the recipe.
If you are not planning on using the brown butter right away in a recipe, allow for it to cool completely before placing it in your fridge for up to 14 days. Use as directed in my recipes.
How to make Brown Butter Oatmeal Cookie Dough
To make gluten free brown butter oatmeal cookies you need two bowls (one for your dry ingredients and one for your wet ingredients). You will also need a small pot to brown your butter in and a heat-proof spatula. I also recommend using a whisk to combine your wet ingredients and a sturdy spatula.
Step 1: Start by browning the butter in a small pot, transfer it to a large bowl, and allow the butter to cool to room temperature. Make sure to scrape all the brown bits and pieces from the pot you browned the butter in. You will need 85 grams of browned butter. If you have less than 85 grams your butter most likely contained more water than the brand of butter I am using. You can balance out the missing browned butter with water.
Step 2: In a small bowl sift together the gluten-free flour, milk powder (if using), baking soda, cinnamon, and salt. Add the gluten-free oats and any add-ins (like chocolate chips) and aside.
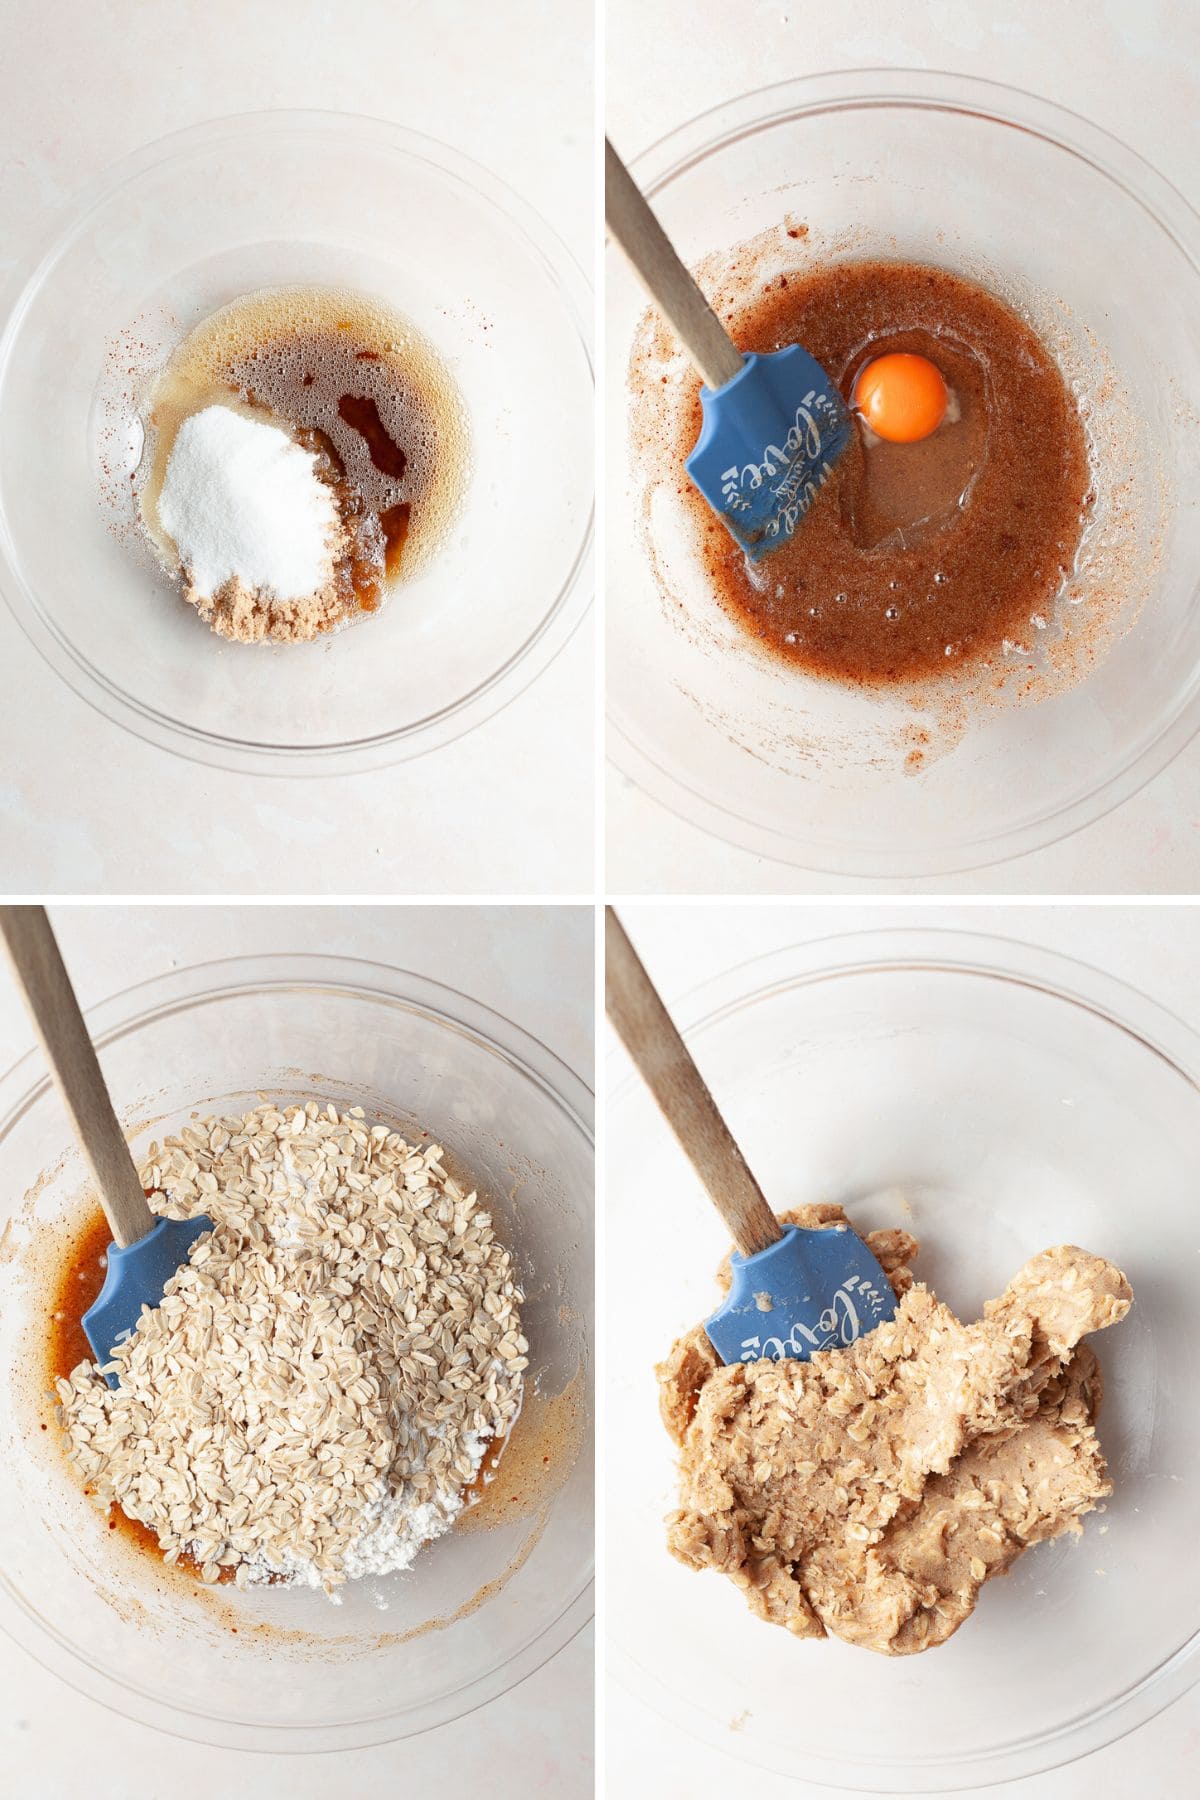
Step 3: Add brown sugar, granulated sugar, vanilla extract, and the room-temperature egg to the cooled browned butter and whisk until smooth.
Step 4: Fold the dry ingredients into the wet ingredients and stir together with a spatula or a spoon. While we do not have to worry about gluten being built up, don't overmix your cookie dough. Just make sure all the flour and dry ingredients are absorbed.
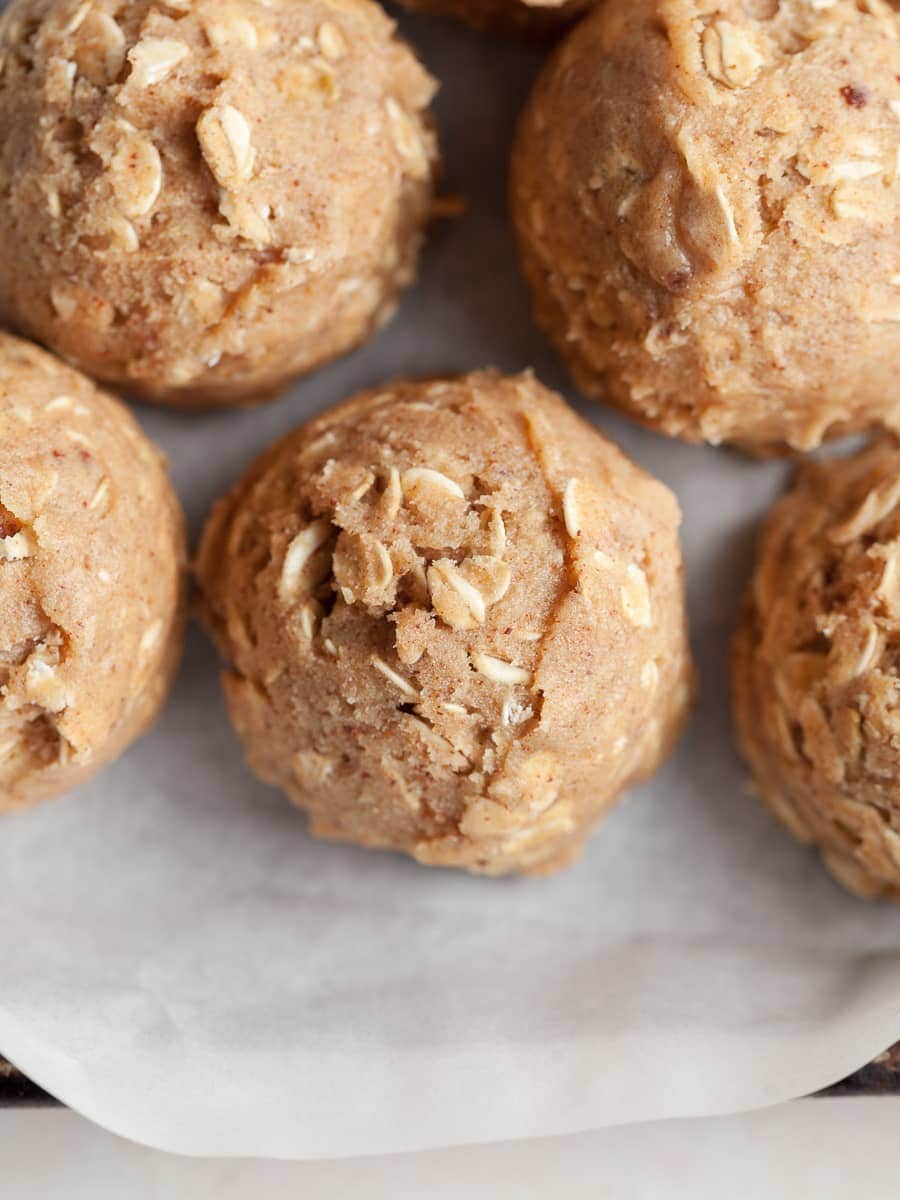
Step 5: Place your cookie dough in your fridge for at least one hour to allow the butter to set up and the dough to be scoopable. The dough will be VERY loose and almost unscoppable if you try to scoop cookies without chilling the dough.
How to bake Brown Butter Oatmeal Cookies
Step 1: When ready to bake, preheat your oven to 350F. Arrange your oven racks in the middle.
Step 2: Line a large baking sheet with parchment paper and use a 2 Tablespoon Cookie Scoop (I refer to this as the #20 - yellow scoop) and portion out your cookie dough. You should get 6-7 cookies out of this dough, depending on how much dough you snacked on. Please be aware the longer the cookie dough is in the fridge, the harder it may be to scoop the gluten-free brown butter cookie dough.
Step 3: When your oven is fully preheated, arrange 6 cookies on a parchment-lined baking sheet and sprinkle them with flaky sea salt (if using)
Step 4: Bake Cookies for 8 minutes and rotate your baking sheet. Bake for an additional 4 minutes. The brown butter oatmeal cookies should appear puffy and start to get golden brown on the edges. These cookies are meant to be chewy and soft so don't overbake them.
Step 5: Remove from the oven, and if desired, use a round cookie cutter slightly larger than the cookie to scoot them into a perfectly round shape. Allow the cookies to cool for 5-10 minutes on the baking pan before moving to a wire rack to cool completely.
Storage & Freezing
Store any leftover cookies you may have in an airtight container at room temperature for up to 3 days. Should you happen to have any leftovers, one can freeze the fully baked and cooled brown butter oatmeal cookies for up to 2 months. Thaw them at room temperature or in the fridge.
Dietary Adjustments Recommendations
Flour: If you would like to create those Gluten Free Brown Butter Oatmeal Cookies with “regular” All-Purpose flour, please use 110 grams of AP flour instead of the gluten free flour. All other ingredients in the recipe will stay the same.
Oats: If you are not celiac or have a wheat allergy, use your favorite rolled oats in this recipe.
Butter: I like to use Miyoko’s and ForA Vegan Butter. Please skip the browning process but melt the product. You will need 85 grams of melted vegan butter. I do NOT recommend margarine or coconut oil.
Gluten Free Brown Butter Oatmeal Cookies ADD-IN’S
Here are a few fun add-ins to use in this recipe for chewy oatmeal cookies
- Dark Chocolate: for a fancier twist, chop up an artisan chocolate bar (65% or darker) and add it to the cookie dough to turn them into brown butter oatmeal chocolate chip cookies
- White Chocolate: white chocolate and oats are one of my favorite cookie combos. Just make sure to use some high-quality white chocolate.
- Butterscotch Chips: add some butterscotch chocolate chips and turn them into Gluten Free Oatmeal Scotchies
- Toffee: Add chopped-up Heath bars to the cookies. So good!
- Dried Fruit: cranberries or dried cherries would work fabulously in this gluten-free cookie recipe, or add raisins to make brown butter oatmeal raisin cookies
- Nuts: Want to mix things up? Try adding some chopped-up pecans, peanuts or walnuts.
- Mini M&M’s: Turn them into a fun cookie for kids – they will love them.
- Blend them: try butterscotch with pecans, white chocolate, dried cherries and pecans, mini M&M's, and more m&m’s…
FAQ for Gluten-Free Brown Butter Oatmeal Cookies
Browned butter adds a distinct and rich flavor to cookies. When butter is heated, its milk solids caramelize, resulting in a nutty and toasty taste. Incorporating browned butter into cookie dough enhances the overall depth of flavor and adds a unique aromatic element. Additionally, browned butter can contribute to a slightly chewier texture in cookies.
Yes, increasing the amount of brown sugar in a cookie recipe can contribute to a softer texture. Brown sugar contains molasses, which adds moisture and helps create a softer and chewier texture in baked goods. The higher the proportion of brown sugar in the recipe, the more moist and tender the cookies tend to be.
The longer the cookie dough is refrigerated, the more hydrated the flour gets meaning the cookies may spread less. If you make this cookie dough ahead of time, make sure to gently press down the raw cookie dough balls before baking.
Baking in grams
My recipes are posted in grams since baking by weight is the most accurate way to bake. Digital Scales are very affordable and can be found on Amazon for less than a set of measuring cups. Measuring cups are very inaccurate and can cause significant errors when it comes to baking. Especially since I bake with gluten-free flours which weigh differently than “regular” flours. I do provide some ingredients like spices and leavening agents in measuring spoons.
Note about Ovens and Oven Temperatures
All my recipes are tested and developed with a conventional oven. I always bake my baked goods on the rack placed in the MIDDLE of my oven. This way the heat coming from the bottom will not burn my baked goods. If you are baking with convection (fan-forced), please adjust the recipes accordingly. Be also prepared that the convection oven can cause your baked goods to dry out quickly and still be raw inside. Be aware that it takes at least 15-20 minutes for a standard American Oven to be fully preheated. I highly recommend investing in an Oven Thermometer.
Want to be the first to know when a new recipe is live?
Make sure to sign up for my “New Recipe Alert” e-mail list – You may sign up here
More delicious Gluten Free Cookie Recipes to try


📖 Recipe
Gluten Free Brown Butter Oatmeal Cookies

Soft, chewy Gluten Free Brown Butter Oatmeal Cookies They have crispy edges, a soft and chewy center, and get their extra rich flavor from the browned butter. *Small Batch Recipe*
Ingredients
Gluten Free Brown Butter Oatmeal Cookies
- 130 grams gluten free flour
- 1 teaspoon dry milk powder (optional)
- ½ teaspoon cinnamon
- ½ teaspoon baking soda
- ½ teaspoon kosher salt
- 80 grams gluten free rolled oats
- 113 grams unsalted butter to make 85 grams browned butter with
- 60 grams light brown sugar
- 40 grams granulated white sugar
- 1 large egg, room temperature
- 1 teaspoon vanilla extract
Add Ins (110 grams total)
- chopped dark chocolate, chocolate covered raisins, chopped nuts, M&MS....
- Flaky sea salt
Instructions
How to make Brown Butter
If you have never made brown butter before, I recommend doing this at a very low temperature, and don’t rush it. Cut butter into small cubes and place in a saucepan over medium heat.
- Place the unsalted butter, straight from the fridge or freezer, in a heavy-bottom saucepan. If you happen to have a pan or pot with white enamel, I recommend using that (makes it easier to see the milk solids caramelize).
- Let the butter melt and allow it to simmer at medium heat. Once the butter has melted, it will start to get thick and foamy and within seconds can witch to a rapid bubble. Make sure to stir it with a heat-proof spatula and scrape the bottom of the pan.
- Continue cooking and stirring until the butter starts to smell nutty and turns a medium amber color. You will start seeing the brown specs on the bottom of the pan and will have a nutty aroma. Brown butter can burn very quickly at this point.
- Remove the browned butter from the heat and transfer it into the bowl of your stand mixer or a heat-proof bowl (make sure to get all the brown bits) of your stand mixer. Allow cooling for 10-15 minutes before proceeding with the recipe.
How to make Gluten Free Brown Butter Oatmeal Cookie Dough
- In a small bowl sift together your gluten free flour, milk powder (if using), baking soda, cinnamon, and salt. Add your gluten-free oats and add ins you may use. Set aside.
- Add both sugars and egg to your cooled browned butter and whisk until smooth.
- Fold in the dry ingredients into your wet ingredients and stir together with a spatula or a spoon.
- While we do not have to worry about gluten being built up, don’t overmix your cookie dough. Just make sure all the flour and dry ingredients are absorbed by the wet ingredients.
- Place your cookie dough in your fridge for at least one hour to allow the butter to set up and the dough to be scoopable. The dough will be VERY loose and almost unscoppable if you try to scoop cookies without chilling the dough.
How to bake the best soft chewy oatmeal cookies
- When ready to bake, preheat your oven to 350F.
- Line a baking sheet with parchment paper and use a 2 Tablespoon Cookie Scoop (I refer to this as the #20 – yellow scoop) and portion out your cookie dough. You should get 8-10 cookies out of this dough, depending on how much dough you snacked on.
- When your oven is fully preheated, arrange 6 cookies on a parchment-lined baking sheet and sprinkle them with some flaky sea salt.
- Bake Cookies for 8 minutes and rotate your baking sheet. Bake for an additional 3-4 minutes. Your cookies should appear puffy and start to get brown on the edges.
- Remove from the oven, and if desired, use a round cookie cutter slightly larger than the cookie to scoot them into a perfectly round shape.
- Allow the cookies to cool for 5-10 minutes on the baking pan before moving to a cooling rack.
- Repeat with the remaining dough if you would like or freeze the cookie dough for future cookie cravings.
Notes
Flour: If you would like to create those Gluten Free Brown Butter Oatmeal Cookies with “regular” All-Purpose flour, please use 110 grams of AP flour instead of the gluten free flour. All other ingredients in the recipe will stay the same.
Butter: I like to use Miyoko’s and ForA Vegan Butter. Please skip the browning process but melt the product. You will need 85 grams of melted vegan butter. I do NOT recommend margarine or coconut oil.
Recommended Products
As an Amazon Associate and member of other affiliate programs, I earn from qualifying purchases.


Nutrition Information:
Yield:
6Serving Size:
1Amount Per Serving: Calories: 400
Calories are a guestimate and randomly generated.


Barrett says
After months of looking at these amazing recipes, I finally made one. What an inaugural recipe! These were amazing, and lost none of the chewiness that comes with a “regular” cookie. The browned butter was the difference maker. Made them with Heath Bar pieces, which paired well. The family fought over who got more.
Daniela Weiner says
I LOVE LOVE LOVE hearing this! Thank you so much for sharing this!
Lori Grevstad says
What kind of flour did you use? I am new to gluten free baking.
Daniela says
Have you read my post about what flour to use for baking? Maybe that’s a good start 🙂
The Best Gluten Free Flour Blends for Baking (and how I use them)
Lynn Allan says
These were fantastic! Wonderful chew and the browned butter flavor works so well with the the earthy oats. Thank you for another yummy recipe that will certainly be made again. 🙂
Kelli says
Made these last night - they were delicious! We subbed vegetable oil in for the browned butter and they came out perfect. (I am sure that the browned butter gives them a better flavor overall, but they were really great with the oil subbed in. The substitution worked well for us when we didn’t have any vegan butter on hand.) We used a mix of semi sweet and milk chocolate in lieu of chocolate covered raisins.
Daniela says
oh I love hearing that this recipe works with vegetable oil. That's super good to know! Glad you enjoyed them
Lisa says
I read your recipe and I really wanted to make, especially the browned butter, but after looking up the conversions to cups I was disappointed because each one I looked up said something different.
Maybe I will just have to buy a scale.😕
Daniela says
well my recipes don’t work with cups 🙂 It’s stated several times on my website that baking by weight is the only accurate way to bake
Alice K says
These cookies are awesome! Crisp edges & soft centre, perfect!!
Also made the small batch choc chip & peanut butter, loved them! Next up is the monkey bread.