
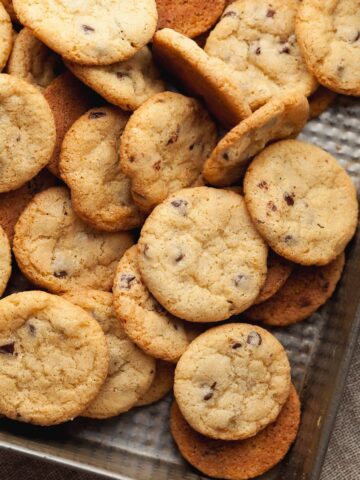
Indulge in rich, chocolatey Gluten Free Chocolate Cut Out Cookies that are perfect for decorating! These gluten free cut-outs hold their shape while staying soft and tender, making them ideal for holidays, birthdays, or any fun baking project. Easy to prepare with no long chill times, this recipe delivers chocolatey perfection every time.

Jump to:
- Recipe Ingredient Notes
- Recommended Tools
- Gluten Free Chocolate Cut Out Cookie Dough
- Rolling out Chocolate Cut Out Cookie Dough
- Baking Instructions
- How to decorate Chocolate Cut Out Cookies
- Storage & Freezing
- Why did my Gluten Free Cut Out Cookies Spread?
- Note about Salt in my Recipes
- Baking in grams
- Note about Ovens and Oven Temperatures
- Substitutions and Modifications
- More Gluten Free Chocolate Recipe
- 📖 Recipe
- 💬 Comments
Recipe Ingredient Notes
Gluten Free Flour: I have tested this recipe for Gluten Free Chocolate Cut Out Cookies with my Cup4Cup Copycat Recipe, King Arthur Measure for Measure and Bob's Red Mill 1-1. In comparison, all 3 blend worked without any issues in this recipe. My personal favorite here is definitely my Cup4Cup Copycat Recipe. All gluten free flour blends used to test this recipe contain xanthan gum.
Dutch Processed Cocoa Powder: Be sure to use dutch processed cocoa powder, which gives the chocolate sugar cut out cookies a rich, fudgy flavor.
Butter: For this recipe, we’re using cold, unsalted butter - straight from the fridge. The cold butter doesn’t fully incorporate into the cookie dough; instead, it breaks into tiny pieces throughout the mixture. This technique helps create light, flaky layers, similar to a pie crust. If needed, you can substitute dairy-free butter, and it will still work beautifully in this recipe.
Oil: A small amount of oil makes the dough easier to roll and cut without cracking, and it helps the cookies stay softer after baking.

Recommended Tools
To successfully make gluten free chocolate cut out cookies, you will need a few kitchen tools:
- Digital Kitchen Scale: a digital kitchen scale is a must-have to make this recipe (or any of my recipes).
- Cookie Cutters: Please be aware that baking time varies depending on the size of the cookie cutters you are using. So please adjust baking times accordingly. I use Halloween Cookie Cutters for these Chocolate Cut Out Cookies. Feel free to use your favorite cookie cutter for this recipe.
- Rolling Pin: you will need a rolling pin to roll out the gluten-free sugar cookie dough. BUT, you can always use a clean bottle (like a wine bottle) in a pinch
- Offset Spatula: I love using Mini Offsets to move unbaked sugar cookie dough from the counter to the baking sheet.
- You will also need a standmixer fitted with the paddle attachment, a few sheet trays and parchment paper.
Gluten Free Chocolate Cut Out Cookie Dough
If you’ve made my gluten free sugar cookies or animal crackers, you know I’m not a fan of cutout cookies that spread. I like cookies that keep their shape and have clean, sharp edges. For these chocolate cutout cookies, I start with cold butter instead of creaming room-temperature butter and sugar. Using cold butter makes the dough easier to handle, helps the cookies bake with crisp, defined edges, and gives them a light, tender, melt-in-your-mouth texture.

- Step 1: In a small bowl, whisk or sift together the gluten free flour, cocoa powder, cornstarch and kosher salt. Set aside.

- Step 2: In the bowl of a stand mixer fitted with the paddle attachment, combine the cold, unsalted butter (cut into small pieces) and granulated sugar.

- Step 3: With the mixer running on low speed, mix just until the butter pieces are coated in sugar. Do not cream the butter and sugar - incorporating air into the mixture will cause the dough to spread during baking.

- Step 4: Add the cold egg, oil and a generous teaspoon vanilla extract to the butter-sugar mixture. At a low speed, mix just enough until the ingredients are combined. The mixture may look curdled since clearly there are no dry ingredients added yet to absorb the liquid.

- Step 5: Add the dry ingredients to the wet ingredients and with the mixer running on low, mix everything together. This may take up to a minute but the dough will slowly come together. While you may consider increasing the speed, I recommend mixing the dough at a low-medium speed to avoid incorporating air into the dough.

- Step 6: Mix the gluten free chocolate cut out cookie dough until no streaks of flour or butter remain. Once the dough turns into a smooth chocolate sugar cookie dough, transfer it to a clean kitchen counter and quickly knead it together into a smooth dough.
Rolling out Chocolate Cut Out Cookie Dough
The rolled out dough only needs to rest for like 10-15 minutes, especially if you kitchen is on the warmer and more humid side I recommend to NOT skip this important step.
Chilling the chocolate cookie dough before cutting makes it easier to transfer the cookies to a parchment-lined baking sheet.

- Step 1: Divide the chocolate sugar cookie dough in half.
- Step 2: Working with one half at a time, place it on a piece of parchment paper and with clean hands press it out into an ½" inch disk. This will make rolling out a lot easier.
- Step 3: Lay a second sheet of parchment paper over the dough. Using a rolling pin, roll the dough between the two sheets until it's about ¼ inch (around 6 millimeters) thick. If needed light flour the surface.

- Step 4: To make the rolling process smoother, I like to turn the dough over a few times. This helps prevent sticking and ensures even thickness. I also peek under the parchment paper occasionally to check the dough's progress and ensure it’s rolled out evenly.
- Step 5: Once the dough is rolled out, place it on a sheet tray and chill for 10–15 minutes. Chilling the chocolate cookie dough before cutting out cookies will make it easier to transfer them eventually to a parchment-lined baking sheet. At this point the dough can be refrigerated up to 2 days.
Baking Instructions
Preheat the oven to 325F and arrange the oven racks in the middle. This way the cookies will bake evenly. Line two baking trays with sheets of parchment paper. The amount of sheet trays needed depends on the size of your cookie cutters.

- Step 1: Use your cookie cutters of choice to cut the dough into desired shapes. Make sure to cut the cookies are close as possible to get a better yield each time you roll out the dough. You can re-roll the scrapes 2 times but I wouldn't go more than that. Otherwise, the cookies will start to shrink while being baked (they will still be delicious)

- Step 2: With an offset knife carefully move the cookies to the prepared sheet tray. Don't overcrowd the sheet tray, make sure to leave enough room between the cookies for an even airflow.

- Step 3: Bake the chocolate cut-out cookies one tray at a time at 325F for 8 - 10 minutes depending on the size of the cookie cutters used. Chocolate cutout cookies are done when the edges feel set, the surface looks matte, and they appear slightly puffy. Since they don’t change color much, rely on texture, puffiness, and aroma rather than appearance alone.

- Step 4: Remove the cookies from the oven and allow them to cool on the sheet tray for a few minutes before carefully transferring them to a cooling rack to cool completely. Repeat with the remaining cookie dough.
How to decorate Chocolate Cut Out Cookies
Make sure the gluten free chocolate cut out cookies are completely cool before you decorate them. While they are delicious on their own, they make the perfect cookies for decorating. I use a very basic icing made from powdered sugar and milk (water works as well). Make sure the icing is a bit thicker if you plan on piping it on the cookies. If you would like to dip the cookies into icing, I have a super simple icing recipe with my Gluten Free Animal Cracker Recipe: Easy Cookie Icing. (This can also be used for piping but you have to reduce the water to about 15-20 grams or even less)
Storage & Freezing
Gluten Free Chocolate Cut Out Dough: I only refrigerate the rolled out gluten-free chocolate cookie dough for up to 2 days. I experienced that after longer storage the dough becomes crumbly and dry. And unpleasant to work with. To prevent this, make sure to wrap it tightly in plastic wrap or cover the sheet pan with a plastic lid to minimize drying out.
Baked, frosted/unfrosted Cookies: Store them in an airtight container at room temperature for up to 5 days. Depending on the frosting you chose, make sure to place pieces of parchment paper between the layers of cookies in your container. This way they don't stick together.
Freeze Baked Cookies: Transfer the baked chocolate cut out cookies to an airtight container and freeze up to 4 weeks. When ready to eat or decorate them, allow them to thaw at room temperature or overnight in the refrigerator.
Unbaked Cookie Dough: Arrange the unbaked gluten-free cut-out cookies on a parchment lined sheet tray and place in the freezer until fully frozen. Once frozen layer them in an airtight container with parchment paper between them. Freeze up to 2 months.
Why did my Gluten Free Cut Out Cookies Spread?
We all know gluten-free baking can be tricky! There are a few common reasons why sugar cookies spread while baking:
- Using room-temperature ingredients: This recipe specifically calls for cold butter and a cold egg. Cold butter doesn’t fully incorporate into the dough; instead, it breaks into tiny pieces that create light, flaky layers - similar to pie crust - giving the best gluten-free sugar cookies.
- Measuring issues: Always weigh your ingredients with a digital kitchen scale instead of using measuring cups. Following the recipe exactly ensures your cookies will come out looking as pretty as mine.
- Not using parchment paper: Some sources claim silicone mats prevent spreading, but parchment works perfectly. It absorbs some of the butter and moisture that evaporates during baking, helping your cookies hold their shape.

Note about Salt in my Recipes
I use Diamond Kosher Crystal Salt in all of my recipes unless otherwise stated. If use use a different brand or kind of salt in your kitchen please adjust accordingly since some salts can be saltier. If you use Morton’s Kosher Salt please be aware that their salt granules are smaller in size, denser, and crunchier and twice as salty.
Baking in grams
I share my recipes in grams and by weight since baking by weight is the most accurate way to bake. Digital Scales are very affordable and easy to use. You can purchase them on Amazon for less than a set of measuring cups. For small amounts under 10 grams, I like to use this Precision Pocket Scale. Measuring cups are very inaccurate which can cause significant errors when it comes to gluten-free baking or baking in general. Especially since I bake with gluten-free flours which weigh differently than “regular” flours. I do provide some ingredients like spices and leavening agents in measuring spoons. To learn more about Baking with a digital scale, make sure to check out my post about Baking by weight.
Note about Ovens and Oven Temperatures
All my recipes are tested and developed with a conventional oven. I always bake my baked goods on the rack placed in the MIDDLE of my oven. This way the heat coming from the bottom will not burn my baked goods.
If you are baking with convection (fan-forced), please adjust the recipes accordingly. Convection oven can cause baked goods to dry out quickly and still be raw inside. Since takes at least 15-20 minutes for a standard American Oven to be fully preheated. I highly recommend investing in an Oven Thermometer.
Substitutions and Modifications
Any dietary or ingredient modifications/substitutions to this recipe may alter the end result in appearance and taste. I test my recipes several times as published in this post and The Gluten Free Austrian Blog is not responsible for the outcome of any recipe you find on our website.
More Gluten Free Chocolate Recipe


📖 Recipe
Gluten Free Chocolate Cut Out Cookies (Perfect for Decorating)

Indulge in rich, chocolatey Gluten Free Chocolate Cut Out Cookies that are perfect for decorating! These gluten free cut-outs hold their shape while staying soft and tender, making them ideal for holidays, birthdays, or any fun baking project.
Ingredients
Gluten Free Chocolate Cut Out Cookies
- 240 grams gluten free multi purpose flour
- 35 grams cornstarch
- 40 grams dutch processed cocoa powder
- ½ teaspoon kosher salt
- 113 grams unsalted butter, COLD
- 140 grams granulated sugar
- 1 large egg, cold
- 10 grams neutral oil
- 1 teaspoon vanilla extract
Instructions
Gluten Free Chocolate Cut Out Cookie Dough
- In a small bowl, whisk or sift together the gluten free flour, cocoa powder, cornstarch and kosher salt. Set aside.
- In the bowl of a stand mixer fitted with the paddle attachment, combine the cold, unsalted butter (cut into small pieces) and granulated sugar.
- With the mixer running on low speed, mix just until the butter pieces are coated in sugar. Do not cream the butter and sugar - incorporating air into the mixture will cause the dough to spread during baking.
- Add the cold egg, oil and a generous teaspoon vanilla extract to the butter-sugar mixture. At a low speed, mix just enough until the ingredients are combined. The mixture may look curdled since clearly there are no dry ingredients added yet to absorb the liquid.
- Add the dry ingredients to the wet ingredients and with the mixer running on low, mix everything together. This may take up to a minute but the dough will slowly come together. While you may consider increasing the speed, I recommend mixing the dough at a low-medium speed to avoid incorporating air into the dough.
- Mix the gluten free chocolate cut out cookie dough until no streaks of flour or butter remain. Once the dough turns into a smooth chocolate sugar cookie dough, transfer it to a clean kitchen counter and quickly knead it together into a smooth dough.
Rolling out Chocolate Cut Out Cookie Dough
The rolled out dough only needs to rest for like 10-15 minutes, especially if you kitchen is on the warmer and more humid side I recommend to NOT skip this important step.
- Divide the chocolate sugar cookie dough in half.
- Working with one half at a time, place it on a piece of parchment paper and with clean hands press it out into an ½" inch disk. This will make rolling out a lot easier.
- Lay a second sheet of parchment paper over the dough. Using a rolling pin, roll the dough between the two sheets until it's about ¼ inch (around 6 millimeters) thick. If needed light flour the surface.
- To make the rolling process smoother, I like to turn the dough over a few times. This helps prevent sticking and ensures even thickness. I also peek under the parchment paper occasionally to check the dough's progress and ensure it’s rolled out evenly.
- Once the dough is rolled out, place it on a sheet tray and chill for 10–15 minutes. At this point the dough can be refrigerated up to 2 days.
Baking Instructions
- Preheat the oven to 325°F and arrange the oven racks in the middle. This ensures the cookies bake evenly. Line two baking trays with sheets of parchment paper. The number of trays needed depends on the size of your cookie cutters.
- Use your cookie cutters of choice to cut the dough into desired shapes. Make sure to place the cutters as close together as possible to get a better yield each time you roll out the dough. You can re-roll the scraps up to 2 times, but I wouldn’t go more than that. Otherwise, the cookies may shrink slightly while baking (they will still be delicious).
- With an offset knife, carefully move the cookies to the prepared sheet tray. Don’t overcrowd the tray—leave enough room between cookies for even airflow.
- Bake the chocolate cut-out cookies one tray at a time at 325°F for 8–10 minutes, depending on the size of the cookie cutters used. Chocolate cut-out cookies are done when the edges feel set, the surface looks matte, and they appear slightly puffy. Since they don’t change color much, rely on texture, puffiness, and aroma rather than appearance alone.
- Remove the cookies from the oven and allow them to cool on the sheet tray for a few minutes before carefully transferring them to a cooling rack to cool completely. Repeat with the remaining cookie dough.
Decorating
Make sure the gluten-free chocolate cut-out cookies are completely cool before decorating. While they’re delicious on their own, they’re perfect for adding icing and designs. I use a simple icing made from powdered sugar and milk (water works too). If you plan to pipe the icing, make it a bit thicker for better control.
If you’d like to dip the cookies into icing, I recommend my Gluten-Free Animal Cracker Recipe: Easy Cookie Icing. This icing can also be used for piping if you reduce the water to about 15–20 grams (or even less) for the right consistency.
Notes
Butter: The butter in this recipe must be cold.
Storage: Store the baked and frosted sugar cookies in an airtight container at room temperature for up to 5 days.
Nutrition Information:
Yield:
40Serving Size:
1Amount Per Serving: Calories: 67
Calories are a guestimate and randomly generated.


Jenny says
I can't wait to try these! 🤩
Vicki says
Family approved!!! Even the members who are not GF!!
The recipe was easy to follow and wonderful dough to work with!!
Daniela says
this makes me so so happy! thank you