As the sun-drenched days of summer roll in, there's nothing quite like sinking your teeth into a sweet and juicy peach. But why stop there? Imagine those same vibrant peaches nestled inside a golden, flaky gluten-free crust, baked to perfection. That's where the Gluten-Free Peach Galette comes into play—a simple yet irresistible dessert that encapsulates the very essence of summer in every delectable bite.

Jump to:
- Recipe Ingredient Notes
- Recommended Tools
- How to make Galette Dough
- Flaky Gluten Free Galette Dough
- Peach Galette Filling
- Rolling Gluten Free Galette Dough
- How to fill and assemble a galette
- How to bake Gluten Free Peach Galettes
- Serving and Storage
- FAQ - Gluten Free Peach Galette
- Note about Salt in my Recipes
- Baking in grams
- Note about Ovens and Oven Temperatures
- Substitutions and Modifications
- More Gluten Free Recipes to try
- 📖 Recipe
- 💬 Comments
Recipe Ingredient Notes
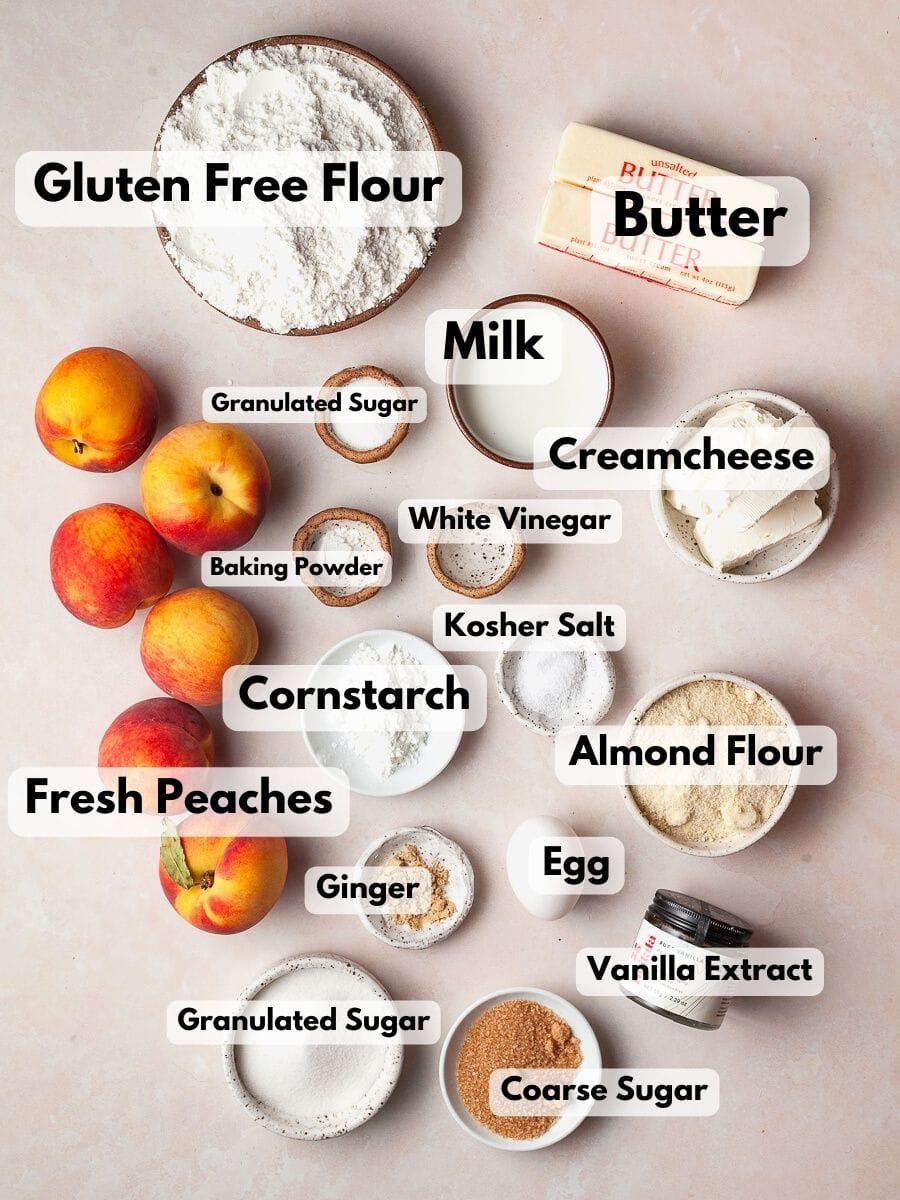
Gluten Free Flour: You can make this Gluten-Free Peach Galette recipe using any gluten-free flour blend available in the US. However, for the flakiest homemade galette crust, it's recommended to use Cup4Cup flour blend. If you have Schaer Mix C Patisserie, that blend is also a good alternative as it has similar ingredients and starches. Just make sure the flour blend you use contains xanthan gum for the best results.
Cream Cheese: Adding cream cheese (the one that comes in block form, not the spread in a tube) to gluten-free galette crusts is a great choice. It brings moisture, tenderness, and richness to the dough. Cream cheese has a water content of 51% and a fat content of 37.7%. Its high water content contributes to a tender and flaky texture, while its creamy consistency adds richness and a subtle tangy flavor. I haven't tested this dessert recipe with vegan or dairy-free alternatives.
Vinegar: Using vinegar in the recipe helps reduce the toughness of the pie crust. White vinegar is my preferred choice, but apple cider vinegar works well too.
Baking Powder: Similar to my gluten-free pop tart dough, this recipe includes baking powder. Baking powder contains a small amount of acid that reacts with the butter in the crust. This reaction creates small gas pockets, which contribute to a more tender crust. In other words, it gives the crust a "little lift".
Peaches: Look for peaches that are ripe but still firm. Avoid overly soft or mushy peaches as they may become too juicy and affect the texture of your peach galette. Ripe peaches should have a sweet, fragrant aroma. If they lack fragrance, they may not be fully ripe. If you like, you may add some fresh raspberries or even strawberries to the peach filling for a little color pop.
Recommended Tools
To successfully make Gluten Free Peach Galette, you'll need a few kitchen tools. Most of them are available on Amazon, but you probably already have them in your kitchen.
Food Processor: I prefer using a food processor to make the dough. It's convenient and saves time. If you prefer making it by hand, quickly work the butter and cream cheese into the dry ingredients, similar to making biscuits or scones. Avoid using a stand mixer, as it can overwork the dough and generate heat, making it sticky and harder to handle.
Rolling Pin: Use a rolling pin to roll out the gluten-free galette dough.
6" Bowl or Plate: I use a 6" bowl or plate to trace perfect circles on the dough. I don't recommend making the gluten free peach galettes smaller than 6" rounds since they can become tricky to handle and shape.
You'll also need the following tools: at least 2 sheet trays, parchment paper, a large bowl, a pairing knife, a cutting board, and a pastry brush.
How to make Galette Dough
To make the dough for gluten-free peach galette, I recommend using a food processor. Alternatively, you can make it in a large mixing bowl by hand, but I don't suggest using a stand mixer.
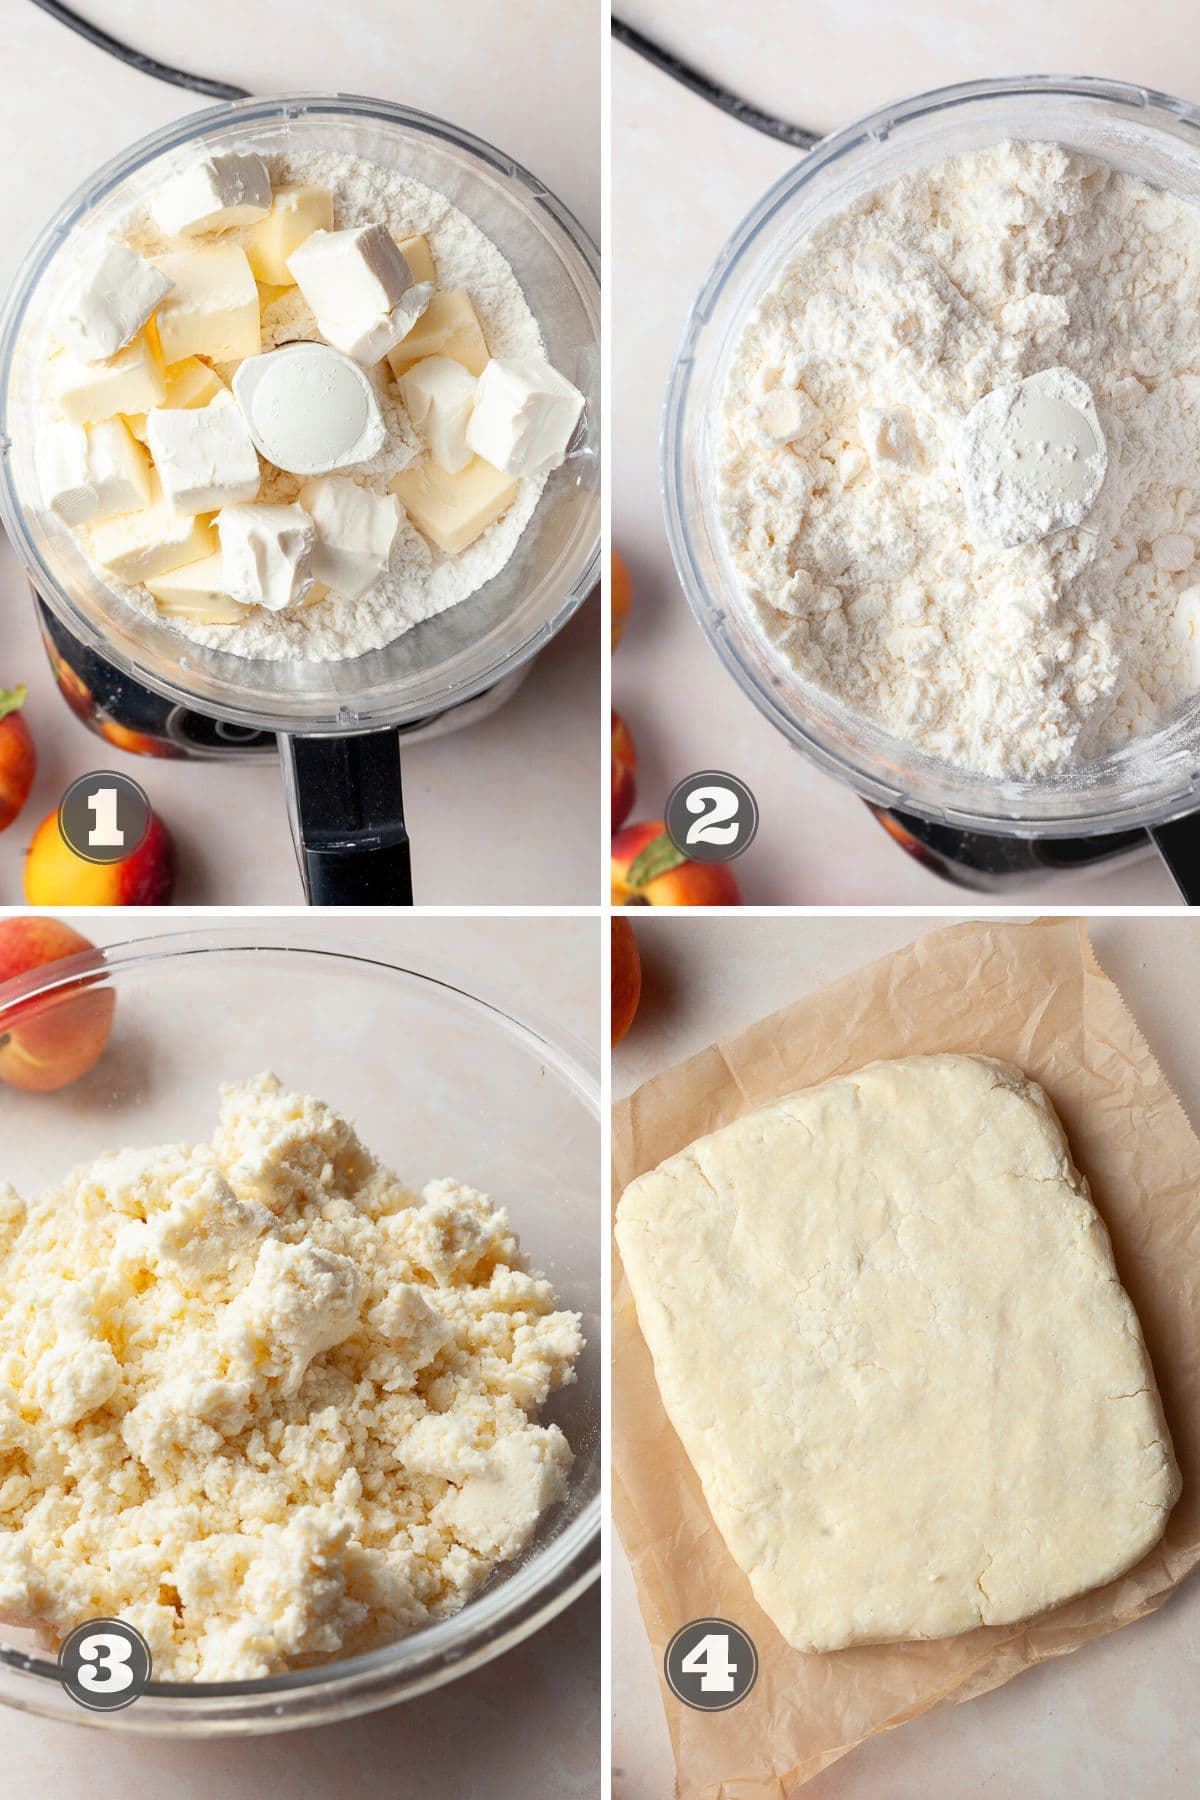
Step 1: In the food processor, combine gluten-free multi purpose flour (preferably Cup4Cup), granulated sugar, baking powder, and kosher salt. Add the cold tablespoon-sized pieces of unsalted butter and cream cheese.
Step 2: Pulse the ingredients quickly about 5-6 times. You should still see big chunks since the cold butter and cream cheese will break up more when you add the milk and vinegar.
Step 3: Add cold milk (or cold water) and vinegar, and pulse 3-4 more times. The dough should not come together in the food processor. If it does, you've mixed it too much.
Step 4: Transfer the gluten-free galette dough to a large bowl. Use your hands to bring the dough together. Using a bowl to contain the mess is better, but you can also do this on a clean kitchen counter.
Step 5: Once the dough is gathered, place it on a parchment-lined sheet tray and shape it into a rectangle. The exact size doesn't matter much, but make sure the dough is about 1 inch tall. This will make rolling it out easier.
Step 6: Cover the gluten-free pie dough with plastic wrap or parchment paper, and refrigerate it for 10-15 minutes.
Flaky Gluten Free Galette Dough
By stacking and flattening the dough, you enhance its flakiness and ensure an even distribution of moisture, making it easier to roll out. It's recommended to keep some extra gluten-free flour nearby to prevent the galette dough from sticking to the parchment paper or rolling pin.
Step 1: After letting the dough rest in the fridge for 10-15 minutes, place it on a lightly floured surface like parchment paper or a clean kitchen counter. If the dough has been refrigerated for an extended period, allow it to soften slightly for a few minutes. Otherwise, it will be difficult to roll out.
Step 2: Roll the dough into a rectangle. The exact size doesn't matter but aim for a thickness of about ½ - ¾ inch.
Step 3: Use a knife to divide the rolled-out gluten-free pie dough into three equal sections.
Step 4: Stack the dough slices on top of each other and gently press them together. Rotate the dough slab by 90 degrees, ensuring the short side faces you. With a rolling pin, roll out the dough again to approximately the same size as before (around ½ to ¾ inch thick).
Step 5: Repeat the slicing into thirds and stack them on top of each other. Press the dough together and use the rolling pin to slightly widen and lengthen the stack. It should be about ¾ inch or 2 cm thick.
Step 6: Wrap the block of galette dough in plastic wrap or parchment paper and refrigerate it for 30 minutes. The dough can be refrigerated for up to 3 days or frozen for up to one month.

Peach Galette Filling
The filling for the gluten free peach galette is pretty straightforward.
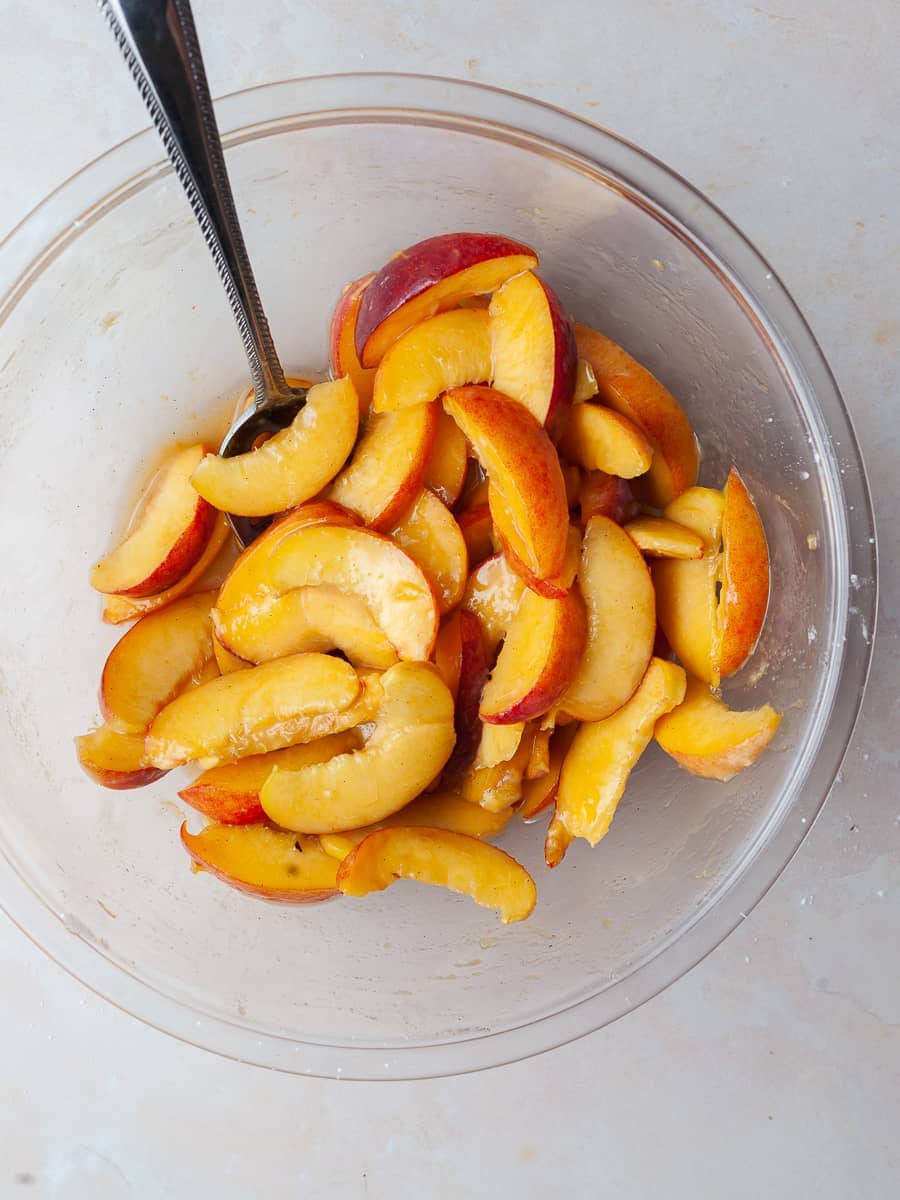
Step 1: Start by cutting the peaches in half all the way around and twist the halves in opposite directions to loosen the pit. Pull the peach halves apart and remove the pit. Most fresh peaches sold in the U.S. are freestone peaches, making the pit easy to remove. However, if you have clingstone peaches, you may need to use a spoon to dig out the pit.
Step 2: Once the pit is removed, place the peach halves with the cut side down on a cutting board and slice them into ¼-inch to ½-inch slices.
Step 3: Add the granulated sugar, cornstarch, a pinch of kosher salt, ground ginger, and vanilla extract and toss gently to coat. If your peaches are very sweet, feel free to reduce the amount of sugar used in the filling. Should you not care for ground ginger, replace it with some ground cinnamon. Or just add a squeeze of fresh lemon juice to bring out the peach flavors.
Step 4: Set the peach galette filling aside while rolling out the gluten-free galette dough. The mixture can sit at room temperature.
Rolling Gluten Free Galette Dough
After chilling the gluten-free galette dough for at least 30 minutes, take it out of the fridge and let it sit at room temperature for a few minutes. If it was chilled for a longer time, give it at least 10 minutes to soften before rolling it out.
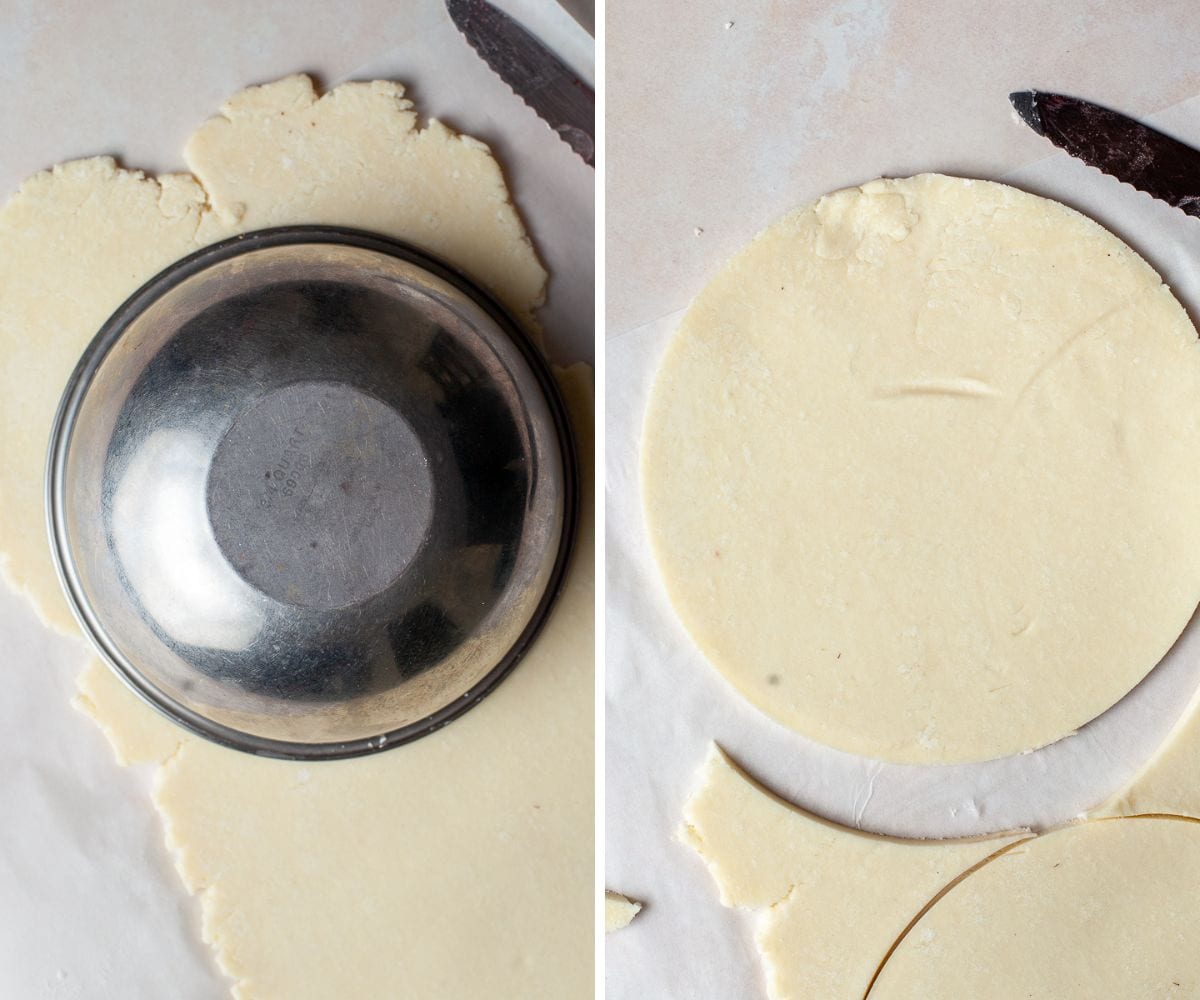
Step 1: Divide the gluten-free galette dough in half, as it makes it easier to roll out. Start by rolling out the first half into a rectangular shape. I aim for approximately 20" x 7" to cut out three 6" round disks. The dough should be about ⅛ inch (3-4 mm) thick.
Step 2: Using a 6" bowl or plate, cut out 6" circles from the rolled dough. Try to cut them as closely together as possible to minimize scrap dough. Place the pie dough circles on a baking sheet lined with parchment paper. Set aside the dough scraps for now (we'll use them later when rerolling the second half of the dough). If your kitchen is warm or you work at a slower pace, you can refrigerate the pie dough rounds while working on the second half of the dough.
Step 3: Once you've rolled out all the pie dough, gather the dough scraps, quickly knead them together, and reroll. You can obtain one to two more 6" galette dough rounds from the dough scraps. I recommend rerolling the dough only once to prevent it from becoming tough.
Pro Tip: Don't let your dough scraps go to waste! Transform them into delightful treats by baking them separately. Simply brush them with an egg wash, sprinkle some coarse sugar for extra sweetness, and bake them at 375°F until golden brown. The cook time of the scraps depends on how big they are.
How to fill and assemble a galette
Step 1: Once you've rolled out the gluten-free galette dough, place it on a sheet pan lined with parchment paper. If the dough seems too thick, you can give it a quick roll with a rolling pin, ensuring it remains a circle. Remember not to roll it thinner than ⅛" inch (3-4 mm).
Step 2: In the center of the dough circle, spoon some almond flour and spread it out slightly, leaving at least a 1.5-inch rim clear around the edges. The almond flour won't add much flavor, but it will absorb the fruit juices and prevent a soggy bottom.
Step 3: Add the peach slices on top of the almond flour, covering the center of the dough.

Step 4: Take the edges of the dough and gently fold them over the filling, creating pleats as you go. This creates a charming rustic shape for the galette while ensuring that the filling stays neatly contained during baking.
Step 5: Remember to pinch down the corners of the dough to keep them in place while baking.
Step 6: Once all the gluten-free galettes are filled, place them in the refrigerator to chill while you preheat the oven.

How to bake Gluten Free Peach Galettes
By following these steps, you'll achieve perfectly baked gluten-free peach galettes.
Step 1: Preheat the oven to 425F when you're ready to bake. Yes, the oven is preheated hotter than the actual baking temperature. So when you place the galettes in the oven, lower the temperature to 400F
Step 2: In a small bowl, whisk an egg with a little milk (non-dairy is fine) or water to create an egg wash. Arrange 4 of the gluten-free galettes on a sheet tray lined with parchment paper. Brush the pastry dough with the egg wash and generously sprinkle coarse sugar, like turbinado sugar, on top.
Step 3: Bake the galettes at 400F for 15 minutes, then reduce the temperature to 375F. Continue baking for another 10-15 minutes until the crust turns golden brown and the fruit filling starts bubbling.
Step 4: Take the peach galette out of the oven and let them cool on the sheet tray for 10 minutes. Then, transfer them to a cooling rack to cool completely or serve.
Step 5: Repeat the process with the remaining galettes. You can refrigerate the assembled rustic tarts for up to 12 hours (overnight), but I don't recommend storing them for an extended period of time.

Serving and Storage
To enjoy the peach galette, you can serve it warm or at room temperature based on your preference.
For an extra indulgence, pair the galette with a dollop of whipped cream or a scoop of vanilla ice cream. A still-warm galette with a generous scoop of vanilla ice cream is a personal favorite for sure.
These gluten-free peach galettes are at their best when freshly baked, as nothing beats the taste of a homemade pie. If you have any leftovers, store them in an airtight container at room temperature for 1-3 days.
I do not recommend freezing the baked or assembled galettes. However, you can freeze the dough circles separately, which can be stored in the freezer for up to one month. When you're ready to use them, allow them to thaw at room temperature or in the fridge.

FAQ - Gluten Free Peach Galette
Sprinkle a thin layer of a dry ingredient, such as almond flour, gluten free breadcrumbs, or crushed cookies, on the bottom of the galette crust before adding the filling. This layer absorbs excess moisture and helps maintain a crisp crust.
I do not recommend freezing the baked or assembled galettes. However, you can freeze the dough circles separately, which can be stored in the freezer for up to one month. When you're ready to use them, allow them to thaw at room temperature or in the fridge.
Peaches can be replaced with other stone fruit such as Nectarines. Make sure to check out my Gluten Free Strawberry Rhubarb Galette Recipe as well.
Note about Salt in my Recipes
I use Diamond Kosher Crystal Salt in all of my recipes unless otherwise stated. If use use a different brand or kind of salt in your kitchen please adjust accordingly since some salts can be saltier. If you use Morton’s Kosher Salt please be aware that their salt granules are smaller in size, denser, and crunchier and twice as salty.
Baking in grams
I share my recipes in grams and by weight since baking by weight is the most accurate way to bake. Digital Scales are very affordable and easy to use. You can purchase them on Amazon for less than a set of measuring cups. For small amounts under 10 grams, I like to use this Precision Pocket Scale. Measuring cups are very inaccurate which can cause significant errors when it comes to gluten-free baking or baking in general. Especially since I bake with gluten-free flours which weigh differently than “regular” flours. I do provide some ingredients like spices and leavening agents in measuring spoons. To learn more about Baking with a digital scale, make sure to check out my post about Baking by weight.
Note about Ovens and Oven Temperatures
All my recipes are tested and developed with a conventional oven. I always bake my baked goods on the rack placed in the MIDDLE of my oven. This way the heat coming from the bottom will not burn my baked goods.
If you are baking with convection (fan-forced), please adjust the recipes accordingly. Be also prepared that the convection oven can cause your baked goods to dry out quickly and still be raw inside. Be aware that it takes at least 15-20 minutes for a standard American Oven to be fully preheated. I highly recommend investing in an Oven Thermometer.
Substitutions and Modifications
Any dietary or ingredient modifications/substitutions to this recipe may alter the end result in appearance and taste. I test my recipes several times as published in this post and The Gluten Free Austrian Blog is not responsible for the outcome of any recipe you find on our website.

More Gluten Free Recipes to try
📖 Recipe
Gluten Free Peach Galette

Experience the essence of summer with this Gluten-Free Peach Galette Recipe. Indulge in sweet and juicy peaches wrapped in a golden, flaky crust, baked to perfection. It's a simple and irresistible dessert that captures the vibrant flavors of the season.
Ingredients
Gluten Free Galette Dough
- 385 grams gluten free multi purpose flour (preferably Cup4Cup)
- ½ teaspoon kosher salt
- ¼ teaspoon baking powder
- 10 grams granulated sugar
- 225 grams unsalted butter, cold
- 170 grams cream cheese, full fat, cold
- 40 grams milk, cold (can be replaced with cold water)
- 15 grams vinegar (white or vinegar)
- additional flour for rolling
Peach Filling
- 5-6 medium sized peaches, around 600 grams
- 40 grams granulated sugar
- 15 grams cornstarch
- 1 teaspoon ground ginger
- 1 teaspoon vanilla extract
- pinch of kosher salt
Assembly and Baking
- 80g almond flour
- 1 egg, for egg wash
- splash of milk for egg wash
- coarse sugar
Instructions
Gluten Free Galette Dough
To simplify the process, I prefer using a food processor to make my gluten-free galette dough. Alternatively, you can make the dough by hand in a large mixing bowl, working the butter and cream cheese into the dry ingredients. I do not recommend using a stand mixer.
- In the food processor bowl, combine gluten-free flour (preferably Cup4Cup), granulated sugar, baking powder, and kosher salt. Add cold butter and cream cheese, sliced into tablespoon-sized pieces or walnut halves.
- Pulse the ingredients in the food processor 5-6 times, leaving some larger chunks as the butter and cream cheese will be further broken up later with the addition of milk and vinegar.
- Add the cold milk (or cold water) and vinegar, pulsing an additional 3-4 times. The dough should not come together in the food processor to avoid overmixing.
- Transfer the gluten-free galette dough to a large bowl. Use your hands to bring the dough together. Alternatively, you can do this on a clean kitchen counter, but I suggest using a bowl to contain the mess.
- Once the dough is gathered together, transfer it to a parchment-lined sheet tray and shape it into a rectangle. The exact size is not crucial at this stage, but ensure the dough is approximately 1 inch tall for easier rolling.
- Cover the gluten-free cream cheese pie dough with plastic wrap or wrap it in parchment paper and refrigerate for 10-15 minutes.
Folding
- Once the dough has rested in the refrigerator for 10-15 minutes, transfer it to a floured surface, such as parchment paper or a clean kitchen counter. If the dough has been refrigerated for a longer period, allow it to soften for a few minutes before rolling, as it will be difficult to work with if too firm.
- Roll the dough into a rectangle of approximately ½ to ¾ inch thickness. The exact size is not critical.
- Using a knife, divide the rolled-out gluten-free pie dough into thirds, ensuring they are similar in size.
- Stack the slices of dough on top of each other and gently press them together. Rotate the dough slab 90 degrees, so the shorter side faces you. With a rolling pin, roll out the dough again to approximately the same size as before, maintaining a thickness of about ½ to ¾ inch.
- Repeat the process of slicing the dough into thirds and stacking them. Press the dough together and use the rolling pin to slightly widen or lengthen the stack. Aim for a thickness of around ¾ inch or 2 cm.
- Wrap the block of galette dough in plastic wrap or parchment paper and refrigerate it for 30 minutes. The dough can be refrigerated for up to 3 days or frozen for up to one month.
Peach Filling
- Start by cutting the peaches in half all the way around and twist the halves in opposite directions to loosen the pit. Pull the peach halves apart and remove the pit. Most fresh peaches sold in the U.S. are freestone peaches, making the pit easy to remove. However, if you have clingstone peaches, you may need to use a spoon to dig out the pit.
- Once the pit is removed, place the peach halves with the cut side down on a cutting board and slice them into ¼-inch to ½-inch slices.
- Add the granulated sugar, cornstarch, a pinch of kosher salt, ground ginger, and vanilla extract and toss gently to coat. If your peaches are very sweet, feel free to reduce the amount of sugar used in the filling.
- Set the peach galette filling aside while rolling out the gluten-free galette dough. The mixture can sit at room temperature.
Rolling the Gluten Free Galette Dough
Once the gluten-free galette dough has chilled for 30 minutes, remove it from the fridge and let it sit at room temperature for a few minutes. If it was chilled for an extended period, allow it to sit for at least 10 minutes to make rolling easier.
- Divide the gluten-free galette dough in half for easier rolling. Roll out the first half into a rectangular shape, aiming for approximately 20" x 7" to cut three 6" round disks. The dough should be about ⅛ inch (3-4 mm) thick.
- Using a 6" bowl or plate, cut out 6" circles from the dough. Place the pie dough circles on a parchment-lined baking sheet, minimizing waste. Set aside the dough scraps for now, as they will be combined with the scraps from the second half of the dough. If your kitchen is warm or you work slowly, refrigerate the pie dough rounds while rolling out the second half of the dough.
- Once all the pie dough is rolled out, quickly knead together and reroll the dough scraps. You should obtain an additional one to two 6" galette dough rounds from the scraps. It's best to only reroll the dough once to prevent it from becoming tough.
How to fill and assemble a Galette
Once the gluten-free galette dough is rolled out and ready, it's time to assemble the gluten-free peach galettes. Ensure that the peach filling is prepared. If you refrigerated the dough circles, let them sit at room temperature before filling to prevent breaking.
- Place a gluten-free galette dough circle on a parchment-lined baking sheet. If the dough seems too thick, you can lightly roll it with a rolling pin while maintaining a circular shape. Do not roll it thinner than ⅛ inch (3-4 mm).
- Spread a spoonful of almond flour in the center of the circle, leaving at least a 1.5-inch clear rim around the edges. The almond flour will absorb fruit juices and prevent a soggy bottom, although it doesn't contribute much flavor.
- Add the peach filling on top of the almond flour.
- Gently fold the edges of the dough over the filling, pleating as you go to create a rustic, free-form shape. Pleating the dough helps contain the filling during baking and gives the galette its unique appearance.
- Pinch down the corners of the dough to secure them in place while baking.
- Once all the gluten-free peach galettes are filled, refrigerate them while preheating the oven.
How to bake Gluten Free Galettes
- Preheat the oven to 425°F.
- In a small bowl, whisk an egg with a little milk (non-dairy is fine) or water to make an egg wash. Place four of the gluten-free galettes on a parchment-lined baking sheet. Brush the pastry dough with the egg wash and generously sprinkle coarse sugar on top.
- Bake the galettes at 400°F for 15 minutes, then lower the temperature to 375°F without opening the oven door. Continue baking for an additional 10-15 minutes until the crust turns golden brown and the fruit filling is bubbling.
- Remove the galettes from the oven and let them cool on the baking sheet for 10 minutes before transferring them to a cooling rack to cool completely or serve.
- Repeat the process with the remaining gluten-free galettes. You can refrigerate them for up to 12 hours (overnight), but I don't recommend storing the assembled galettes for an extended period.
Notes
Find detailed instructions and photos on how to make this gluten free galette recipe in the blog post
Gluten Free Flour: The only pre-mixed gluten-free flour blend though that generates the flakiest homemade gluten free pie crust is Cup4Cup
Storage: Gluten Free Galettes are the best when enjoyed the same day they have been baked. Store any leftover in an airtight container at room temperature 1-3 days.
Fruit for Filling: It is very difficult to give an exact amount of fruit needed for filling. The amounts listed made enough filling for seven gluten free galettes.
Recommended Products
As an Amazon Associate and member of other affiliate programs, I earn from qualifying purchases.
Nutrition Information:
Yield:
8Serving Size:
1Amount Per Serving: Calories: 500
Calories are a guestimate and randomly generated.



Kimberly
This sounds delightful! I have fresh peaches from a friend this week. This will be a perfect way to use them.
As a side note: you have an error in the blog portion of the recipe. Under the assembly instructions #6 you have strawberry rhubarb listed as the filling instead of peach. 🍑
Daniela
Thank you for catching that. I have updated the post
Debby H
This recipe is a delightful discovery! It is the best gf crust I have ever made. I will use it for many recipes going forward. I used GF Jules flour blend. I have used that for years and find it to be a good product. I personalized this recipe and enjoyed that. I use lemon juice instead of the vinegar. I also added a layer of frangipane under the peaches. Very yummy indeed. The almond flour is really a smart addition. The bottom crust was nice and crisp! Overall this galette was buttery with sublime fruit. Instead of making a large one. I made a two person sized pastry. The next day I used the dough to make a second one. Today I will make a third one. It doesn't get any better than that!
Morgan
This recipe is sooo good. It was very easy to make and everyone loved eating them. It was hard not to keep them for myself and eat all of them on one sitting.
Amy
Hi Daniela,
Thanks for this recipe, it looks perfect for all the peaches I have. I would like to make one large galette, instead of a bunch of little ones. Are there any recipe changes you would recommend other than the baking time?
Daniela
Hi Amy, I really can't think of any changes aside from the baking time. Please let me know how it works out!