
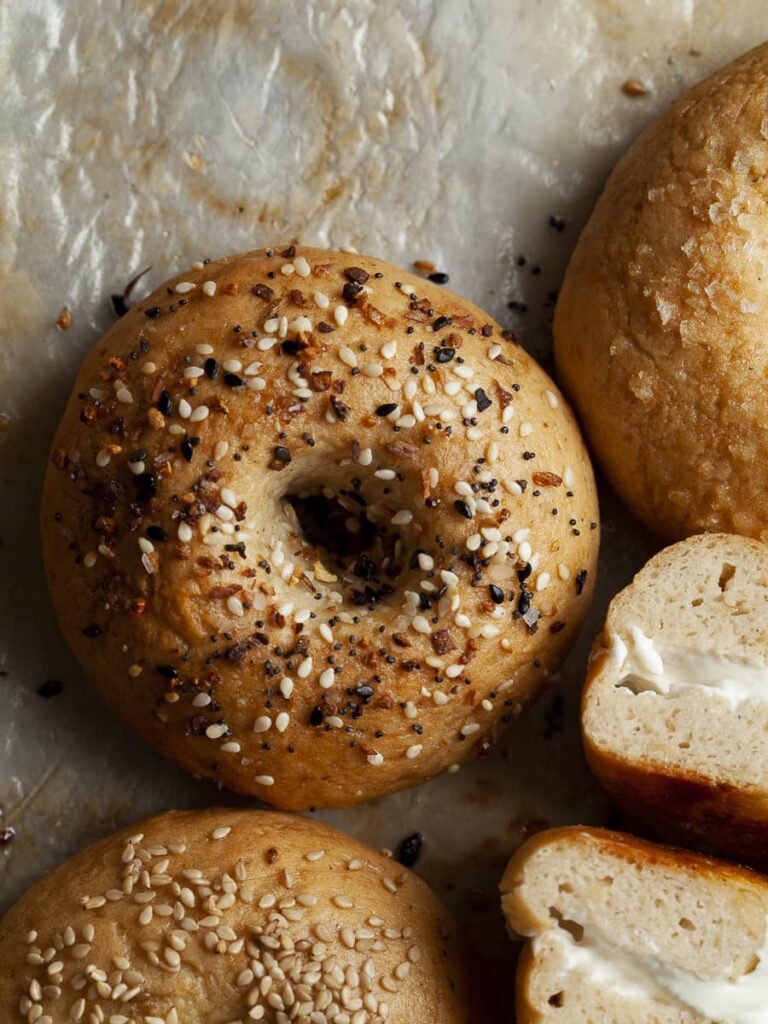
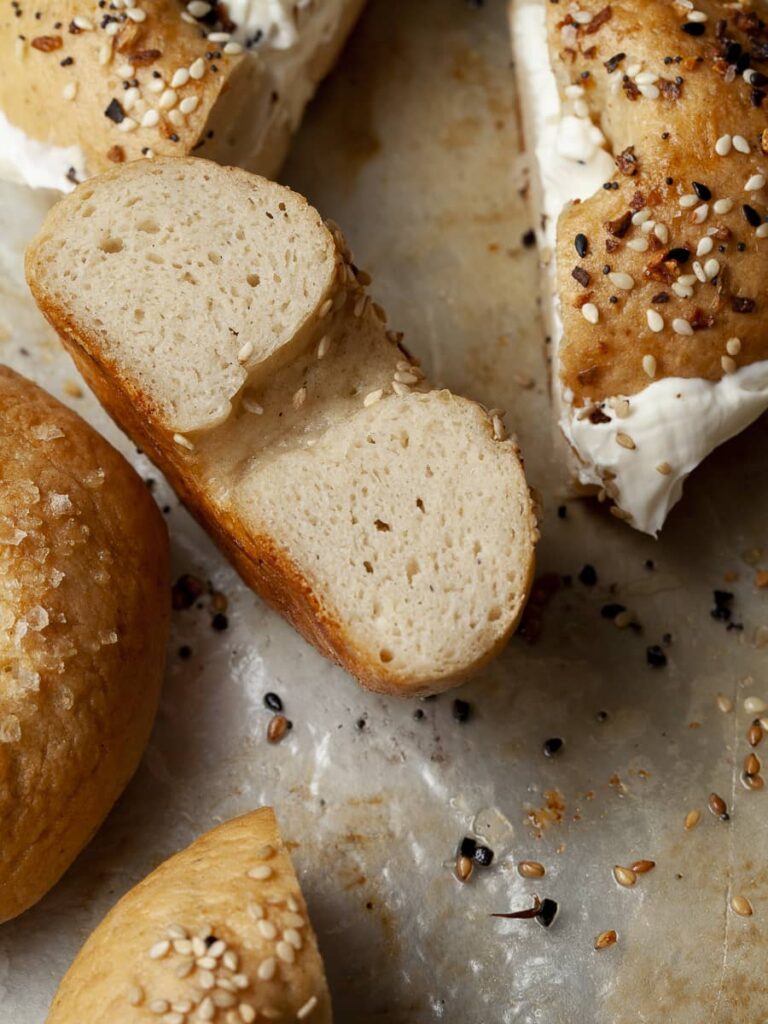
These gluten-free bagels are soft and tender on the inside with the perfect chew. And they are easier to make than you may think. All you need is some time and a little bit of patience. But trust me, it's worth it and these gluten free vegan bagels will be the hit at your next holiday brunch party (especially when it comes to your friends and family members with celiac disease)
This recipe for gluten-free bagels is very similar to my gluten-free pretzel buns recipe. So if you have mastered pretzels, you will definitely master this simple gluten-free bagel recipe.
Jump to:
- Recipe Ingredient Notes
- Ingredient Substitution Notes
- Tools Needed to make Bagels at home
- How to make Gluten Free Bagel Dough
- Shaping and proofing of Gluten Free Bagels
- Water Bath and Baking
- Storing and Freezing
- What to serve with Gluten Free Bagels?
- Gluten Free Sourdough Bagels
- How to make Gluten Free Bagel Chips
- FAQ about Gluten Free Bagel
- Note about Salt in my Recipes
- Baking in grams
- Note about Ovens and Oven Temperatures
- Substitutions and Modifications
- 📖 Recipe
- 💬 Comments
Recipe Ingredient Notes
Gluten Free Flour: This recipe for Gluten Free Bagels will NOT work with store-bought flour blends such as Cup4Cup or Bob’s Red Mill 1-to-1. These blends are not designed to work for yeasted doughs. The flours used in this recipe are also used in my own gluten-free flour blend and should be staples in every gluten-free pantry.
- Super Fine Brown Rice Flour: This is what gives these gluten-free bagels their structure. I recommend using super fine brown rice flour since regular ground brown rice flour will give the buns a gritty texture. I do NOT recommend using white rice flour since it is lower in protein and will cause a gummy texture in the dough.
- Sorghum Flour: Sorghum Flour is high in protein, soft flour with light color. It helps the bagels to get their light texture but also a depth of flavor.
- Potato Starch: Potato Starch (which is NOT the same as potato flour!) lightens the crumb of gluten-free bagels. It is made from the root tubers of potato plants.
- Tapioca Starch/Flour: Tapioca starch/flour gives baked goods a chewy texture, as well as, contributes to the browning.
Whole Psyllium Husks: This ingredient helps to reduce the crumbly structure often found in gluten free baked goods. It also gives the dough a wheat-like texture. I have only tested this recipe with Whole Psyllium Husks which can be found in your local health food store. If Psyllium Husk Powder is all you have on hand, you can use the same amount in this recipe for Gluten Free Bagels. Please be aware the crumb might be a bit denser.
Milk Powder: Milk Powder is an optional ingredient. The casein found in milk powder helps gluten-free bread to rise higher and have a lighter crumb. It also contributes to the color of bread or other baked goods.
Vinegar: The added vinegar activates sodium bicarbonate found in the baking powder which helps the gluten-free bagel to rise. White Vinegar or Apple Cider Vinegar work in this recipe.
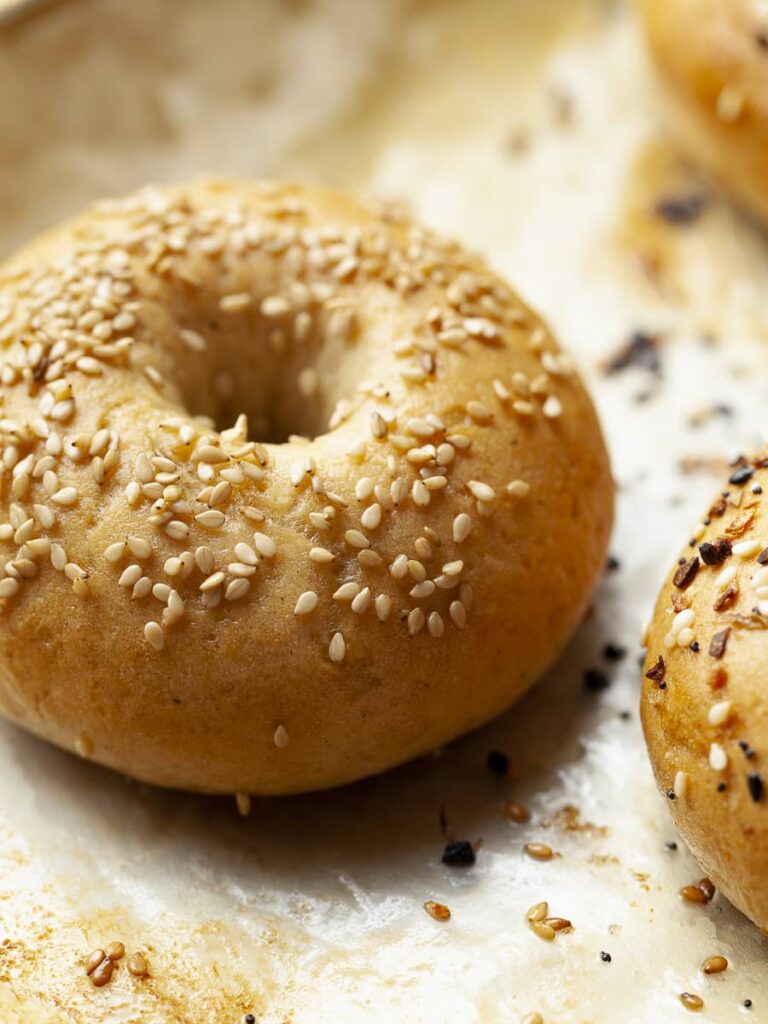
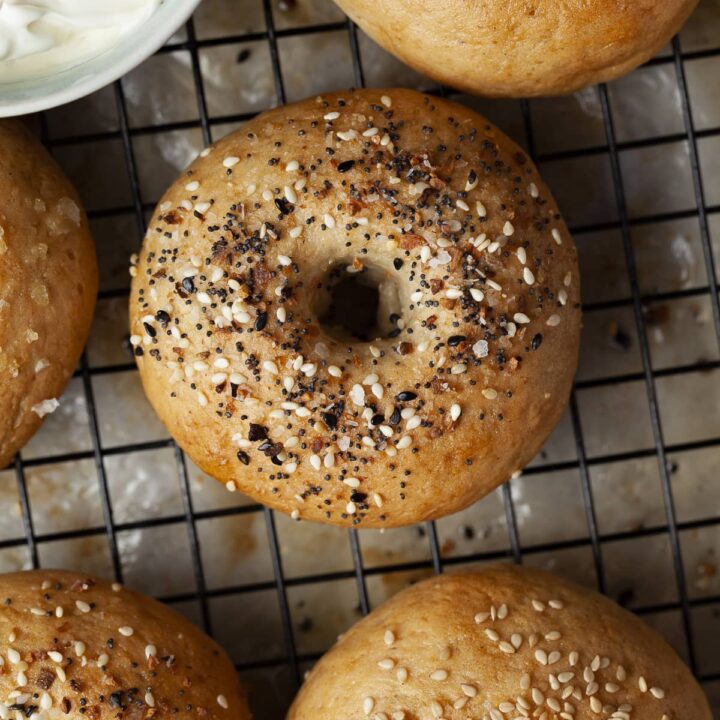
Toppings: Top your gluten-free bagels with Everything but the Bagel Seasoning, sesame seeds, poppy seeds, grated asiago cheese, flaky sea salt, cinnamon sugar....

Ingredient Substitution Notes
If you must replace any of the ingredients used in the original recipe for Gluten-Free Bagels, please be aware your results may vary. I do not recommend replacing all the ingredients since you will be creating a whole new recipe.
Gluten-Free Flour Substitutions
- Super Fine Brown Rice Flour – cassava flour
- Sorghum Flour – millet or chickpea flour
- Tapioca Starch – potato starch or corn starch
- Potato Starch – corn starch or tapioca starch
Xanthan Gum: I have not tested this recipe or any of my recipes with Guar Gum. To replace the xanthan gum please use 9 grams of guar gum. Results may vary.
Tools Needed to make Bagels at home
To successfully make this gluten-free bagel recipe, you will need the following equipment
- Digital Kitchen Scale is a must-have to make this recipe (or any of my recipes)
- Stand mixer fitted with the dough hook, hand mixer, or someone willing to knead the dough by hand
- two baking sheets, parchment paper
- A large pot or saucepan big enough to hold 12 cups of water, a slotted spoon or spatula, a pastry brush

How to make Gluten Free Bagel Dough
I highly recommend using a stand mixer or an electric hand mixer to make the dough for gluten-free bagels. Mixing this by hand can be a workout. Plus gluten-free bread dough tends to be very sticky.
Step 1: Lightly dust a parchment-lined baking pan with some tapioca starch and set aside (lightly! just like 10 grams of flour or less)
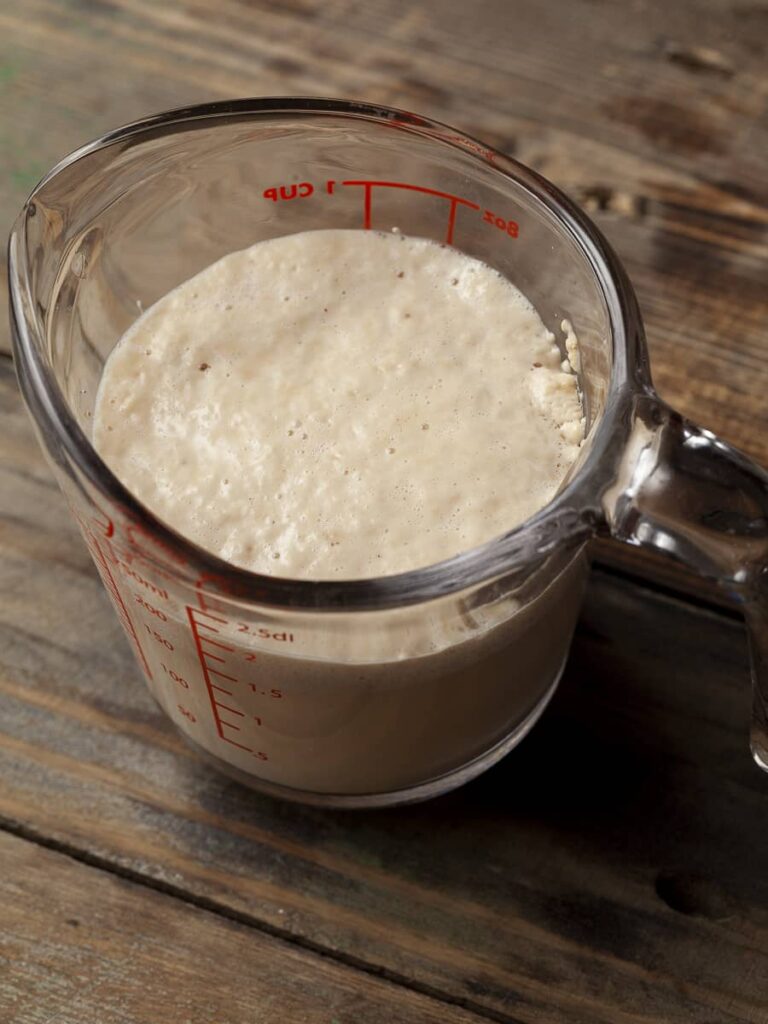
Step 2: Start by activating the yeast in the warm water. Warm the water in a small bowl in your microwave for 30-60 seconds. The temperature should be around 110F (No hotter than 115F or you will kill your yeast). I recommend using a digital thermometer to check the temperature. Sprinkle the active dry yeast and a pinch of sugar over the warmed water and allow for it to sit for 10-15 minutes. Your yeast will be ready when it looks bubbly and frothy. IF your yeast is not bubbly and frothy after 10 minutes, it should not be used in any recipes.
Step 3: In the bowl of your stand mixer fitted with the dough hook attachment combine the superfine brown rice flour, sorghum flour, tapioca starch, potato starch, brown sugar, baking powder, milk powder (IF USING), kosher salt, psyllium husk, and xanthan gum. Whisk to combine. If you are using some gluten-free sourdough starter discard, you can add it now.
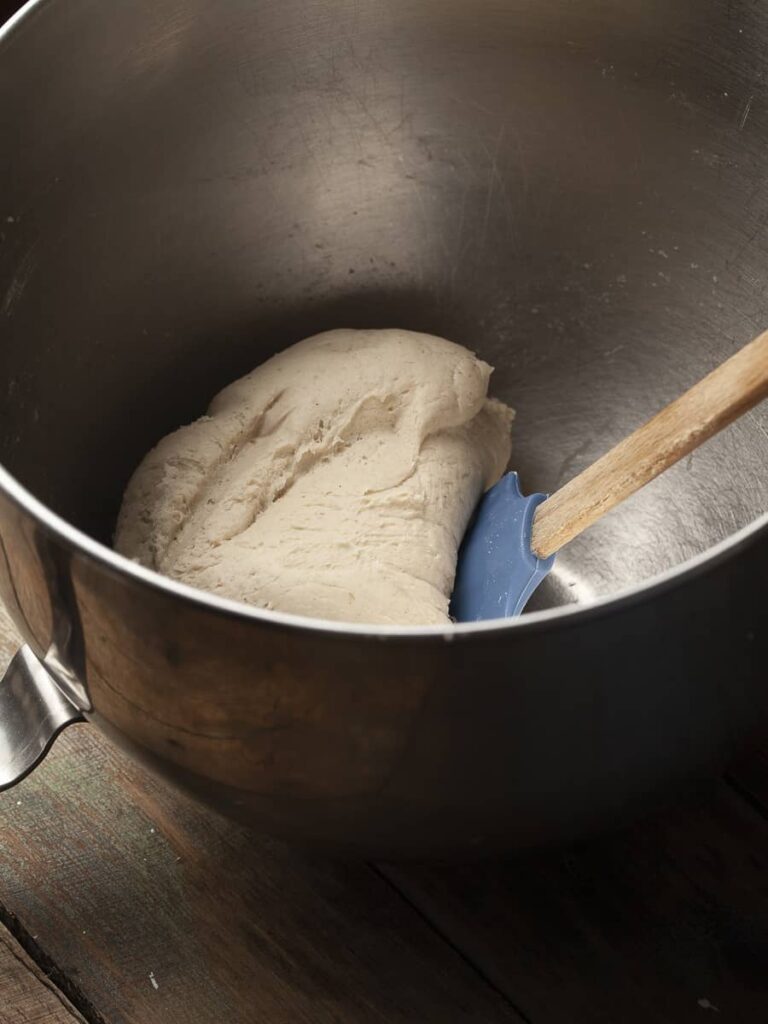
Step 4: When the yeast mixture is ready, add it to the dry ingredients along with the oil and vinegar. Mix the mixture at a low speed to combine. Once the dough starts to come together, increase the speed of your mixer to medium-high and mix for 3-4 minutes. The dough will look soft and not like your typical bread dough (This is normal for Gluten Free bread doughs).
Step 5: With a flexible spatula or your hands, remove the dough from your mixing bowl and place it on the lightly floured sheet pan. The dough for gluten-free bagels may be a bit tacky but this is normal. Allow the dough to rest for 10 minutes before proceeding with shaping the bagels. (If you like, stick it in the fridgefor 10-15 minutes)
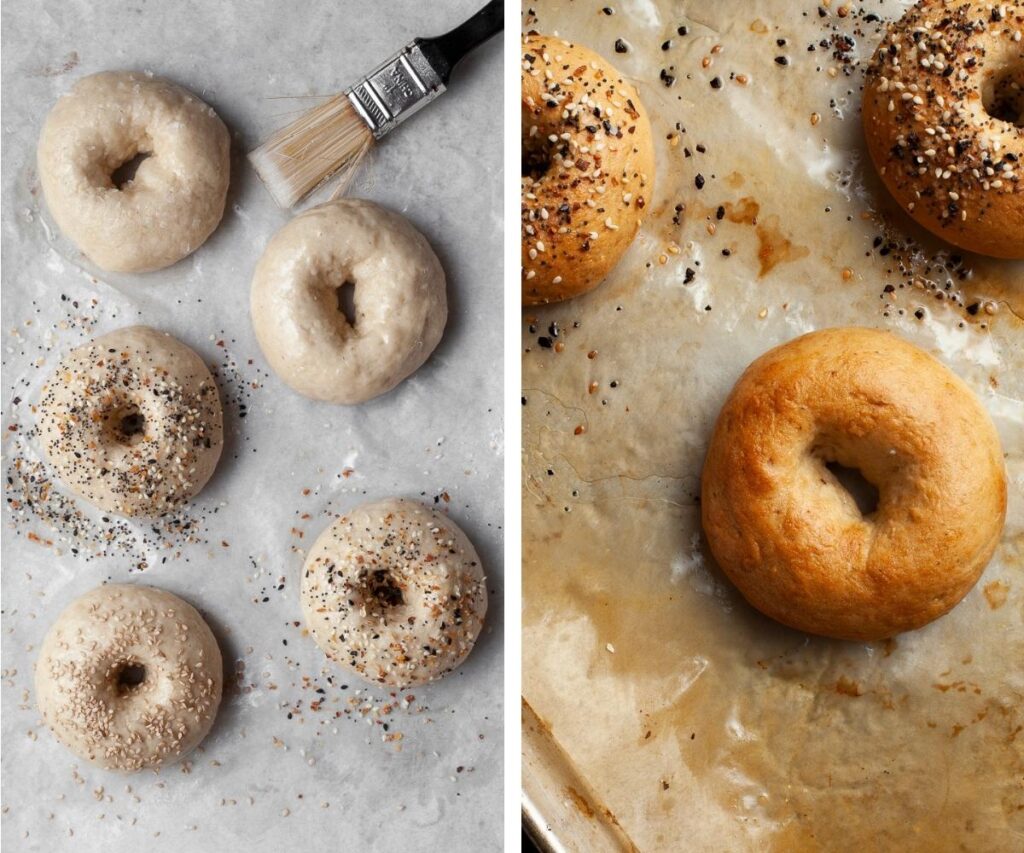
Shaping and proofing of Gluten Free Bagels
Make sure to start with a clean work surface and have a little bit of tapioca starch nearby. The little extra flour will be helpful in case the bagel dough is a bit sticky or tacky to work with. Try not to go overboard with the extra flour or your bagels will be tough.
Step 1: Line a baking tray with parchment paper and lightly spray with a nonstick cooking spray. Set aside. If you skip spraying the parchment paper, the bagels will most likely stick to the paper.
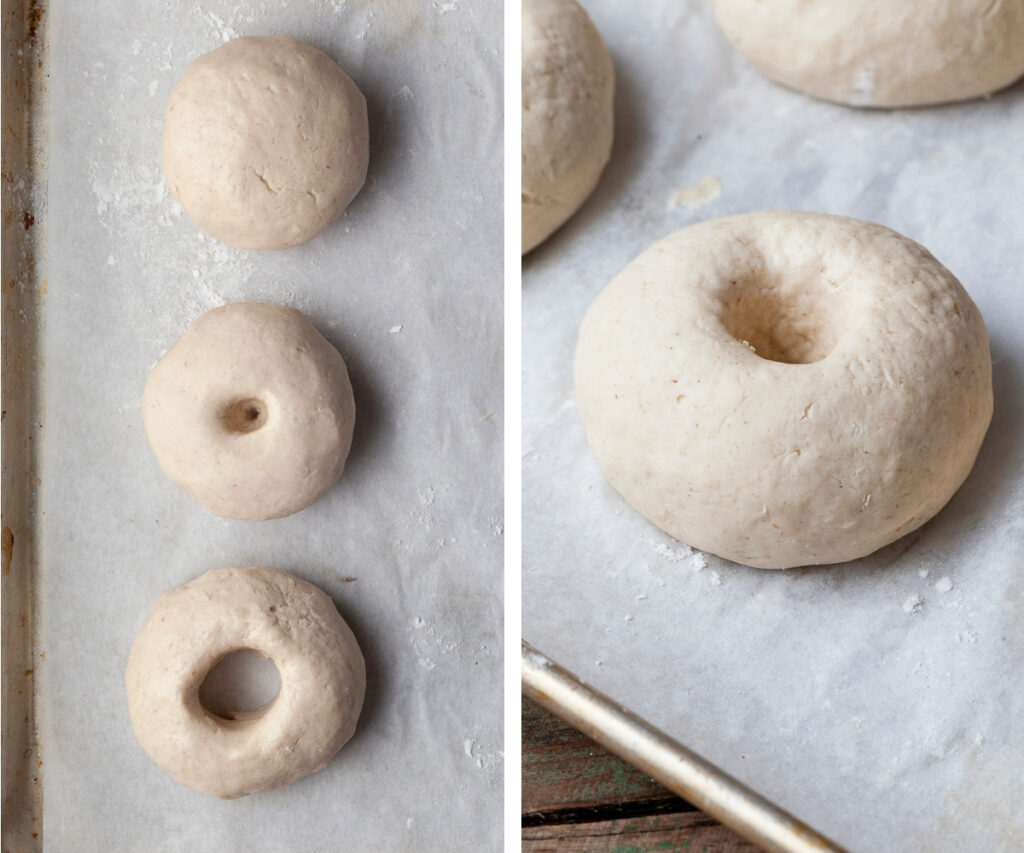
Step 2: Using a kitchen scale, divide the dough into 5 equal pieces by weight. Weigh the entire dough and divide it by 5.
Step 3: Shape into tight dough balls and carefully use your thumb to press a hole in the center and widen the hole to around 1". If I feel like the dough is too sticky, I like to lightly oil a finger. The extra oil makes the shaping easier. Carefully transfer the shaped bagels to the prepared baking sheet. Make sure you leave each bagel with enough room to rise.
Step 4: Once all the gluten-free bagels have been shaped allow cover them with a clean tea towel or sprayed plastic wrap. Let the dough rise in a warm place until 50% bigger than their original size. I like to use my oven for this by preheating it for a few minutes until it’s around 100F (check your oven thermometer!!), TURN OFF and place the tray of bagels in the oven. Depending on how warm your kitchen/proofing environment is, this can take anywhere from 60-90 minutes.
Pro Tip: I like to lightly sprinkle the bagels with a little water before allowing them to be proofed. The additional moisture seems to encourage the proofing and keeps the dough from drying out.
Water Bath and Baking
Once the gluten-free bagels are puffy looking and 50% bigger than their original size transfer them to the freezer (the whole sheet tray). Freezing the bagels for 10-20 minutes, while you preheat the oven, prepare the water bath and toppings. This will make them easier to handle and ensure they keep their bagel shape. I like to use Everything but the Bagel Seasoning, Sesame Seeds, or Za'atar Seasoning.
Preheat your oven to 425F and arrange your oven rack in the center of the oven.
For the Water Bath, bring 8 cups of water to a boil in a large pot. While the water comes to a boil, line a baking pan with parchment paper and spray with non-stick spray, prepare the oil and your toppings of choice. Spraying the parchment paper with a non-stick spray is highly recommended unless you want your bagels to stick to the parchment paper after being baked.
Once the water is at a boil, carefully add the baking soda and brown sugar. The baking soda will not only give the bagels a nice chewy but it will also help with the browning without using an egg wash. The brown sugar will help with the shine of the crust and some additional flavor. You can also use maple syrup or honey instead.
Remove the bagels from the freezer and with a slotted spoon, carefully add two bagels to the boiling water bath and allow them to boil for 45 seconds on each side. Boiling the bagels longer may cause them to have a wrinkly crust. Remove the bagels from the water bath and place them on the prepared baking sheet. Repeat with all of them.
Once all the gluten-free bagels have been boiled, brush them with oil and top them with your toppings of choice.
Bake for 19-21 minutes until dark golden brown. I highly recommend keeping an eye on them after 18 minutes since every oven is different.
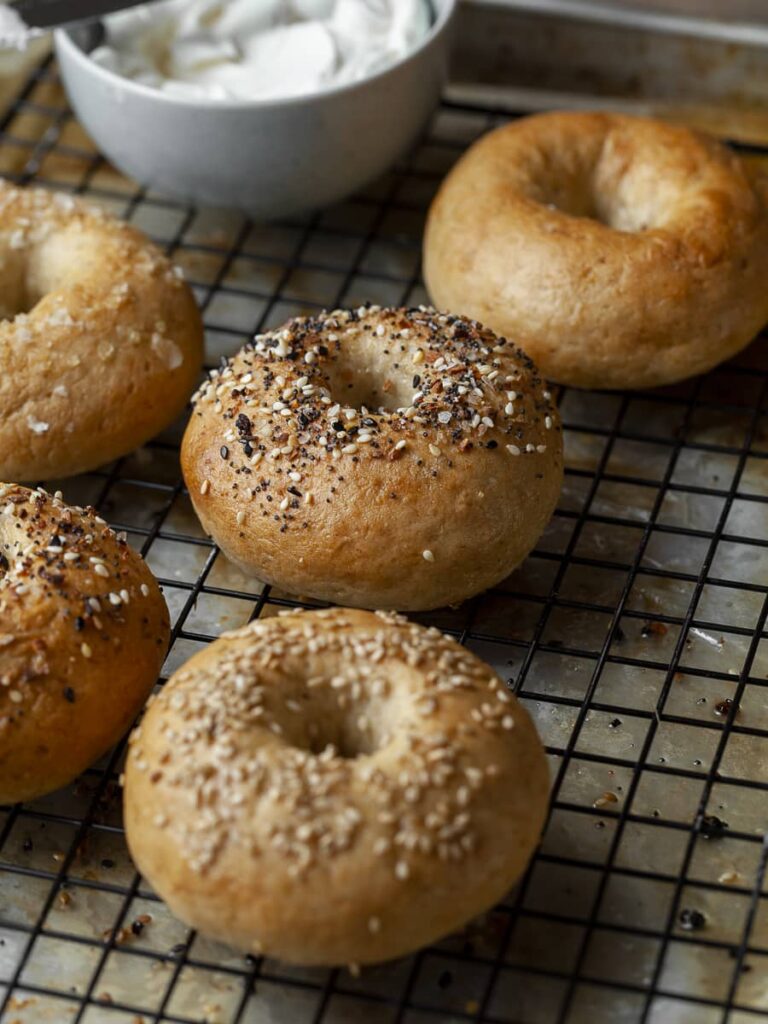
Remove the baked gluten-free bagels from the oven and allow them to cool on the baking pan for a few minutes before transferring them to a wire rack to cool completely.
These gluten-free bagels are best enjoyed the day they have been baked. But if you happen to have any leftovers, store the baked rolls in an airtight container at room temperature for up to 2 days. They might be extra chewy gluten-free bagels after a day or two.
Storing and Freezing
Gluten Free Bagels and bagels, in general, are the best the day they have been baked. The longer they sit, the chewier they will get. To store these gluten-free bagels, I recommend sticking them in a brown paper bag and storing them at room temperature for up to two days. I recommend toasting them before enjoying them to re-crisp them.
To freeze bagels, make sure they are fully cooled. Wrap each individual bagel in plastic wrap and place it in a ziplock bag or airtight container. For easy thawing, I recommend slicing them before freezing. This way you can pop them in your (gluten-free) toaster to thaw and reheat them. Freeze for up to 6 weeks.
What to serve with Gluten Free Bagels?
Everyone loves a delicious plain bagel with a thick layer of cream cheese. Here are a few, maybe new to you, bagel topping ideas.
- Cream Cheese, Smoked salmon, and dill
- Peanut Butter, slices of banana, and some gluten-free granola
- Bacon, Egg, and Cheddar Cheese
- Nutella, Strawberries and chopped hazelnuts
- Avocado Bagel Sandwich with slices of cucumber, radishes, fresh sprouts and yogurt
- Gluten Free Pizza Bagel - top each bagel half with some marinara sauce, and grated cheese, and bake at 375 until the cheese is bubbly
Gluten Free Sourdough Bagels
Do you happen to have a gluten-free sourdough starter in your fridge and are not sure what to do with it? Add up to 30 grams of cold, straight from the fridge sourdough starter to your gluten free bagel dough (along with the yeast and water) to give them a unique, more flavorful taste. No need to activate the sourdough before using it.
How to make Gluten Free Bagel Chips
Got some gluten free bagels that got a bit stale? Use a sharp knife and slice each bagel in half. Then slice each half into ⅛" strips or as thin as you can. Spread the bagel slices on a baking sheet and drizzle with olive oil. Season as desired (I like mine with some garlic powder) and bake at 320F for 10-15 minutes until golden brown and crisp. Make sure to give them a turn around half way through baking. Remove them from the oven and allow for them to cool completely before transferring them to an airtight container. Serve with your favorite dips.
FAQ about Gluten Free Bagel
Can I make this recipe vegan?
Since the milk powder is an optional ingredient, this recipe is already vegan as written.
My dough is very sticky
This dough will be tacky but should be easy to work with. Make sure to let it rest for at least 10 minutes for the psyllium husk to do its magic (refrigeration does help). You may lightly flour your hands and workspace. It’s also important to mention that on a hot and humid day any bread dough can be challenging to work with.
Can I freeze unbaked bagels?
To freeze the unbaked bagels, I recommend freezing them after shaping and before rising. Once ready to bake, remove them from the freezer and allow for them to thaw in the fridge overnight, and proof them as directed in the recipe.
Can I skip the Psyllium Husk?
I do not recommend skipping the Psyllium Husk since it is an important contributor to the structure and crumb of my recipe for gluten-free bagels.
Can I double this recipe?
Yes, you can double this recipe for gluten free bagles.
Note about Salt in my Recipes
I use Diamond Kosher Crystal Salt in all of my recipes unless otherwise stated. If use use a different brand or kind of salt in your kitchen please adjust accordingly since some salts can be saltier. If you use Morton’s Kosher Salt please be aware that their salt granules are smaller in size, denser, and crunchier and twice as salty.
Baking in grams
I share my recipes in grams and by weight since baking by weight is the most accurate way to bake. Digital Scales are very affordable and easy to use. You can purchase them on Amazon for less than a set of measuring cups. For small amounts under 10 grams, I like to use this Precision Pocket Scale. Measuring cups are very inaccurate which can cause significant errors when it comes to gluten-free baking or baking in general. Especially since I bake with gluten-free flours which weigh differently than “regular” flours. I do provide some ingredients like spices and leavening agents in measuring spoons. To learn more about Baking with a digital scale, make sure to check out my post about Baking by weight.
Note about Ovens and Oven Temperatures
All my recipes are tested and developed with a conventional oven. I always bake my baked goods on the rack placed in the MIDDLE of my oven. This way the heat coming from the bottom will not burn my baked goods.
If you are baking with convection (fan-forced), please adjust the recipes accordingly. Convection oven can cause baked goods to dry out quickly and still be raw inside. Since takes at least 15-20 minutes for a standard American Oven to be fully preheated. I highly recommend investing in an Oven Thermometer.
Substitutions and Modifications
Any dietary or ingredient modifications/substitutions to this recipe may alter the end result in appearance and taste. I test my recipes several times as published in this post and The Gluten Free Austrian Blog is not responsible for the outcome of any recipe you find on our website.
📖 Recipe
Gluten Free Bagels
These gluten-free bagels are soft and tender on the inside with the perfect chew. And they are easier to make than you may think. All you need is some time and a little bit of patience. But trust me, these gluten free vegan bagels are worth it.
Ingredients
To Activate Yeast
- 200 grams water, unfiltered
- 4 grams active dry yeast
- pinch of granulated white sugar
For Gluten Free Bagel Dough
- 100 grams super-fine brown rice flour
- 65 grams sorghum flour
- 55 grams tapioca starch (plus more for shaping the rolls)
- 45 grams potato starch
- 20 grams light brown sugar
- 5 grams xanthan gum (1 ¼ teaspoon)
- 5 grams baking powder
- 3 grams milk powder (optional)
- 3 grams kosher salt
- 3 grams whole psyllium husk (2 teaspoons)
- 10 grams neutral oil (like olive oil, grapeseed or sunflower oil)
- 6 grams vinegar
For Baking Soda Bath
- 8 cups water
- 20 grams baking soda
- 15 grams light brown sugar (or maple syrup or honey)
To Finish
- Additional oil for brushing
- Toppings of your choice
Instructions
How to make Gluten Free Bagel Dough
- Warm 200 grams of water in a small bowl to 110-114F.
- Add the active dry yeast and a pinch of sugar and allow to sit for 10 minutes. Your yeast is ready to use when it looks bubbly and frothy.
- In the bowl of your stand mixer combine brown rice flour, sorghum flour, tapioca starch, potato starch, brown sugar, baking powder, milk powder (if using), kosher salt, psyllium husk, and xanthan gum
- When the yeast mixture is ready, add it to the dry ingredients along with the 10 grams of oil and vinegar. Mix the mixture at a low speed to combine. Once the dough starts to come together, increase the speed of your mixer to medium-high and mix for 3-4 minutes. The dough will look soft.
- Remove the dough from the mixing bowl and place it on the lightly floured sheet pan. The dough may be a bit tacky but this is normal. Allow the dough to rest for 10 minutes before proceeding with shaping the bagels.
Shaping and rising of bagels
- Line a baking tray with parchment paper and lightly spray with a nonstick cooking spray. Set aside.
- Divide the gluten-free bagel dough into equal pieces by weight.
- Shape into tight dough balls and carefully use your thumb to press a hole in the center and widen the hole to around 1". If I feel like the dough is too sticky, I like to lightly oil a finger. Carefully transfer to the prepared baking sheet. Make sure you leave each bagel with enough room to rise. Repeat with all the dough.
- Cover the bagels with a clean towel or lightly greased plastic wrap and allow for them to rise in a warm place until 50% bigger than their original size. I like to use my oven for this by preheating it for a few minutes until it’s around 100F (check your oven thermometer!!), TURN OFF and place the sheet tray with the bagels in the oven. It can take anywhere from 60-90 minutes for the bagels to be ready to be baked.
Water Bath and Baking
- Once the gluten-free bagels have risen, transfer them on the sheet pan to the freezer for 10-20 minutes.
- While the bagels are in the freezer, preheat your oven to 425F and arrange your oven rack in the center of the oven.
- For the Water Bath, bring 8 cups of water to a boil in a large pot. Make sure it has enough space since the baking soda will foam up once you add it to the boiling water.
- While the water comes to a boil, line a baking pan with parchment paper and spray with non-stick spray, prepare the oil and your toppings of choice.
- Once the water is at a boil, carefully add the baking soda and brown sugar. It will foam up!
- Remove the bagels from the freezer and with a slotted spoon, carefully add two bagels to the boiling water bath and allow them to boil for 45 seconds on each side. emove the bagels from the water bath and place them on the prepared baking sheet. Repeat with all of them.
- Once all the bagels have been boiled, brush them with oil and top them with your toppings of choice. U
- Bake for 20-22 minutes at 425F until dark golden brown.
- Remove the baked bagels from the oven and allow them to cool on the baking pan for a few minutes before transferring them to a wire rack to cool completely.
- Store any leftovers you may have in a brown paper bag or airtight container for up to 2 days or freeze for one month.
Notes
Please make sure to read Recipe Ingredient Notes and ingredient substitution notes regarding ingredient questions.
Topping Ideas: Everything but the Bagel Seasoning, sesame seeds, poppy seeds, grated asiago cheese, flaky sea salt, cinnamon sugar....
Recommended Products
As an Amazon Associate and member of other affiliate programs, I earn from qualifying purchases.


Nutrition Information:
Yield:
6Serving Size:
1Amount Per Serving: Calories: 230
Calories are a guestimate.


patricia says
Just wondering, since I cannot have dairy, I sometimes use coconut milk powder to replace the regular milk powder. Would you recommend doing that with this recipe? Thanks
Daniela says
Patricia, Coconut milk powder does not have any casein in it. So adding it will not do much to the bagels. They will still be delicious without the added milk powder. Believe me 🙂
Devan says
Your photos are absolutely stunning and I can already see how soft these bagels look from the photos. It's clear you put a lot of hard work into your recipes and that's also why you have such great recipes. Don't stop, and thank you for all your hard work and recipe inspiration!
nancy says
your pastry recipes are always so spot on! i love this GF version for bagels. Now i can i have a nice breakfast bagel fresh from home!
Bernice says
I don't eat gluten free but I have a friend that does and I've always wanted to bake for her. Thank you so much for your explanation of all the different flours and what they do. That's super helpful to me!
Jacqui says
You really can’t tell that these are gluten free! Incredible!
jan says
wow these look incredibly delicious!!!
Lori | The Kitchen Whisperer says
Outstanding!!! I love the tip about freezing them slightly before the water bath! Great tip! These are crazy delish!
Kate says
Absolutely delicious! This recipe is a keeper. Your bread recipes are always so so good!
Amy Liu Dong says
Bagels are one of the favorites in the house and this one looks really delicious.
I will def save this recipe and will make this for my family. Thank you!
Dennis says
My wife's cousin is gluten-free and she came for a visit. I made your bagels for her and she absolutely loved them!!
Holly says
Daniela, I followed your recipe to the t and it came out perfectly! The texture was great. Thank you for bringing bagels back into my life!!
Daniela says
Holly, this makes me so happy
Jenny says
These gluten-free bagels are great. I am a newbie and don't bake often. I came upon your recipe, and I followed your detailed instructions and managed to pull it off! The bagels taste amazing. I feel so proud! Thanks so much for this.
Moop Brown says
I've never made my own bagels from scratch before but I'm looking forward to trying these and also appreciate that they're gluten free.
JELLA JO says
Hi! It looks so delicious! Thank you for the recipe!
I want to make your blog bread, but I don't want to put xanthan gum in the bread. There is xanthan gum in the recipe for similar breads on your blog. Of course, I know what xanthangum does in gluten-free bread and how important it is, but I don't want to use it if possible.
Instead, I use psyllium husk, so can I increase the amount of psyllium husk and get rid of xanthan gum? I want to know how different the taste and texture are.
If it's a really big difference, I'll use xanthan gum. But I hope I can make similar taste and texture without xanthangum.
Daniela says
Hello, you can use psyllium husk instead of xanthan gum. I have not tried it so I can't guarantee the recipe will turn out the same.
Giorgia says
Hi!
Thank you very much for all the recipes, they're wonderful!! <3
I'm looking forward to doing this one!
Just a question, how many bagels (aprox) is this recipe for? Just to have an idea 🙂
Thank you! Have a wonderful day!!
Daniela says
Giorgia, this recipe for gluten free bagels makes 5-6 bagels. I prefer dividing the dough into 5 pieces which gives me 5 good sized bagels
Kristine says
I love this recipe. I switch out the potato flour for arrowroot flour because I can’t have potato and it still turns out lovely. I also usually double or triple it so I can make a big batch and freeze them. My favorite variation is to make them jalapeño flavored by juicing a few jalapeños and sub the juice for some of the water. Then I dice up a few more and mix them in at the very end of the mixing process. Delicious!
Daniela says
oh my! this sounds like heaven! I have to try them with jalapeños
Whitney Dobry says
Hello, I would like to make this recipe but only have psyllium husk power. How much powder should I substitute for the whole husk?
Daniela says
I would just slightly add less of the powder, around 2.5 grams. the crumb may be denser.
Merle says
Have you ever tried an overnight proof in the fridge for the bagels? Would love to try it so I can bake them fresh in the morning.
Daniela says
if your fridge is very cold, this should be no problem at all 🙂
Paula says
I’m wondering if it’s possible to add blueberries?
My daughter is GF and is begging me to make blueberry bagels and I trust your recipes!
Daniela says
Paula, it's funny you mention this because for some odd reason I have been thinking about blueberry bagels. I have not tried them and wanna do a little research first. I am just afraid the blueberries will turn them purple
Stephanie says
I wonder if dried blueberries would work, kind of like raisins.
Don Neault says
Thank you posting such amazing gluten free recipes!
I have a question on milk powder vs whole milk. Does it matter which one I use in the gluten free bagels?
Daniela says
You could use milk instead of water. The milk powder is an optional ingredient
Mel says
Hi! Would like to ask if I can replace sorghum with buckwheat flour?
Daniela says
I have bot tested bagels with buckwheat but in general it should be a great substitution
Merle says
We love this recipe. Just made a quadruple batch - 2x double recipe and made half everything and half cinnamon raisin and did overnight proof as well. Took them out of fridge in the morning and let them warm up and rise then froze briefly before boiling and baking. Came out great!
Lisa Corbett says
Good to know! How much cinnamon and raisins did you add?
Daniela says
There is a recipe for Gluten Free Cinnamon Raisin Bagels on this website: Gluten Free Cinnamon Raisin Bagels