
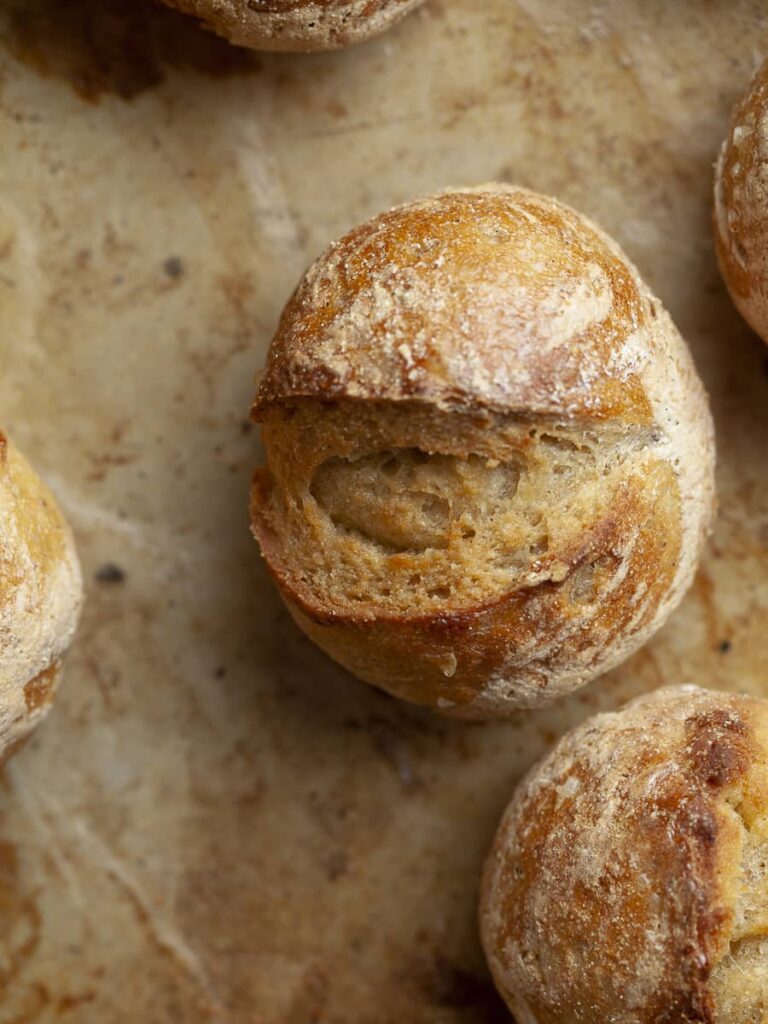
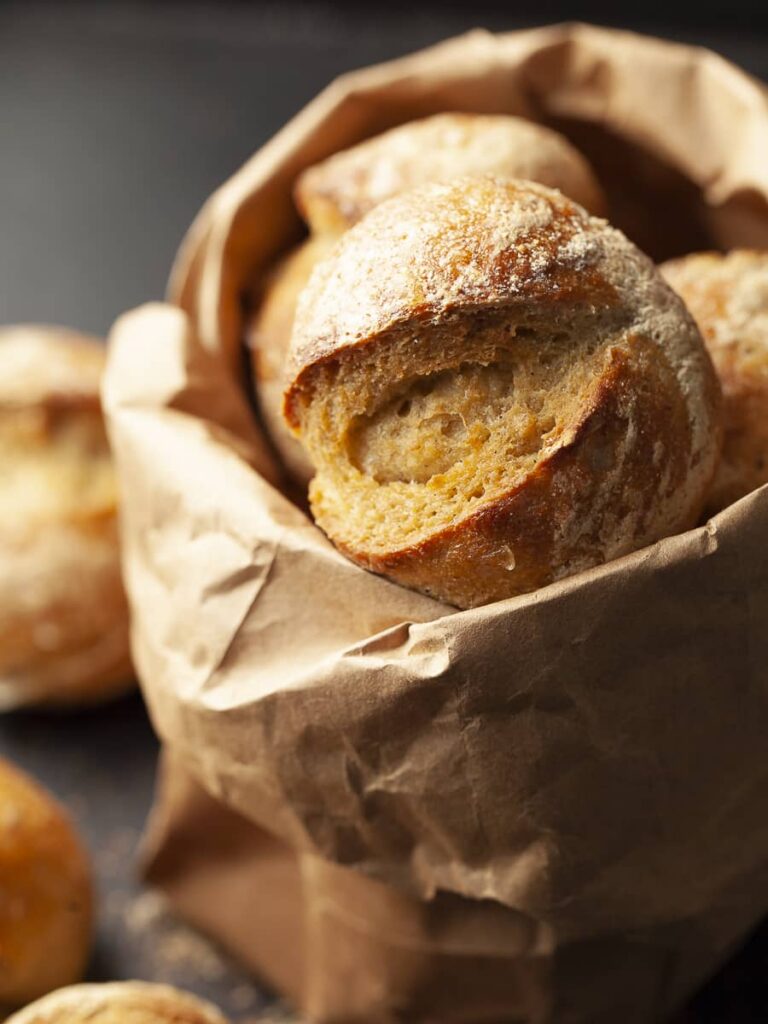
These Gluten Free Artisan Bread Rolls will be the star of your next dinner party. With a cackly/crunchy crust, they remind me of the rolls and Broetchen you can find in bakeries all over Europe. Serve them at your next dinner party with some high-quality olive oil for dipping. Or use them to make a delicious gluten free Panzanella salad (a Tuscan summer salad made with bread). And my personal favorite way to enjoy these gluten free dinner rolls - warm from the oven with butter and some homemade jam.
This recipe was created to provide an alternative to my light and fluffy gluten free dinner rolls which are made with Caputo Fioreglut (a gluten-free specialty flour from Italy)
Jump to:
- Recipe Ingredient Notes
- Recommended Kitchen Tools
- What is Psyllium Husk?
- How to make Gluten-Free Artisan Bread Dough
- Shaping and proofing of Gluten Free Artisan Bread Rolls
- Cornstarch Glaze for Rustic Crust
- How to bake Gluten Free Artisan Dinner Rolls
- Storing and Freezing
- Serving Ideas
- Variations of Gluten Free Artisan Bread Rolls
- FAQ about Gluten Free Artisan Dinner Rolls
- Note about Salt in my Recipes
- Baking in grams
- Note about Ovens and Oven Temperatures
- Substitutions and Modifications
- More Gluten Free Bread Recipes to try
- 📖 Recipe
- 💬 Comments
Recipe Ingredient Notes
Gluten Free Flour: This recipe for Gluten Free Artisan Bread Rolls will not work with store-bought gluten-free flour blends like Bob Red Mill 1-to-1 or Cup4Cup. Each flour in this recipe has a purpose in this recipe.
- Super Fine Brown Rice Flour: This is the key to the structure of artisan bread rolls. I recommend using super fine brown rice flour since regular ground brown rice flour will give the buns a gritty texture. I do NOT recommend using white rice flour since it is lower in protein and will cause a gummy texture in the dough.
- Sorghum Flour: Sorghum Flour is high in protein, soft flour with a light color. It helps the rolls to get their light texture but also a depth of flavor.
- Tapioca Starch/Flour: Tapioca starch/flour gives baked goods a chewy texture, as well as, contributes to the browning. Without added starch, these gluten free artisan bread rolls will be dense and dry.
- Fine Yellow Corn Meal: Corn Meal is a fine ground meal (coarse flour) ground from dried corn. It gives the bread rolls a wonderful texture and flavor. This is not the same as cornstarch. It is the same product I use in my Gluten Free Sweet Cornbread Recipe.
Whole Psyllium Husks: This ingredient helps to reduce the crumbly structure often found in gluten-free baked goods. It also gives the dough a wheat-like texture. I only use Whole Psyllium Husks in my gluten-free bread recipes. I have NOT tested this recipe with Psyllium Husk sold in powder form.
Yogurt: The added yogurt tenderizes the dough and gives the bread a wonderful flavor. Casein, a protein found in dairy yogurt, can mimic gluten and help with the structure of the dough. I have tested this recipe with plain yogurt and plain greek yogurt. If you use a non-dairy please be aware the structure of the bread may be different.

Recommended Kitchen Tools
To successfully make Gluten Free Artisan Dinner Roll Recipe, you will need a few kitchen tools you most likely already have in your kitchen.
Digital Kitchen Scale: is a must-have to make this recipe (or any of my recipes). For small amounts under 10 grams, I like to use this Precision Pocket Scale.
Stand Mixer: fitted with the dough hook will work the best to make this gluten-free bread recipe. One can make the dough by mixing it by hand but it will be tricky and sticky.
Oven Safe Pot: For the steam, the best option is a shallow, oven-safe pan that can withstand high temperatures. I like to use a cast iron skillet.
You will also need a sheet pan, a digital thermometer (to check the doness of the dinner rolls), a pastry brush and a razor or bread scoring tool.
What is Psyllium Husk?
Psyllium husks come from the seed of the Plantago plant, a native of India and Pakistan. It is naturally gluten-free. It is known as a source of soluble fiber which loves to absorb moisture. This ingredient helps reduce the crumbly structure often found in gluten-free baked goods. It gives the dough elasticity and flexibility and makes it workable.
Psyllium husk is especially useful in gluten-free recipes which rely on the structure gluten provides. Psyllium interacts strongly with the proteins in gluten-free flours, creating a sturdy enough structure to support highly leavened bread once the bread cools. Skipping the psyllium husk will cause the bread dough to be very sticky and you will not be able to properly shape the buns.

How to make Gluten-Free Artisan Bread Dough
The dough for gluten-free artisan rolls can be made with a stand mixer or by hand. If you use a stand mixer, please make sure to use the dough hook. If you choose to mix the dough by hand, make sure to blend all ingredients well.
- Start by activating the yeast in the warm water. Warm the water in a small bowl in your microwave for 30-60 seconds. The temperature should be around 110F (No hotter than 115F which will kill your yeast). I recommend using a digital thermometer to check the temperature. Sprinkle the active dry yeast and a generous pinch of sugar over the warmed water. Allow for it to sit for 10-15 minutes. Your yeast will be ready when it looks bubbly and frothy. IF your yeast is not bubbly and frothy after 10 minutes, it should not be used in any recipes
- In the bowl of a stand mixer or a large bowl sift together the gluten-free flours, psyllium husk, xanthan gum, kosher salt, and brown sugar. Add the yogurt and vinegar.
- When the yeast mixture is ready, add it to the dry ingredients. Mix the mixture at a low speed to combine. Once the dough starts to come together, increase the speed of your mixer to medium-high and mix for 3-4 minutes. The dough will look soft and not like your typical bread dough (This is normal for Gluten Free bread dough).
- Remove the bowl from the stand mixer and cover with a clean towel. Allow the dough to sit at room temperature for 30 minutes. During those 30 minutes, the flours and psyllium husk will hydrate.

Shaping and proofing of Gluten Free Artisan Bread Rolls
Once the gluten free artisan bread roll dough has rested for 30 minutes, it is time to shape it into little buns.
- Line a sheet pan with parchment paper and sprinkled with some fine cornmeal ready. The cornmeal will keep the rolls from sticking to the parchment paper.
- Using a kitchen scale, divide the dough into 6 equal pieces by weight. Weigh the entire dough and divide it by 6. It should be around 100 grams per roll.
- On a lightly floured kitchen counter (I use tapioca starch for this), shape the pieces of gluten free bread dough into smooth dinner rolls. If your dough is sticky, you can lightly grease your hands or sprinkle a tiny bit of flour, but avoid using too much as it can affect the dough's texture.
- Arrange the gluten free artisan bread rolls on the sheet tray. Make sure to leave some room between them so they can rise properly.
- Once all the gluten-free artisan rolls have been shaped, cover them with a clean tea towel or sprayed plastic wrap. Let the dough rise in a warm place until 50% bigger than its original size. At this point, you can also refrigerate them for up to 8 hours and allow them to rise slowly in the fridge.
- I like to use my oven for this by preheating it for a few minutes until it’s around 100F (check your oven thermometer!!), TURN OFF and place the tray of gf bread rolls in the oven. Depending on how warm your kitchen/proofing environment is, this can take anywhere from 45 - 75 minutes.
Note about rising during warm summer months: Issues with bread dough rising too quickly during warm summer months are very common. I recommend placing the shaped buns in the fridge for 2-3hrs which will allow them to rise slowly. When ready to bake, allow for them to sit at room temperature for 30 minutes while preheating the oven and making the cornstarch glaze.

Cornstarch Glaze for Rustic Crust
To achieve a shiny crust with a nice crunch, the bread rolls are "glazed" with a corn starch slurry before baking. When the bread is baked in an oven with steam- the starch in the crust is able to gelatinize before it all dries out and becomes crispy. This is what makes the crust crisp, shiny, and delicious- characteristic of "artisan" bread. Basically, any starch (tapioca flour or cornstarch) can be used to make this glaze.
Alternatively one can brush the buns with oil or an egg yolk/water mixture before baking. I can not guarantee this will achieve the same shiny, crusty bread as the cornstarch glaze. For a softer crust brush the unbaked dinner rolls with heavy cream.
Pro Tip: Wait to prepare the Cornstarch Glaze until the oven is fully preheated. Otherwise, it will become too thick to brush onto the risen gluten free bread rolls.
How to bake Gluten Free Artisan Dinner Rolls
- Once the gluten free artisan bread rolls are puffy looking and 35-40% bigger than their original size preheat the oven to 475F. It will take at least 30 minutes for the oven to fully preheat. Arrange one oven rack in the middle of the oven and the second one the closest to the bottom of the oven (this is for the steam bath)
- When the oven is fully preheated, bring water to boil in an oven-safe pot or pan. I like to use a cast iron pan for this. The boiling water creates steam in the oven which will help with the crust of the bread rolls.
- While waiting for the water to come to a boil, quickly prepare the cornstarch glaze. Mix the water and cornstarch in microwave-safe container and heat for 15-20 seconds on HIGH or until thick. Whisk it well. Be careful - this mixture can be very hot and easily overboil.
- Remove from the microwave and give it a good stir to ensure the cornstarch is fully combined with the water. The mixer will be thick and look similar to glue.
- Brush each bun with the cornstarch glaze using a pastry brush. Then score each artisan bread roll with a razor blade or a serrated knife somewhere between ¼" and ½" deep.
- Once the water is at a boil, CAREFULLY transfer the pot/pan with the boiling water to the oven placing it on the bottom rack.
- Place the bread buns on the middle rack and bake at 475F for 10 minutes. After 10 minutes CAREFULLY remove the pan holding the water and reduce the oven temperature to 450F.
- Finish baking the gluten-free artisan bread rolls at 450F for 15-17 minutes until golden brown and they have an internal temperature of at least 205F.
- Remove the gluten free dinner rolls from the oven and allow them to cool on the baking pan for a few minutes before transferring them to a wire rack to cool completely.
- These gluten-free rolls are best when eaten within the day of baking. Should you happen to have any leftovers, store the baked rolls in an airtight container at room temperature for 1-2 days.

Storing and Freezing
It's no secret that gluten-free bread tends to get stale very quickly. To prolong the shelf life I recommend storing the fully cooled gluten-free artisan bread rolls in an airtight container or ziplock bag at room temperature. The buns will lose their crunchy crust the longer they sit in a container or ziplock bag and become chewy. (especially if it's a humid day!). To reheat/re-crisp the rolls place them on a sheet tray, cover them with foil and bake at 350F for 10-15 minutes.
To freeze the rolls, place them into a ziplock bag and try to squeeze out as much air as possible. Freeze up to 6 weeks. Allow the rolls to thaw in the fridge or on the counter. Once thawed, I recommend crisping them in the oven at 350F for 10-15 minutes (make sure to cover them with foil before breaking)
Serving Ideas
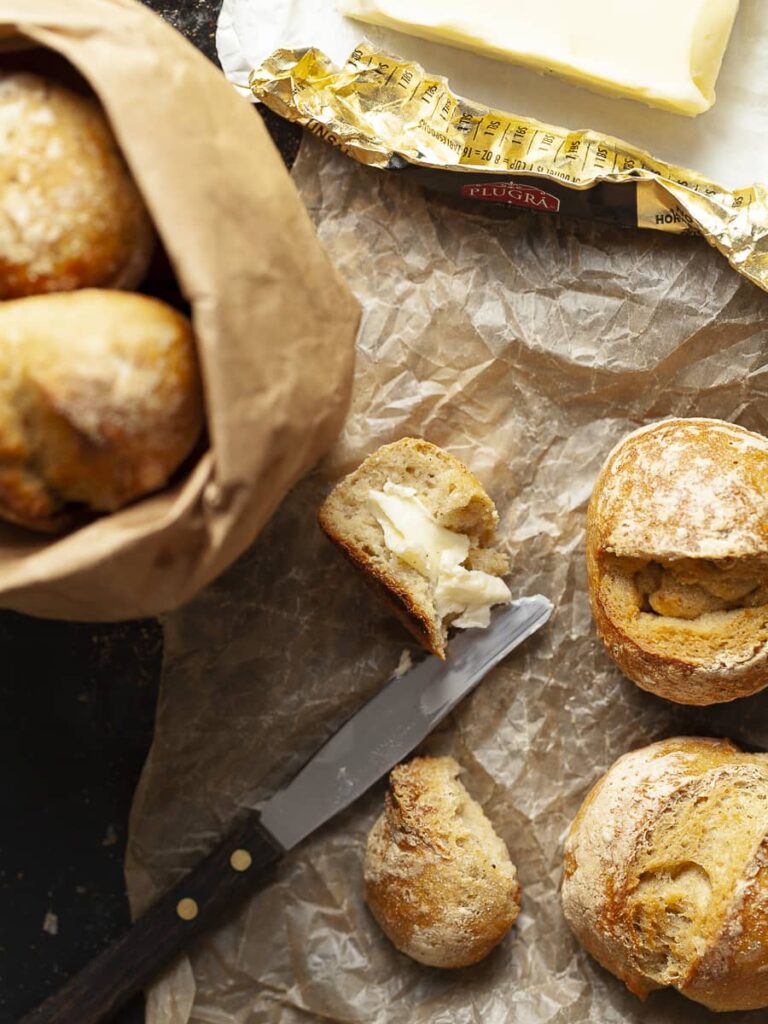
Enjoy these dinner rolls like every other bread out there. If you ask me, these gluten-free dinner rolls are the best still warm from the hot oven with a generous amount of butter and jam.
- They are fabulous for dipping in good olive oil along with a nice spread of cheese and cold cuts.
- Use them to make Panzanella Salad (Tuscan chopped salad of soaked stale bread, onions and tomatoes) or homemade croutons.
- I love serving these rolls with a hearty bowl of soup such as this Gluten-Free Broccoli Cheddar Soup or this Homemade Gluten-Free Tomato Soup.
Variations of Gluten Free Artisan Bread Rolls
Here are a few variations of gluten-free artisan bread rolls you can try, each adding a unique twist to the classic recipe:
Jalapeño Cheddar Gluten-Free Artisan Rolls: Add 60 grams of shredded cheddar and 30-50 grams pickled jalapeños (depending how spicy you like it) to the gluten free bread dough along with 3 grams garlic powder and a generous pinch of cayenne (optional)
Sunflower Seeds Artisan Bread Rolls: Soak 50 grams of raw, unsalted sunflower seeds in 50 grams of hot water while preparing the gluten free bread dough. Once the dough is prepared, drain the sunflower seeds and add them to the dough. Sprinkle the rolls with some additional sunflower seeds before baking.
FAQ about Gluten Free Artisan Dinner Rolls
Yes! This recipe can be made with gluten free sourdough discard. Replace up to 50 grams of the brown rice flour and 50 grams of water with a total of 100 grams of sourdough discard. This will NOT replace the commercial yeast used in the recipe but give the bread a delicious flavor.
Gluten-Free Flour blends such as Bob’s Red Mill or King Arthur Measure for Measure are NOT designed to be used for recipes containing yeast. I highly recommend using the recommended gluten-free flours to make these gluten-free artisan dinner rolls.
Yes! While I have not tried this, you can sprinkle the rolls after brushing them with the corn starch glaze with your favorite toppings such as chia seeds, pumpkin seeds, flaky sea salt, flax seed, Everything but the Bagel Seasoning, and poppy seeds....
This can happen very easily, especially if your oven is running hot or you use a very thin sheet pan. If the rolls are too close to the heat source (which comes from the bottom at most American ovens), the bottoms will burn quickly. To avoid this you can use two sheet pans (especially if your sheet pans are very thin) or move the bread rolls from the middle rack to a higher rack. You know your oven the best (and we all know every oven has its own mind of its own
Note about Salt in my Recipes
I use Diamond Kosher Crystal Salt in all of my recipes unless otherwise stated. If use use a different brand or kind of salt in your kitchen please adjust accordingly since some salts can be saltier. If you use Morton’s Kosher Salt please be aware that their salt granules are smaller in size, denser, and crunchier and twice as salty.
Baking in grams
I share my recipes in grams and by weight since baking by weight is the most accurate way to bake. Digital Scales are very affordable and easy to use. You can purchase them on Amazon for less than a set of measuring cups. For small amounts under 10 grams, I like to use this Precision Pocket Scale. Measuring cups are very inaccurate which can cause significant errors when it comes to gluten-free baking or baking in general. Especially since I bake with gluten-free flours which weigh differently than “regular” flours. I do provide some ingredients like spices and leavening agents in measuring spoons. To learn more about Baking with a digital scale, make sure to check out my post about Baking by weight.
Note about Ovens and Oven Temperatures
All my recipes are tested and developed with a conventional oven. I always bake my baked goods on the rack placed in the MIDDLE of my oven. This way the heat coming from the bottom will not burn my baked goods.
If you are baking with convection (fan-forced), please adjust the recipes accordingly. Convection oven can cause baked goods to dry out quickly and still be raw inside. Since takes at least 15-20 minutes for a standard American Oven to be fully preheated. I highly recommend investing in an Oven Thermometer.
Substitutions and Modifications
Any dietary or ingredient modifications/substitutions to this recipe may alter the end result in appearance and taste. I test my recipes several times as published in this post and The Gluten Free Austrian Blog is not responsible for the outcome of any recipe you find on our website.
More Gluten Free Bread Recipes to try


📖 Recipe
Gluten Free Artisan Bread Rolls
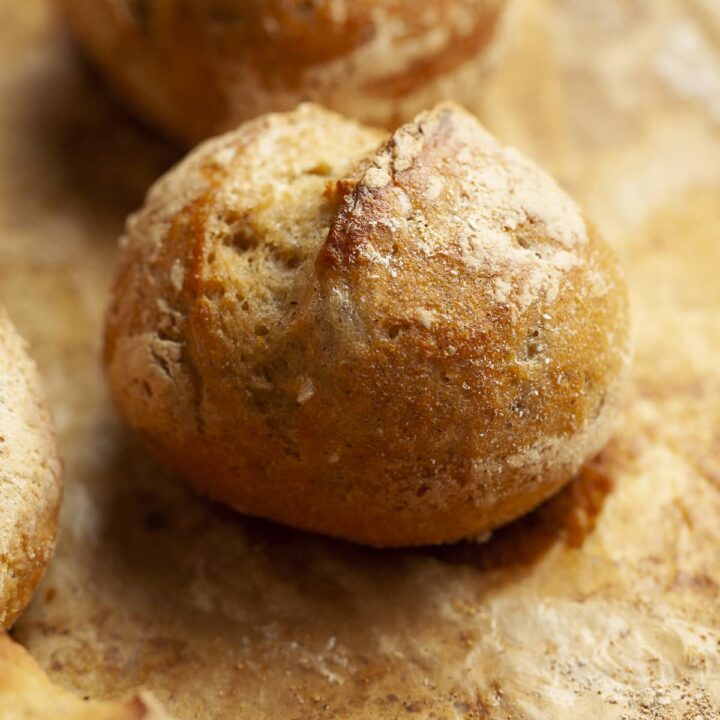
These gluten free artisan bread rolls will be the star of your next dinner party. With a cackly/crunchy crust they remind me of the rolls and Broetchen you can find in bakeries all over Europe.
Ingredients
To activate the yeast
- 225 grams water
- 4 grams active dry yeast
- pinch of granulated white sugar
Gluten Free Artisan Bread Rolls
- 100 grams super fine brown rice flour
- 100 grams tapioca starch (plus extra for shaping)
- 35 grams sorghum flour
- 35 grams fine yellow cornmeal (plus extra for sheet pan)
- 15 grams light brown sugar
- 4 grams xanthan gum (1 teaspoon)
- 4 grams kosher salt (1 teaspoon)
- 8 grams whole psyllium husk
- 50 grams yogurt
- 10 grams vinegar (white vinegar or apple cider)
Corn Starch Glaze
- 50 grams water
- 5 grams corn starch
Instructions
How to make Gluten Free Artisan Bread Roll Dough
- Warm 225 grams of water in a small bowl to 110-114F.
- Add the active dry yeast and a pinch of sugar and allow to sit for 10 minutes. Your yeast is ready to use when it looks bubbly and frothy.
- In the bowl of your stand mixer combine brown rice flour, sorghum flour, tapioca starch, yellow cornmeal, brown sugar, kosher salt, psyllium husk, and xanthan gum along with the yogurt and vinegar.
- When the yeast mixture is ready, add it to the dry ingredients. Mix the mixture at a low speed to combine. Once the dough starts to come together, increase the speed of your mixer to medium-high and mix for 3-4 minutes. The dough will look soft.
- Remove the bowl from the stand mixer and cover with a clean towel. Allow the dough to sit at room temperature for 30 minutes. During those 30 minutes, the flours and psyllium husk will hydrate.
Shaping and rising of rolls
- Line a baking tray with parchment paper and lightly spray with a nonstick cooking spray. Set aside.
- Using a kitchen scale, divide the dough into 6 equal pieces by weight.
- On a lightly floured kitchen counter (I use tapioca starch for this), shape the pieces of gluten free bread dough into smooth dinner rolls. If your dough is sticky, you can lightly grease your hands or sprinkle a tiny bit of flour, but avoid using too much as it can affect the dough's texture.
- Arrange the gluten free artisan bread rolls on the sheet tray. Make sure to leave some room between them so they can rise properly.
- Once all the gluten-free artisan rolls have been shaped, cover them with a clean tea towel or sprayed plastic wrap. Let the dough rise in a warm place until 50% bigger than its original size. At this point, you can also refrigerate them for up to 8 hours and allow them to rise slowly in the fridge.
Baking the Gluten Free Artisan Dinner Rolls
- Once the gluten free artisan bread rolls are puffy looking and 35-40% bigger than their original size preheat the oven to 475F. It will take at least 30 minutes for the oven to be fully preheated. Arrange one oven rack in the middle of the oven and the second one the closest to the bottom of the oven (this is for the steam bath)
- When the oven is fully preheated, bring water to boil in an oven safe pot or pan. I like to use a cast iron pan for this.
- While waiting for the water to come to a boil, quickly prepare the cornstarch glaze. Mix the water and cornstarch in microwave-safe container and heat for 15-20 seconds on HIGH or until thick. Whisk it well. Be careful - this mixture can be very hot and easily overboil.
- Remove the glaze from the microwave and give it a good stir to ensure the cornstarch is fully combined with the water. The mixer will be thick and look similar to glue.
- Brush each bun with the cornstarch glaze using a pastry brush.
- Score each artisan bread roll with a razor blade or a serrated knife somewhere between ¼" and ½" deep.
- Once the water is at a boil, CAREFULLY transfer the pot/pan with the boiling water to the oven placing it on the bottom rack.
- Place the bread buns on the middle rack and bake at 475F for 10 minutes.
- After 10 minutes CAREFULLY remove the pan holding the water and reduce the oven temperature to 450F.
- Finish baking the gluten free artisan bread rolls at 450F for about 17 - 20 minutes until golden brown and they have an internal temperature of at least 205F. Baking Times depend on the size of the artisan rolls and your oven!
- Remove the gluten free dinner rolls from the oven and allow them to cool on the baking pan for a few minutes before transferring them to a wire rack to cool completely.
- These gluten-free rolls are best enjoyed the day they have been baked. Should you happen to have any leftovers, store the baked rolls in an airtight container at room temperature for 1-2 days.
Notes
Note about rising during warm summer month: Issues with bread dough rising too quickly during warm summer months is very common. I recommend placing the shaped buns in the fridge for 2-3hrs which will allow them to rise slowly. When ready to bake, allow for them to sit at room temperature for 30 minutes while preheating the oven and making the cornstarch glaze.
Cornstarch Glaze: Alternatively the buns can be brushed with oil or an egg yolk/water mixture before baking. I can not guarantee this will achieve the same shiny, crusty bread like the cornstarch glaze.
Recommended Products
As an Amazon Associate and member of other affiliate programs, I earn from qualifying purchases.

Nutrition Information:
Yield:
6Serving Size:
1Amount Per Serving: Calories: 188
Calories are a guestimate.


Elsa says
Hi, I'm highly allergic to psyllium, what substitution can I use?
Daniela says
hello, you could use twice the amount (6 grams) of flaxseed meal.
Titch says
Hi. I live in Australia & can’t seem to find cornmeal. I know it’s not cornflour as the texture would be different? What is the alternative? Thank you.
Daniela says
Hm. It may be called polenta in Australia? It’s fine ground cornmeal.
Peter says
This reminded me of bread rolls we enjoyed on our last trip to Germany. They freeze wonderfully too!
Sophia says
My mom can't eat gluten so I made these for her for Mother's Day and she loved them!! My gluten eating husband and kids had some too and really liked them!
mikayla says
Bread is an every meal favorite here, these came out so good. A crisp outside with a soft fluffy inside. I loved the texture the little bit of cornmeal added with a dint of sweetness I attribute to the brown suger
Dawn Zic says
My son is not able to have rice or tapioca. Is there another flour that can be substituted?
Daniela says
Hello, please make sure to read the Ingredient substitution notes where I answer questions like this one 🙂
Vasuddha says
Hello!
I couldn't find the ingredient substitutuon note.
Please help.
Looking to find substitutuon for corn meal.
Enriqueta E Lemoine says
Thank you so much for sharing all this knowledge. I'm saving and pinning this. I'm going to buy all the ingredients to make it because I'm not entirely gluten-free because I love bread so much.
veenaazmanov says
Never tried Baking Bread at home. Your recipe looks so easy and I cant wait to try this out. Thanks
Colleen says
I am so excited to get the ingredients to make these bread rolls! I miss being able to eat rolls and other breads and have never found a recipe that I liked. But these look amazing!
Loreto and Nicoletta says
I have never seen gluten free bun that look this good. Love the color and crust. You have me totally curious. And we need to try these. We have quite a few friends that are gluten intolerant. This would come in very handy! Great types and knowledge. Interesting notes on the psyllium husks. Yhanjs for sharing!😋🥰❤👍👌
Annie says
These are like your favorite crusty bread but in miniature form and gluten-free! We loved having them to dip in our homemade soup.
Uma says
These gluten-free artisan bread rolls are cackly and super delicious. I love the baking part with brown rice flour. Thanks for the recipe.
Hayley Dhanecha says
The BEST gluten-free bread rolls I have ever seen! One of my friend following a GF diet, sharing this link with her, I am sure she will be so HAPPY 🙂
Gisela says
Hi! I recently found you through instagram and I LOVE your recipes. I want to attempt to recreate these bread rolls because they look amazing and I have been in a pursuit for a nice gluten free artisan bread for years now. I was wondering if the Brown rice flour could be substituted by teff/ buckwheat/ white rice+hemp protein/ millet flour? Unfortunately I cannot have nor Brown rice flour (because of the rice bran), nor the cassava flour substitute you suggest; I saw that teff and millet flour have a slighty higher amount of protein than the brown rice one; since I also cannot have dairy (so no casein 🙁 ) I thought that maybe that extra protein can make up for the yogurt missing? Do you have any experience making bread with these flours? If you do I would love to hear it!
Thanks in advance!
Daniela says
Hello, as for the yogurt I recommend using a dairy-free yogurt (which is widely available). It can not be substituted with different flour since it is a wet component of this recipe. I have not tested any of my recipes with teff flour or millet flour. Clearly, this is something you can try but with any substitutions, I do not guarantee for the recipe to work.
Pascale Poitras says
Good morning,
I was going to make these these rolls tomorrow for Father’s Day but am unsure about a few ingredients…
Psyllium husk- where do I find
Super fine brown rice flour- if not available as super fine should I process in food processor?
Corn meal- same question as above
I’d order from Amazon but I’m in a small town in Idaho and deliveries are slow!
Thanks!
Daniela says
Hello, psyllium husk can be found at health stores or online: Whole Psyllium Husk. As for Super fine brown rice flour, you may blend it in the food processor. This is the cornmeal I use - this can be found in most grocery stores: FINE Corn Meal
Catherine Gorey says
Is it possible to make the artisan bread rolls and refrigerate overnight before baking?
Daniela says
Hello, as mentioned in the blog post the artesian bread rolls can be refrigerated for up to 8 hours.
Kate says
I've been really enjoying this recipe! The crunch of the crust is incredible.
I've been having an issue with the rolls not rising in the oven. I've made it three times, and each time they basically don't expand at all once in the oven. My best guess is that I've been over-proofing them. I pre-heat my oven to ~100 F, turn it off, leave it open, and put them in there between 30 mins to an hour. Do you have any thoughts on what might be going wrong?
Daniela says
Hi, do you make any changes to the recipe or do you follow it as written?
Katie says
Hi! I've been following it as written.
Daniela says
I wonder if you overproof them. Or add too much psyllium husk (I use this one: Organic India Psyllium Herbal Powder - Whole Husk Fiber. When adding too much psyllium, the dough will not expand when baking. Also - do you score each bun before baking with a sharp knife or razor blade?
Dena Logan says
I have always reheated crispy breads by dousing them with water and placing in a 375° oven for 5 to 10 minutes. Will this method work with these rolls also?
Daniela says
Dena, I have not tried this but I thought about it while I ate my last roll. If you give it a try, please share your experience. I am curious!
Lois says
I made these. They turned out really well on the first try. Nice crispy crust, toothsome interior, subtly sweet. The cornstarch wash trick worked to impart a brown and crispy crust, although next time I'll start out with less cornstarch in the glaze. I had to thin it considerably to allow it to brush on easily. Crusty, chewy artisan breads are one of the things I miss the most about no longer eating wheat. Great recipe! Thanks!
Mary N says
Hi your recipe looks really good. I have had nothing but failure making gluten free breads but not willing to give up. If you don’t have sourdough starter do you think yeast would work?
Daniela says
Hi, the bread recipe will work wonderfully as written. The sourdough starter is optional.
Cassie Lombardi says
Just made these. I was happy for a first time effort. Definitely not as pretty as yours but nice and crunchy crust and beautifully soft on the inside. This was the first thing I’ve used your sourdough starter on and I can’t wait to try again.
Peter Staa. says
This is my favourite gluten-free bread recipe to-date. I love the look and the taste of the buns. Thanks for a great recipe.
Two questions:
1. I find the texture inside the bun quite dense and compact. Not a fluffy or airy bun. Is that the way it should be, or am I doing something wrong? [I'm using dry active yeast only, not adding the optional sour dough].
2. How long should the rise time be after the buns are shaped? I have a cool kitchen in winter [21 or 22 degrees C] and I do the rise at room temp., not in the fridge.
Thanks for any info you can provide on this.
Peter.
Daniela says
hello, are you making adjustments to the flours you use? Do you use whole psyllium husk as written in the recipe? Because I don’t work with psyllium powder and that may cause the dense texture. or too much xanthan gum.
As for rising at room temperature, it’s very hard to give up an exact number.
Peter says
Thanks, Daniela, Yes, I'm using whole psyllium husks. I'll play a bit more with other batches and see what I come up with. Meanwhile, thanks again.
Daniela says
Sounds good! I will make some soon and let you know if I have an answer for your questions 🙂
Susan says
Can this recipe be shaped into baguettes instead of rolls?
Thank you.
Daniela says
You could probably give it a try 🙂 I don't see why not
Dan L says
I made these recently and oh my, they were amazing. I have never had a gluten free piece of bread with an outer crust like this. My wife and daughter have celiac disease and they absolutely loved these rolls! I look forward to making them again soon. Thanks so much!
Catherine says
I’m looking forward to making these beautiful rolls! After brushing dough with olive oil, do you fold the dough so the oiled side is inside?
Daniela says
Yes! You can see the detailed step by step instructions in the blog post above the recipe card 🙂
KP says
Hello! Can I use corn flour instead of corn meal? In my country that seems to be the only option finer than “medium grain corn meal”. Thanks!
Daniela says
As long as it’s not cornstarch (the white powdery stuff), you should be fine. I am certain cornmeal has a different name in every country