
This Gluten Free Pumpkin Roll is everything I love about fall desserts. A soft pumpkin sponge cake, a light cream cheese filling, and that classic spiral that always looks so pretty. It’s much easier to make than it looks, and I included plenty of tips so you can roll it up confidently and impress everyone at Thanksgiving and throughout the holiday season.

Jump to:
- Recipe Ingredient Notes
- Tools needed to make a Pumpkin Roll
- How to make a Pumpkin Roulade
- Cream Cheese Filling
- How to fill a Gluten Free Pumpkin Roll
- Serving
- Storage & Freezing
- Note about Salt in my Recipes
- Baking in grams
- Note about Ovens and Oven Temperatures
- Substitutions and Modifications
- More Gluten Free Pumpkin Recipes to try
- 📖 Recipe
- 💬 Comments
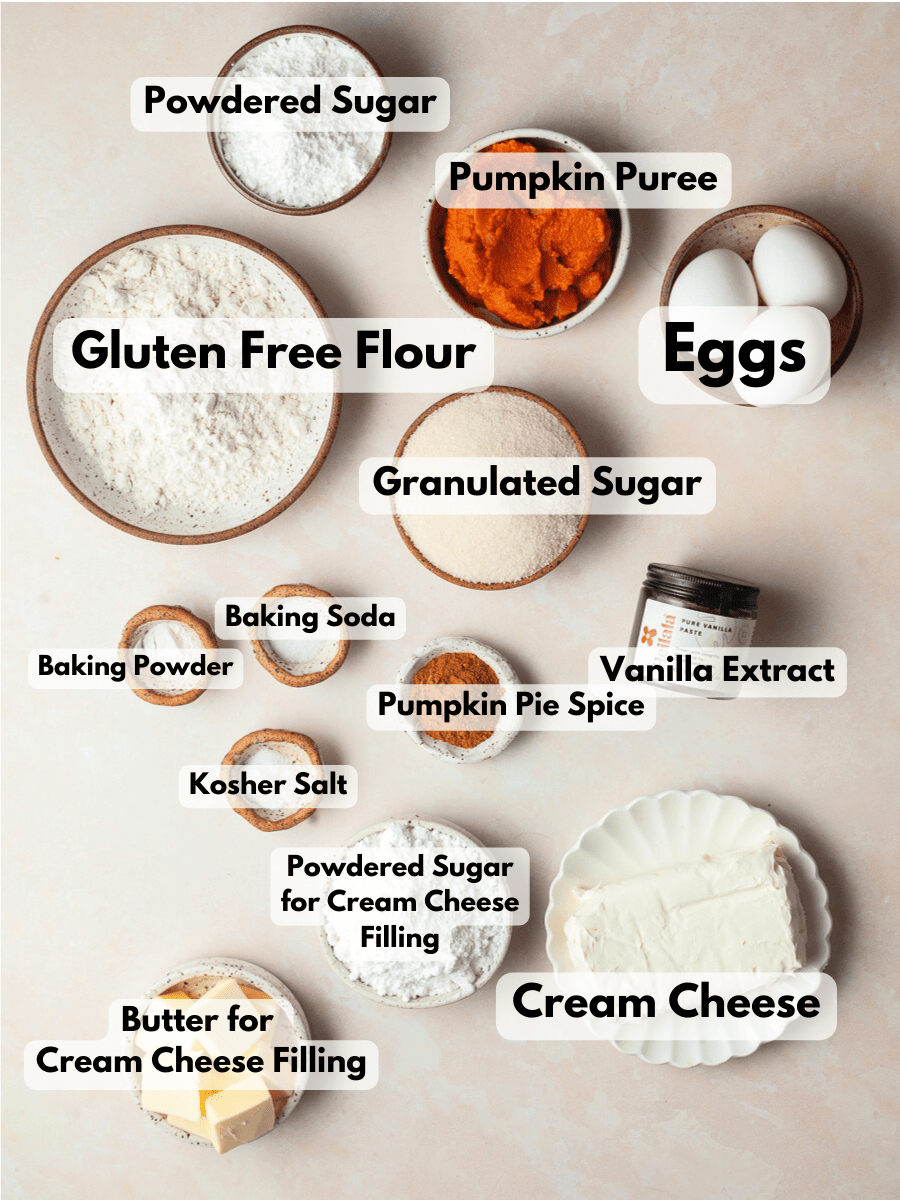
Recipe Ingredient Notes
Gluten Free Flour: I experimented with various gluten-free flour blends, including Cup4Cup, my own gluten free flour blend, and Bob's Red Mill 1-to-1, when preparing the Gluten-Free Pumpkin Roll Recipe. While all three flour blends performed well in creating the gluten-free pumpkin sponge cake, the batters produced with my blend and Bob's 1-to-1 were notably lighter and fluffier compared to the one made with Cup4Cup. Cup 4 Cup Gluten-Free Flour is primarily made from corn starch, which quickly absorbs the liquid in the sponge cake batter, causing this difference. Also, the pumpkin roll made with Cup4Cup had a starchy aftertaste.
Eggs: Eggs are a key ingredient for the gluten free pumpkin sponge cake. Without eggs, a sponge cake would be dense and heavy. As well it would be lacking the characteristic lightness and texture that makes it so appealing. This recipe will not work with egg substitutions.
Pumpkin Puree: Make sure to use 100% canned pumpkin and not pumpkin pie filling. They often sit next to each other on shelves at the grocery store and have very similar labels. As much as I love making everything from scratch, canned pumpkin puree is very convenient. Should your canned pumpkin contain much moisture, make sure to blot it with paper towels before measuring and adding to the recipe. Personally, I am a big fan of the canned pumpkin sold at Aldi.
Pumpkin Pie Spice: Pumpkin Pie Spice is a blend of cinnamon, ginger, nutmeg, allspice and cloves. If you do not have it in your pantry, you can substitute it with my easy homemade pumpkin spice blend. Pumpkin Spice brings out the flavor of pumpkin in the cake roll.
Cream Cheese: For the cream cheese frosting, I use a full-fat block/brick of cream cheese. If you are dairy free, feel free to use dairy-free cream cheese like Kite Hill instead.
Tools needed to make a Pumpkin Roll
To successfully make this pumpkin cake roll recipe, you will need a few kitchen tools. Most of them are available on Amazon, which I have linked.
Jelly Roll Pan: a jelly roll pan is typically required to make a Cake Roll. The pan is about 10x15 inches with shallow sides, around 1 inch in height. If you don't have a jelly roll pan, you could try using a similar-sized baking sheet. I have had good luck finding very affordable Swiss roll pans at discount stores such as TJ Maxx.
A clean kitchen towel: The gluten free cake is rolled up in the towel while it is still warm. Allow it to cool in the rolled shape. While some recipes call for parchment paper, I think a kitchen towel is more flexible and there will be fewer cracks in the cake. I use flour sack dish towels, which are lightweight and have a smooth texture.
You will also need a mixer (electric hand mixer or stand mixer), two large mixing bowls, a whisk, a flexible rubber spatula, an offset knife, and a sifter.

How to make a Pumpkin Roulade
You can either use a stand mixer fitted with the balloon (whisk) attachment or a hand mixer to make the gluten free pumpkin roll batter.
- Preheat the oven to 350°F. Spray the jelly roll pan with cooking spray and line it with parchment paper. Lightly spray the parchment paper with some nonstick spray. Just a light coating. This will help with the baked pumpkin cake not sticking to the parchment paper. Set aside.
- In a small bowl, combine the gluten free multi purpose flour, baking powder, baking soda, pumpkin spice and kosher salt. Whisk or sift together and set aside.
- In a large mixing bowl, combine the granulated sugar, vanilla extract and room temperature large eggs. Whisk them at a medium high speed for 3-4 minutes until they look thick and have tripled in volume. The air whisked into the eggs ensures a light and fluffy pumpkin cake roll.
- Carefully whisk the pumpkin puree into the egg mixture, making sure not to deflate the eggs.
- Fold the sifted dry ingredients gently into the wet ingredients. Try not to overmix the batter, which can cause a dense pumpkin sponge cake. The batter will be thin.
- Pour the gluten free pumpkin cake batter into the prepared pan. With a small offset spatula, carefully spread it out evenly. Carefully transfer the pan to the preheated oven.

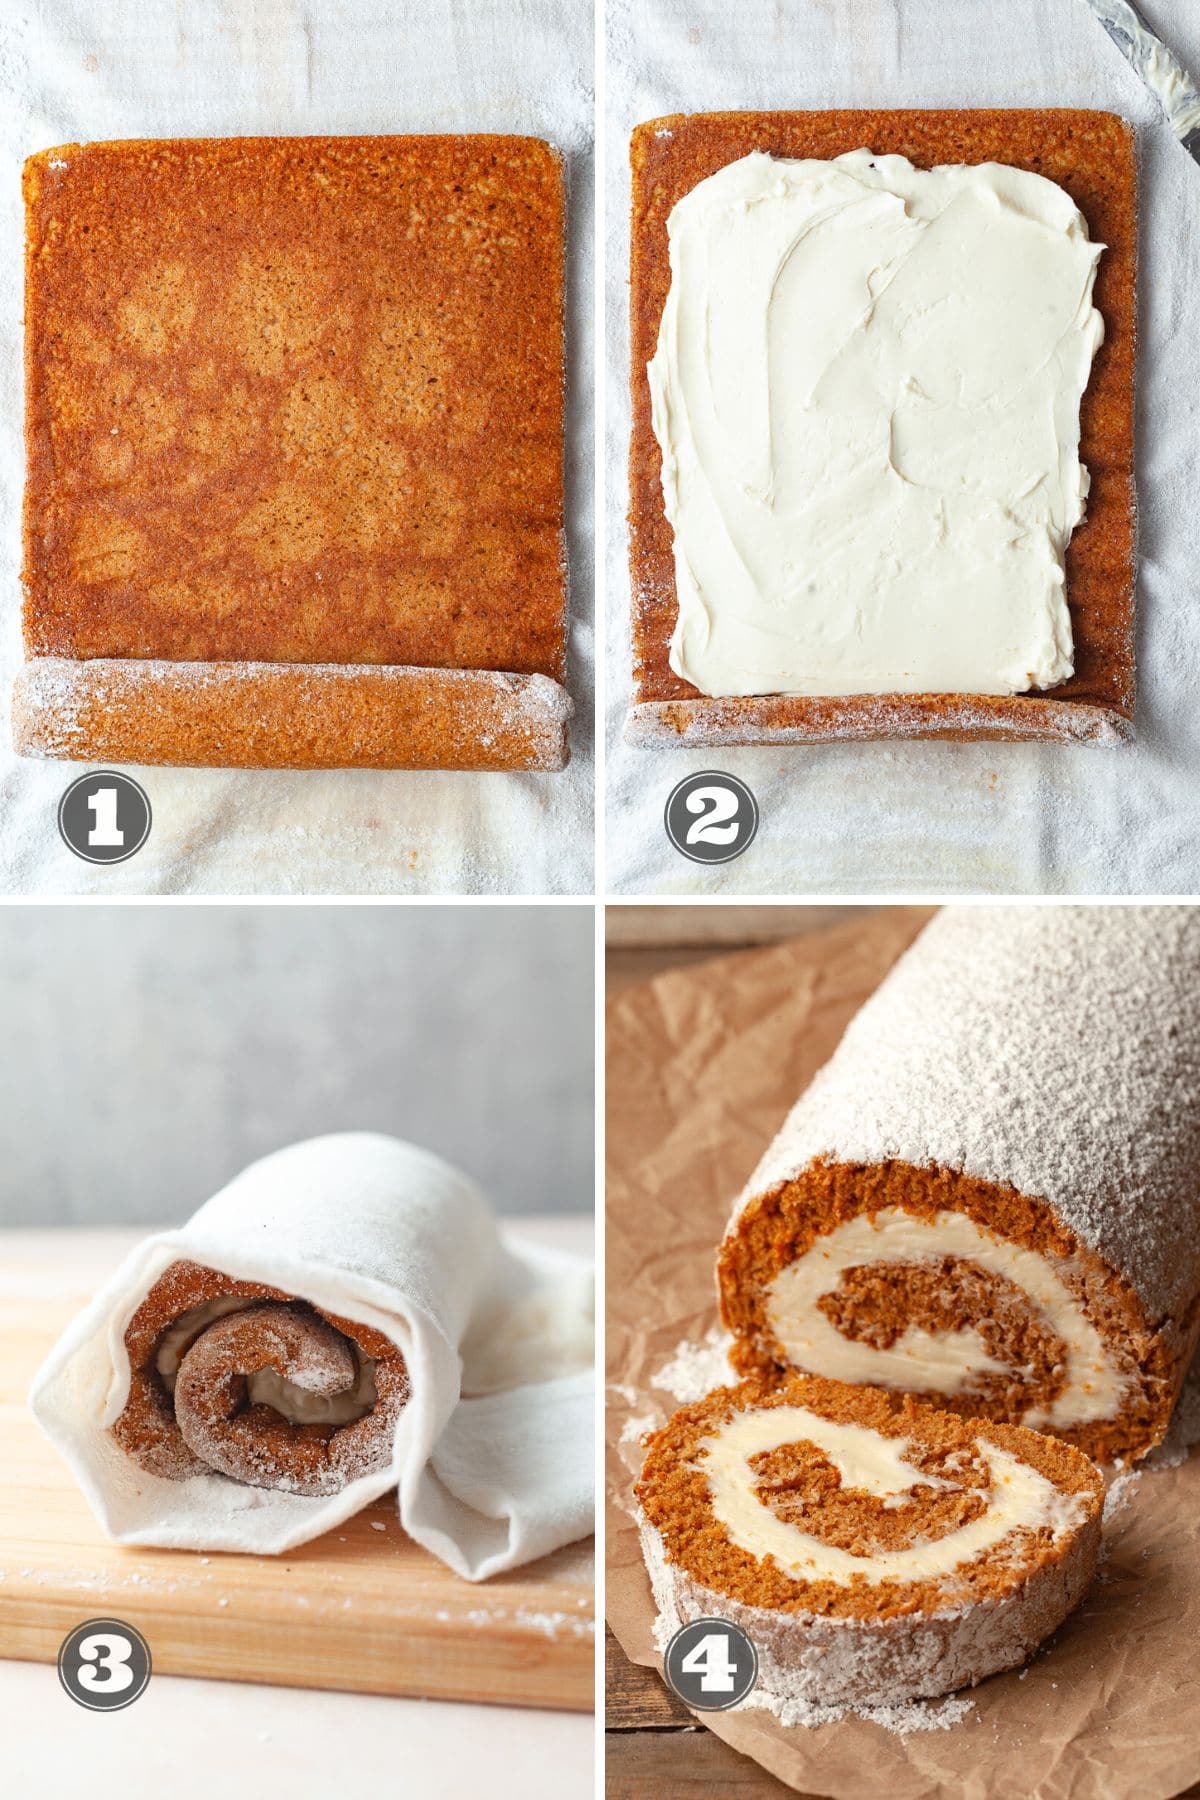
- While the cake for the pumpkin roll is baking, prepare a clean kitchen towel that will be used to roll up the still-hot cake roll. Lay the kitchen towel on top of a large cutting board, large baking sheet or table and generously dust it with some powdered sugar.
- Bake the sponge cake for 14-15 minutes until is golden brown and springs back when gently pressed in the center. Or if a toothpick inserted into the middle of the cake comes out clean. Remove the cake from the oven and allow it to cool for 1 minute on a cooling rack. Use a dinner knife and run it around the edges of the cake to loosen it from the pan.
- Quickly (but carefully) flip the cake out of the pan on top of the sugared kitchen towel. Gently peel off the parchment from the bottom of the cake. If you sprayed the parchment paper with the non stick spray, it should come right off the cake.
- Once the parchment paper is removed, it's time to roll up the cake. Roll the warm cake gently from one short edge to the other, using the kitchen towel. Avoid rolling it too tightly, but don't make it too loose either. Rolling it too tightly will cause it to break, while rolling it too loosely will result in an unattractive roll. Let the cake cool completely on a cooling rack, ensuring that the final seam is facing downwards.

Cream Cheese Filling
Make sure the unsalted butter and the cream cheese are at room temperature. Especially the cream cheese, or you will end up with lumps of cream cheese in the cake filling.
- In the bowl of the stand mixer or a medium bowl, combine the unsalted butter, powdered sugar and a pinch of kosher salt. Mix for 2 minutes until light and fluffy. Make sure to start the mixer at a low speed or there will be powdered sugar coating your kitchen counter.
- Add the room-temperature cream cheese and vanilla extract and beat until you have a smooth, creamy thick cream cheese frosting. Remember to use a flexible spatula to scrape the sides of the bowl, ensuring that no pockets of sugar or butter remain on the bottom of the bowl.
How to fill a Gluten Free Pumpkin Roll
- Start by gently and carefully unrolling the FULLY cooled gluten free jelly roll cake. You can do this on a cutting board, a sheet tray or a clean kitchen countertop.
- Top the cake with the cream cheese filling and spread it evenly over the surface of the cake. Make sure to leave a small margin around the edges to avoid the creamy filling spilling out when rolled. I like to leave a ½ inch border around the long sides and a 1-inch border on the short end. Trust me, the filling will spread when you roll up your gluten-free pumpkin roll.
- Roll the pumpkin cake up gently and slowly, without the use of the towel this time. Ensure that the cake is rolled tightly to maintain an even spiral shape, but be careful not to press too hard and push out too much of the filling.
- Wrap the cake in the kitchen towel or plastic wrap and place the Gluten Free Pumpkin Roll on a sheet tray seam-side down.
- Allow the cake roll to chill in the fridge for about an hour to allow it to fully set up. This way the Gluten Free Pumpkin Roll will be easier to slice. Hold off dusting it with powdered sugar until you are ready to serve it, though.
Serving
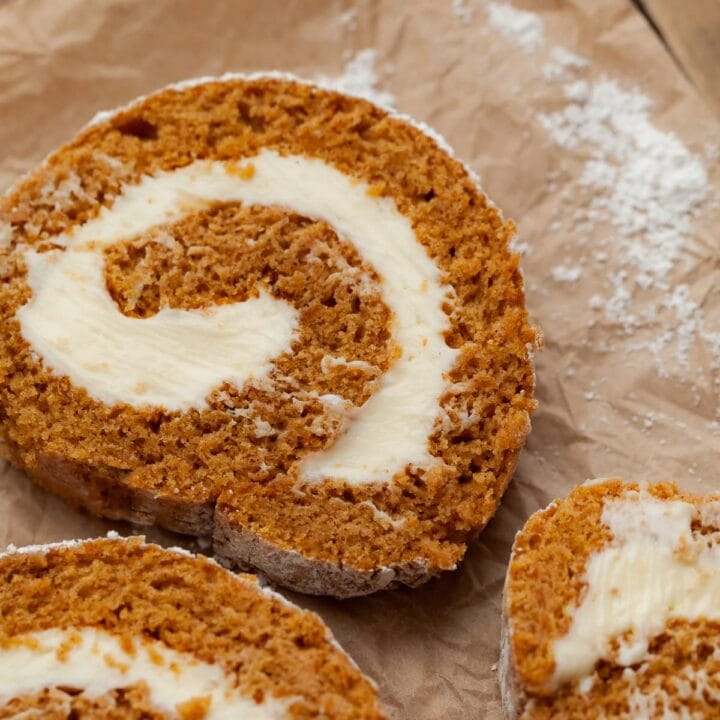
Once the pumpkin cake roll has set in the refrigerator for at least 30 minutes, remove it from the baking sheet and place it on a serving platter or cake stand. It should be sturdy enough to transfer it without any issues.
Dust the top of the jelly roll with powdered sugar right before slicing. Some people like to top the cake with additional whipped cream, so if you like, you can do that.
Use a sharp knife to slice the Gluten Free Pumpkin Cake Roll into rounds. To get clean and neat slices, wipe the knife clean between each cut. Arrange the slices on individual plates and serve this perfect cake immediately to your guests.
Storage & Freezing
Store any leftovers of the Pumpkin Swiss Roll in an airtight container in the fridge for up to 3 days. This cake is the best the day it was baked but does store well for a few days. If you dusted the roll with powdered sugar, please be aware that the sugar may melt in the fridge and cause it to become damp. The cake will still taste amazing but may be a bit sticky.
If you plan on making this cake ahead of time, make sure to wait until you are ready to serve it when it comes to the powdered sugar.
One can freeze a Pumpkin cake rolls for up to 2-3 months. Once the cake is filled, tightly wrap the entire pumpkin cake roll in several layers of plastic wrap. This helps prevent freezer burn and keeps the cake roll fresh during freezing. Place the wrapped pumpkin cake roll in a freezer-safe container or a large freezer bag. Make sure to remove as much air as possible from the bag before sealing it. To thaw the frozen pumpkin cake roll, transfer it to the refrigerator and let it thaw slowly overnight. This gradual thawing process helps maintain the texture and prevents condensation from forming on the cake. Once the pumpkin cake roll has thawed, you can slice it and serve it as you would normally.
You can also freeze the individual slices of pumpkin cake roll. I like to place them on a lightly greased piece of parchment paper and place them in an airtight container. Thaw them in the fridge.

Note about Salt in my Recipes
I use Diamond Kosher Crystal Salt in all of my recipes unless otherwise stated. If use use a different brand or kind of salt in your kitchen please adjust accordingly since some salts can be saltier. If you use Morton’s Kosher Salt please be aware that their salt granules are smaller in size, denser, and crunchier and twice as salty.
Baking in grams
I share my recipes in grams and by weight since baking by weight is the most accurate way to bake. Digital Scales are very affordable and easy to use. You can purchase them on Amazon for less than a set of measuring cups. For small amounts under 10 grams, I like to use this Precision Pocket Scale. Measuring cups are very inaccurate which can cause significant errors when it comes to gluten-free baking or baking in general. Especially since I bake with gluten-free flours which weigh differently than “regular” flours. I do provide some ingredients like spices and leavening agents in measuring spoons. To learn more about Baking with a digital scale, make sure to check out my post about Baking by weight.
Note about Ovens and Oven Temperatures
All my recipes are tested and developed with a conventional oven. I always bake my baked goods on the rack placed in the MIDDLE of my oven. This way the heat coming from the bottom will not burn my baked goods.
If you are baking with convection (fan-forced), please adjust the recipes accordingly. Convection oven can cause baked goods to dry out quickly and still be raw inside. Since takes at least 15-20 minutes for a standard American Oven to be fully preheated. I highly recommend investing in an Oven Thermometer.
Substitutions and Modifications
Any dietary or ingredient modifications/substitutions to this recipe may alter the end result in appearance and taste. I test my recipes several times as published in this post and The Gluten Free Austrian Blog is not responsible for the outcome of any recipe you find on our website.

More Gluten Free Pumpkin Recipes to try


📖 Recipe
Gluten Free Pumpkin Roll
Gluten Free Pumpkin Roll - a timeless and elegant autumn dessert that never fails to make a lasting impression. This delicious fall dessert starts with a pumpkin sponge cake, filled with a whipped cream cheese frosting rolled it into its signature spiral shape. Definitely an eye-catching dessert!
Ingredients
Gluten Free Pumpkin Cake Roll
- AS NEEDED powdered sugar for dusting the kitchen towel
- 105 grams gluten free multipurpose flour
- ½ teaspoon baking powder
- ½ teaspoon baking soda
- ½ teaspoon kosher salt
- 2 teaspoons pumpkin pie spice
- 180 grams granulated sugar
- 3 large eggs, at room temperature
- 1 teaspoon vanilla extract
- 160 grams pumpkin puree
Cream Cheese Filling
- 90 grams unsalted butter, room temperature
- 225 grams cream cheese, room temperature
- 90 grams powdered sugar
- ½ teaspoon vanilla
- pinch of kosher salt
- AS NEEDED powdered sugar for serving
Instructions
How to bake a Gluten Free Pumpkin Roll
- Preheat the oven to 350F. Spray the jelly roll pan with cooking spray and line it with parchment paper. Lightly spray the parchment paper with some nonstick spray. Set aside.
- In a small bowl combine the gluten free flour, baking powder, baking soda, pumpkin spice and kosher salt. Whisk or sift together and set aside.
- Combine the granulated sugar, vanilla extract, and room temperature eggs in a large mixing bowl. Whisk them at a medium high speed for 3-4 minutes until they look thick and have tripled in volume.
- Carefully whisk the pumpkin puree to the egg mixture, ensuring not to deflate the eggs.
- Fold the sifted dry ingredients gently into the wet ingredients. Try not to overmix the batter which can cause a dense pumpkin sponge cake. The batter will be thin.
- Pour the gluten free pumpkin cake batter into the prepared jelly roll cake pan. With a small offset spatula, carefully spread it out evenly. Carefully transfer the pan to the preheated oven.
- While the cake for the pumpkin roll is baking, prepare the clean kitchen towel which is used to roll up the still-hot roulade. Lay the kitchen towel on top of a large cutting board, large baking sheet or table and generously dust it with some powdered sugar.
- Bake the sponge cake for 14-15 minutes until is golden brown and springs back when gently pressed in the center.
- Remove the cake from the oven and allow it to cool for 1 minute on a cooling rack.
- Quickly (but carefully) flip the cake out of the pan on top of the sugared kitchen towel. Gently peel off the parchment from the bottom of the cake.
- Roll the warm cake gently from one short edge to the other, using the kitchen towel. Avoid rolling it too tightly, but don't make it too loose either.
- Let the ROLLED pumpkin cake cool completely, ensuring that the final seam is facing downwards.
Cream Cheese Filing
- In the bowl of the stand mixer or a medium bowl combine the unsalted butter, powdered sugar and a pinch of kosher salt. Mix for 2 minutes until light and fluffy. Make sure to start the mixer at a low speed or there will be powdered sugar coating your kitchen counter.
- Add the room-temperature cream cheese and vanilla extract and beat until you have a smooth, creamy thick cream cheese frosting. Remember to use a flexible spatula to scrape the sides of the bowl, ensuring that no pockets of sugar or butter remain on the bottom of the bowl.
How to fill and roll a Gluten Free Pumpkin Roll
- Start by gently and carefully unrolling the cooled gluten free jelly roll cake.
- Top the cake with the whipped cream cheese filling and spread it evenly over the surface of the cake. Make sure to leave leaving a small margin around the edges to avoid the filling spilling out when rolled. I like to leave a ½ inch border around the long sides and a 1" inch border on the short end.
- Roll the pumpkin roll up gently and slowly, without the use of the towel this time. Ensure that the cake is rolled tightly to maintain an even spiral shape, but be careful not to press too hard and push out too much of the filling.
- Wrap the cake in the kitchen towel or plastic wrap and place the Gluten Free Pumpkin Roll on a sheet tray seam-side down. Allow the cake roll to chill in the fridge for about an hour to allow it to fully set up. This way the Gluten Free Pumpkin Roll will be easier to slice. Hold off dusting it with powdered sugar until you are ready to serve it though.
Serving
- Once the pumpkin cake roll has cooled and set in the refrigerator, remove it from the baking sheet and place it on a serving platter or cake stand.
- Dust the top of the jelly roll with powdered sugar.
- Use a sharp knife to slice the Gluten Free Pumpkin Roll into rounds. To get clean and neat slices, wipe the knife clean between each cut. Serve this perfect cake immediately to your guests.
Notes
Storage: Store any leftovers of the Strawberry Swiss Roll in an airtight container in the fridge for up to 3 days.
Nutrition Information:
Yield:
12Serving Size:
1Amount Per Serving: Calories: 341
Calories are a guestimate and randomly generated.


Maria F. says
Hi Daniela,
Silly question.. When rolling the cake with the floured cloth, is the cloth also rolled with the cake, or just used to nudge the roll and cover it while it sets before filling.
Thanks so much!
Daniela says
Hello, the cloth is rolled with the cake.
Daniela says
The reasoning behind rolling it WITH the towel is very simple: This way the unfilled cake does not stick to each other? If you would roll it while warm without the towel in between, you would end up with a plain pumpkin roll cake