
This Gluten Free Strawberry Rhubarb Tart is the perfect dessert to celebrate the season. With a tender, buttery crust filled with a luscious strawberry rhubarb filling and topped with a delectable oatmeal streusel, it's a delightful treat. Whether enjoyed warm with a scoop of ice cream or as is on a lazy day, a slice of this tart is a tasty celebration of summer fruits.
This gluten free Strawberry Rhubarb Tart starts with my Gluten Free Pâte Sablée filled with a delicious strawberry rhubarb filling and topped with a buttery oatmeal streusel. While this tart recipe uses a few components they all come together in no time and can even be made ahead.

Jump to:
- Recipe Ingredient Notes
- Tools needed to make a Strawberry Rhubarb Tart
- What is Pâte Sablée?
- How to make Gluten Free Pâte Sablée
- How to assemble a Tart Shell
- Oatmeal Streusel Topping
- Strawberry Rhubarb Tart Filling
- How to blind bake a Tartshell
- Assemble and Bake a Gluten Free Strawberry Rhubarb Tart
- Serving
- Storage & Freezing
- FAQ - Gluten Free Strawberry Rhubarb Tart
- Note about Salt in my Recipes
- Baking in grams
- Note about Ovens and Oven Temperatures
- Substitutions and Modifications
- More Gluten Free Strawberry Recipes
- 📖 Recipe
- 💬 Comments
Recipe Ingredient Notes
Gluten Free Flour: I have tested the Gluten Free Pâte Sablée (Sweet Tart Dough) with three popular gluten free flour blends as well as my own blend. King Arthur Measure for Measure works well in the Gluten Free Pâte Sablée as well as Cup4Cup and Bob's Red Mill 1-to-1. Cup4Cup did provide the lightest crumb.
Old Fashioned Oats: I recommend using old-fashioned oats in this recipe for the best results. Quick Oats are too thin and you will lose the texture of the oatmeal crumble topping. If you are celiac or gluten-free, make sure to use gluten-free oats. Oats can be replaced with equal amounts of pecans or walnuts.
Freshly Grated Ginger: Fresh ginger root can be found in the produce department of well-stocked grocery stores. Sometimes the roots seem very big and it's okay to break off just what you need. You will need around 1 inche to make this gluten free strawberry rhubarb tart. Pre-grated ginger is also available in the freezer section and is sometimes available in a tube in the produce aisle (look near the fresh herbs). The fresh ginger pairs very well with the rhubarb and strawberries and gives the filling a little "zing". If you aren't a fan of ginger, a little lemon zest is a nice addition to the strawberry rhubarb filling.
Rhubarb: Look for rhubarb stalks that are brightly colored, whether they're red, pink, or green, depending on the variety. The stalks should be firm and crisp, indicating freshness. Thicker stalks tend to be more mature and might have a stronger flavor and more tart, while thinner stalks are usually more tender and sweeter.
Tools needed to make a Strawberry Rhubarb Tart
There are a few kitchen tools you will need to make a Gluten Free Strawberry Rhubarb Tart successfully. Most of them are available on Amazon which I have linked but I think you most likely already have them in your kitchen.
Tart shells: I use a 9.5" tart pan with a removable bottom. If you like you can also bake this recipe in individual tartlet shells. This strawberry rhubarb tart recipe is for one 9.5" Tart or 6 tartlets.
Rolling pin: To roll out the gluten-free Pâte Sablée (Sweet Tart Dough), I recommend using a rolling pin.
Stand Mixer or Food Processor: Pâte Sablé can be made with a stand mixer or food processor. You can also use an electric hand mixer.

What is Pâte Sablée?
Pâte sablée is a type of French pastry dough known for its rich, tender texture. It's a sweet shortcrust pastry, often used as the base for tarts and desserts. The name "sablée" comes from the French word for "sandy," which describes its delicate, sandy texture. This dough calls for with flour, butter, sugar, and eggs, and includes almond flour for flavor and tenderness. The high butter content gives it a melt-in-the-mouth quality, making it perfect for holding creamy or fruity fillings.
How to make Gluten Free Pâte Sablée
Make sure the butter and the egg are at room temperature. This will ensure a sandy texture in the dough and a tender texture in the baked gluten-free crust.
- In a small mixing bowl whisk together the gluten-free multi purpose flour, almond flour, and kosher salt. Set aside.
- In the bowl of a stand mixer fitted with the paddle attachment combine the room temperature unsalted butter and powdered sugar. Cream together until smooth without overmixing it.
- Scrape down the sides of the bowl and the room-temperature egg. Continue to mix until combined. The mixture may look curdled but will come together once you add the dry ingredients.

- With the mixer running at a low speed, add the dry ingredients. Mix just until there are no more visible spots of flour.
- Transfer the dough to a parchment-lined sheet tray. Gather the dough and press it into a round disk, around 1" tall. Wrap it in plastic wrap and refrigerate for at least 1 hour up to 2 days.

How to assemble a Tart Shell
If the dough is too cold to roll out, allow it to sit at room temperature for 10 minutes.
- Place the gluten free tart dough on a lightly floured sheet of parchment paper.
- Use a rolling pin to gently press down on the dough to start flattening it.
- Roll from the center outward, applying even pressure to avoid uneven thickness. To ensure your dough rolls out even, rotate your parchment paper 90 degrees every few rolls and repeat (this will also prevent the dough from cracking).
- If the dough feels stuck or is sticking to the rolling pin, dust it with some additional gluten-free flour. You can also flip the rolled-out dough over if needed. The easiest way to do this is to top the rolled out dough with an additional piece of parchment paper to make a "sandwich" with the gluten free dough in between and then flip it over. This does make rolling easier and prevents creases in the parchment paper from affecting the dough. Roll out the dough around ⅛-¼ inch thick - around 0.5cm (50 mm).
- Once the tart dough is rolled out in a large circle, at least 2-3" larger than your tart pan, use the rolling pin to transfer the dough. Carefully, make sure not to stretch the dough, roll it up around the rolling pin, and gently lay it over the tart pan.

- Gently press the tart dough into the shell. Use your fingers to gently press the dough into the bottom of the pan and up along the edges. Don’t worry if excess dough hangs over the edges.
- Take a small paring knife or use your fingers and trim off the dough that’s hanging over the edges, It’s okay to leave a little bit of extra dough (like ¼″ or 2-3mm) in case the dough shrinks a little bit while blind baking.
- Allow the prepared tart shell to sit in the fridge for at least 30 minutes before blind baking. You may also refrigerate it for 3 days or freeze it for up to 3 months. Just make sure to wrap it tightly if you plan on making it ahead of time.

Oatmeal Streusel Topping
While the Gluten Free Tart Shell is chilling, it's time to make the Gluten Free Oatmeal Streusel topping for the strawberry rhubarb tart. This can be made ahead of time and stored in the freezer. If you are not okay with oats feel free to substitute them with gluten free flour or nuts such as pecans or walnuts.
- Melt the butter in a small pot on the stove or a microwave safe bowl. Allow to cool for a few minutes.
- In the meantime combine the Gluten Free Flour, gluten-free oats, light brown sugar, ground ginger, and kosher salt in a mixing bowl and whisk together.
- Using a fork or a small spatula, lightly mix the dry ingredients and the melted butter together until crumbles form. Don’t overmix.
- Place the crumble topping in the fridge while you prepare the Strawberry Rhubarb Filling. At this point, you may even freeze the crumb topping for up to 3 months. It makes a great addition to muffins, coffee cakes, and even cheesecakes.

Strawberry Rhubarb Tart Filling
I like to make the Strawberry Rhubarb Filling about 30 minutes in advance so the fruit has time to macerate. If your fruit releases a lot of juices, make sure to drain them. Otherwise, your tart crust will become soggy and unpleasant.
- Wash the rhubarb stalks under cold water and dry them with a paper towel. Remove both ends and any leaves as they are toxic.
- Slice the Rhubarb stalks into rounds around ¼" wide round slices (kinda like cutting celery) and add them to a mixing bowl. If the stalks are particularly thick, you might want to cut them lengthwise first and then into smaller pieces to ensure even cooking.
- To prepare the strawberries, hull them by removing the green tops, wash them under cold water, and pat them dry. Slice them into halves or quarters, depending on their size. Add them to the bowl with the diced rhubarb.
- Add the grated ginger (if using), vanilla extract, cornstarch, granulated sugar, and kosher salt to the prepared fruit. Cornstarch helps to thicken the juices released by the fruits as they cook, preventing a runny pie.
- Mix everything gently but thoroughly, ensuring the fruit is evenly coated with the sugar and cornstarch mixture.
- Allow the fruit filling to sit at room temperature while you blind bake the tart shell.

How to blind bake a Tartshell
Before we can fill our tart shell with the delicious strawberry rhubarb filling, one has to blind-bake it. This step does not fully bake the dough. It just gives it a head start.
- Preheat the oven to 350F and arrange the rack in the middle.
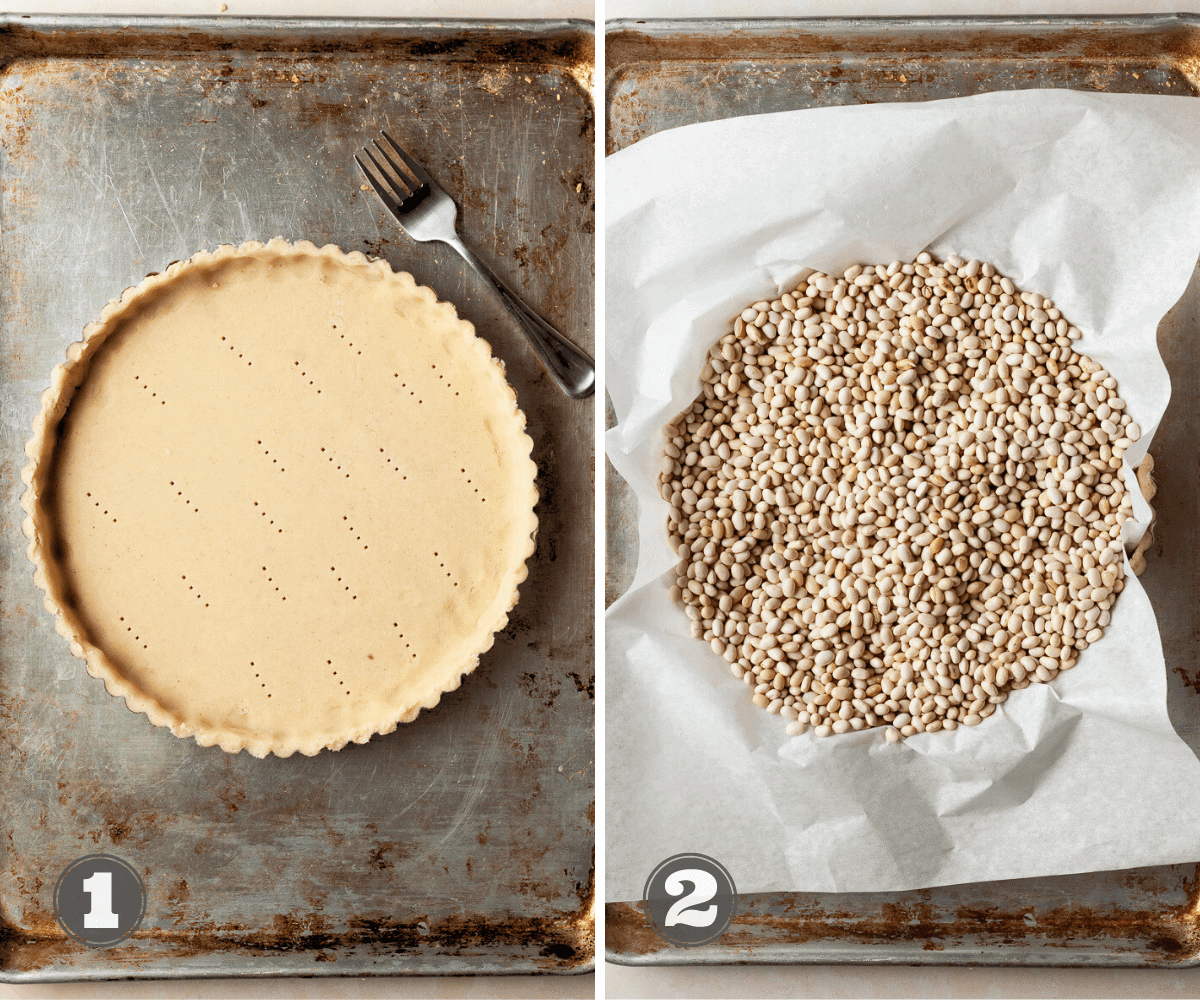
- When your oven is preheated, place the tart crust on a sheet tray. Poke it several times with a fork (this helps to release any air that might be trapped)
- Press a square of parchment paper or aluminum foil tightly against the gluten-free tart crust. Make sure to cover the edges to prevent them from burning. Fill it evenly with dried beans, dried rice or pie weights if you happen to own some.
- Bake for 15 minutes and remove from the oven. Carefully remove the parchment paper and dried beans (just grab the edges and remove them). Do not turn off the oven! Increase the temperature to 375F!
- Allow the gluten free tart shell to cool for 5-10 minutes on a cooling rack before filling it.
Assemble and Bake a Gluten Free Strawberry Rhubarb Tart
- Make sure the oven is preheated to 375F!
- In a small bowl combine the gluten free flour and granulated sugar. Sprinkle this flour sugar mixture on the bottom of the tart shell. This will soak up the fruit juices and help to limit a soggy tart bottom.
- Transfer the strawberry rhubarb tart filling to the tart shell and spread out evenly. If the fruit releases a lot of juices, avoid adding them to the tart.
- Top the fruit with the oatmeal crumble.
- Place the strawberry rhubarb tart in the oven and bake at 375F for 15 minutes. After 15 minutes lower the temperature to 350F and continue baking the tart for an additional 25-30 minutes. The streusel should be golden brown and you may see some juices running from the tartlets. If you like you can test the internal temperature of the fruit with a digital thermometer. It should reach at least 212F.
- Carefully remove the gluten free tart from the oven and allow it to cool in the tart pan for at least 2 hours before removing it from the tart pan and serving.

Serving
To remove a tart from its shell, ensure it is completely cooled. Place the tart pan on an elevated object (like a can) and gently push down on the edges of the tart ring to slide it off, leaving the tart on the pan’s removable bottom. Carefully slide a spatula under the tart to transfer it to a serving plate. If the tart base sticks, use a knife to gently loosen it before sliding it off. (Clearly, this only works for a tart shell with a removable bottom)
Use a sharp knife to cut the tart into slices. Dust the slices with some powdered sugar if you like and serve with a dollop of whipped cream or a scoop of vanilla ice cream.

Storage & Freezing
This Gluten Free Strawberry Rhubarb Tart is the best the day it has been baked. You may store any leftovers in an airtight container in the fridge for up to 3 days. If you like reheat the slices in the microwave for 30 seconds before serving.
I don't recommend freezing the baked strawberry rhubarb tart but you may freeze the components like the unbaked gluten free tart shell and the oatmeal streusel.
FAQ - Gluten Free Strawberry Rhubarb Tart
A soggy tart bottom can result from undertaking the strawberry tart, excessive liquid in the filling, or skipping blind baking.
Rhubarb has a unique flavor that is tart, slightly sour, and often described as tangy or reminiscent of green apples. It also carries a hint of earthiness, particularly in its raw form. When cooked, rhubarb's tartness mellows slightly, but it still maintains its distinctive tangy taste.
Note about Salt in my Recipes
I use Diamond Kosher Crystal Salt in all of my recipes unless otherwise stated. If use use a different brand or kind of salt in your kitchen please adjust accordingly since some salts can be saltier. If you use Morton’s Kosher Salt please be aware that their salt granules are smaller in size, denser, and crunchier and twice as salty.
Baking in grams
I share my recipes in grams and by weight since baking by weight is the most accurate way to bake. Digital Scales are very affordable and easy to use. You can purchase them on Amazon for less than a set of measuring cups. For small amounts under 10 grams, I like to use this Precision Pocket Scale. Measuring cups are very inaccurate which can cause significant errors when it comes to gluten-free baking or baking in general. Especially since I bake with gluten-free flours which weigh differently than “regular” flours. I do provide some ingredients like spices and leavening agents in measuring spoons. To learn more about Baking with a digital scale, make sure to check out my post about Baking by weight.
Note about Ovens and Oven Temperatures
All my recipes are tested and developed with a conventional oven. I always bake my baked goods on the rack placed in the MIDDLE of my oven. This way the heat coming from the bottom will not burn my baked goods.
If you are baking with convection (fan-forced), please adjust the recipes accordingly. Convection oven can cause baked goods to dry out quickly and still be raw inside. Since takes at least 15-20 minutes for a standard American Oven to be fully preheated. I highly recommend investing in an Oven Thermometer.
Substitutions and Modifications
Any dietary or ingredient modifications/substitutions to this recipe may alter the end result in appearance and taste. I test my recipes several times as published in this post and The Gluten Free Austrian Blog is not responsible for the outcome of any recipe you find on our website.


📖 Recipe
Gluten Free Rhubarb Strawberry Tart

This gluten free Strawberry Rhubarb Tart is the perfect dessert. A tender, buttery crust filled with a strawberry rhubarb filling and topped with a delectable oatmeal streusel. Whether you have it warm with a scoop of ice cream or cold on a lazy day, a slice of strawberry rhubarb tart is a tasty treat that celebrates the best of summer fruits.
Ingredients
Gluten Free Pâte Sablée (Sweet Tart Dough)
- 240 grams Gluten-Free Multipurpose Flour
- 40 grams fine ground almond flour
- 75 grams powdered sugar
- ¼th teaspoon kosher salt
- 113 grams butter, room temperature, cut into smaller pieces
- 1 large egg, room temperature (around 60 grams)
Gluten Free Oatmeal Streusel
- 60 grams brown sugar
- 80 grams Gluten Free Multipurpose Flour
- 30 grams gluten free oats
- 1 teaspoon ground ginger
- ½ teaspoon salt
- 60 grams unsalted butter
Strawberry Rhubarb Filling
- 300 grams washed and diced strawberries
- 300 grams peeled and diced rhubarb
- 1-2 teaspoons freshly grated ginger (optional)
- 30 grams Cornstarch
- 50 grams granulated white sugar
- 1 teaspoon vanilla
- ¼ teaspoon kosher salt
Crust Dust to avoid a soggy tart bottom
- Combine 1 tablespoon gluten free flour and 1 tablespoon granulated white sugar
Instructions
Gluten Free Pâté Sablée
- In a small mixing bowl whisk together the gluten-free flour, almond flour, and kosher salt. Set aside
- In the bowl of a stand mixer fitted with the paddle attachment combine the room temperature butter and powdered sugar. Cream together until smooth without overmixing it
- Scrape down the sides of the bowl and the room-temperature egg. Continue to mix until combined.
- With the mixer running at a low speed, add the dry ingredients. Mix just until there are no more visible spots of flour.
- Transfer the dough to a clean kitchen counter. Gather the dough and press it into a round disk, around 1" tall. Wrap it in plastic wrap and refrigerate for at least 1hrs up to 3 days.
How to line a Tart Shell
- Place the gluten free tart dough on a lightly floured sheet of parchment paper.
- Use a rolling pin to gently press down on the dough to start flattening it.
- Roll from the center outward, applying even pressure to avoid uneven thickness. To ensure your dough rolls out even, rotate your parchment paper 90 degrees every few rolls and repeat (this will also prevent the dough from cracking).
- Roll out the dough around ⅛-¼ inch thick - around 0.5cm (50 mm).
- Once the tart dough is rolled out in a large circle, at least 2-3" larger than your 9.5inch tart pan, use the rolling pin to transfer the dough. Carefully, make sure not to stretch the dough, roll it up around the rolling pin, and gently lay it over the tart pan.
- Gently press the tart dough into the shell. Use your fingers to gently press the dough into the bottom of the pan and up along the edges.
- Take a small paring knife or use your fingers and trim off the dough that’s hanging over the edges, It’s okay to leave a little bit of extra dough (like ¼″ or 2-3mm) in case the dough shrinks a little bit while blind baking.
- Allow the prepared tart shell to sit in the fridge for at least 30 minutes before blind baking.
Oatmeal Streusel Topping
- Melt the butter in a small pot on the stove or a microwave safe bowl. Allow to cool for a few minutes.
- In the meantime combine the Gluten Free Flour, gluten-free oats, light brown sugar, ground ginger, and kosher salt in a mixing bowl and whisk together.
- Using a fork or a small spatula, lightly mix the dry ingredients and the melted butter together until crumbles form. Don’t overmix.
- Place the crumble topping in the fridge while you prepare the Strawberry Rhubarb Filling.
Strawberry Rhubarb Filling
- Wash the rhubarb stalks under cold water and dry them with a paper towel. Remove both ends and any leaves as they are toxic.
- Slice the Rhubarb stalks into rounds around ¼" wide round slices (kinda like cutting celery) and add them to a mixing bowl. If the stalks are particularly thick, you might want to cut them lengthwise first and then into smaller pieces to ensure even cooking.
- To prepare the strawberries, hull them by removing the green tops, wash them under cold water, and pat them dry. Slice them into halves or quarters, depending on their size. Add them to the bowl with the diced rhubarb.
- Add the grated ginger (if using), vanilla extract, cornstarch, granulated sugar, and kosher salt to the prepared fruit. Cornstarch helps to thicken the juices released by the fruits as they cook, preventing a runny pie.
- Mix everything gently but thoroughly, ensuring the fruit is evenly coated with the sugar and cornstarch mixture.
- Allow the fruit filling to sit at room temperature while you blind bake the tart shell.
How to blind bake a Tartshell
- Preheat the oven to 350F and arrange the rack in the middle.
- When your oven is preheated, place the tart crust on a sheet tray. Poke it several times with a fork (this helps to release any air that might be trapped)
- Press a square of parchment paper or aluminum foil tightly against the gluten-free tart crust. Make sure to cover the edges to prevent them from burning. Fill it evenly with dried beans, dried rice or pie weights if you happen to own some.
- Bake for 15 minutes and remove from the oven. Carefully remove the parchment paper and dried beans (just grab the edges and remove them). Do not turn off the oven! Increase the temperature to 375F!
- Allow the gluten free tart shell to cool for 5-10 minutes on a cooling rack before filling it.
Assemble and Bake a Gluten Free Strawberry Rhubarb Tart
- Make sure the oven is preheated to 375F!
- In a small bowl combine the gluten free flour and granulated sugar. Sprinkle this flour sugar mixture on the bottom of the tart shell. This will soak up the fruit juices and help to limit a soggy tart bottom.
- Transfer the strawberry rhubarb tart filling to the tart shell and spread out evenly. If the fruit releases a lot of juices, avoid adding them to the tart.
- Top the fruit with the oatmeal crumble.
- Place the strawberry rhubarb tart in the oven and bake at 375F for 15 minutes. After 15 minutes lower the temperature to 350F and continue baking the tart for an additional 25-30 minutes. The streusel should be golden brown and you may see some juices running from the tartlets. If you like you can test the internal temperature of the fruit with a digital thermometer. It should reach at least 212F.
- Carefully remove the gluten free tart from the oven and allow it to cool in the tart pan for at least 2 hours before removing it from the tart pan and serving.
Notes
Storage: This Gluten Free Strawberry Rhubarb Tart is the best the day it has been baked. You may store any leftovers in an airtight container in the fridge for up to 3 days. If you like reheat the slices in the microwave for 30 seconds before serving.
Recommended Products
As an Amazon Associate and member of other affiliate programs, I earn from qualifying purchases.

Nutrition Information:
Yield:
12Serving Size:
1Amount Per Serving: Calories: 326
Calories are a guestimate and randomly generated.


Alene says
I live in Florida and I believe we have passed the rhubarb season here. What would you suggest for filling? Just strawberries? Or something else? Thanks! I love your sablée recipe! It is exactly the way I would make my pie crusts before I needed to be gluten free, either egg or ice water. I miss those days of perfect, easy pie crusts.
Daniela Weiner says
Alene, this is a great question. I am actually working on a list of fillings but here are a few ideas: Peaches! I love a good peach tartlet. Or blueberries? You can't go wrong with blueberries or just strawberries.
Michelle says
Highly recommend this recipe. Thank you for explaining everything step by step
Lorraine says
hello! what size tart dish would you recommend for making one large tart?
Daniela Weiner says
Lorraine, this is an excellent question. I prefer a 9" tart shell for a large tart. I feel like if you go bigger than that, your middle part of the tart will be soggy. I hope this helps
Lorraine says
Great, thank you so much!
Holly says
This recipe is fantastic! I have lots of rhubarb in my garden and knew I needed to make this immediately! Although it was more time intensive than some other recipes, the final results are impressive! Daniela's instructions for making each component were easy to follow and I felt like a pro. This tart is delicious!!
Jennifer Baez says
I was so nervous because it was my first time making a tart. Then realizing half way through the recipe I didnt have a tart pan. No worries made this in a pie dish and it came out great!
I pre-made the tart base, filling and crumb the night before and let it sit in the fridge. I drained off the water and baked it for about 20 mins more due to the shape of the dish. Still came out great!
First time eating rhubarb and I must say I will do this again.
Daniela says
I am SO proud of you ❤️❤️❤️