
Gluten Free Pumpkin Madeleines are a delicious fall twist on classic madeleines. They’re soft, lightly spiced, and have that perfect little hump in the middle that makes madeleines so charming. Think of them as a bite-sized cross between pumpkin bread and a French tea cake - cozy, elegant, and impossible to stop at just one. If you’re looking for a new fall baking recipe that feels special but is still easy to make, these pumpkin madeleines are it.

Jump to:
- Recipe Ingredient Notes
- Recommended Tools
- Gluten Free Pumpkin Madeleine Batter
- Baking Gluten Free Pumpkin Madeleines
- Serving & Storage
- Pro Tips for Baking Pumpkin Madeleines
- Note about Salt in my Recipes
- Baking in grams
- Note about Ovens and Oven Temperatures
- Substitutions and Modifications
- More Gluten Free Pumpkin Recipes to try
- 📖 Recipe
- 💬 Comments
Recipe Ingredient Notes
Gluten Free Flour: I tested this gluten free pumpkin madeleine recipe with my own gluten free flour blend, King Arthur Measure for Measure, and Bob's Red Mill 1-1 (Blue Bag). While all three work in this recipe, I found that Bob’s Red Mill gave the best results. The madeleines baked up with a beautiful signature “bump” and had that light, melt-in-your-mouth texture you want in a perfect madeleine. For my classic Gluten Free Madeleines, I usually recommend King Arthur Measure for Measure, but for these pumpkin madeleines, Bob’s Red Mill is the winner.
Canned Pumpkin: Be sure to grab 100% pure pumpkin, not pumpkin pie filling - the cans look similar and often sit side by side at the grocery store. While I love making things from scratch, canned pumpkin puree is a convenient (and reliable) choice for this recipe.
Eggs: For best results, use room temperature eggs.
Pumpkin Spice: This is the key to that pumpkin spice fall flavor in these madeleines. Pumpkin Pie Spice is a classic blend that can be found in almost any grocery store. You can also whip up your own mix at home if you’d like more control over the balance of spices.
Homemade Pumpkin Pie Spice
- 3 tablespoons ground cinnamon
- 2 teaspoons ground ginger
- 1 ½ teaspoons ground nutmeg
- 1 teaspoon ground allspice
- 1 teaspoon ground cloves
Mix all the ingredients and store in a small jar or an airtight container. It’ll keep for months, but honestly, mine never lasts that long. Once you’ve made a batch, you’ll want to sprinkle it into everything: pumpkin muffins, lattes, cookies, even oatmeal.

Recommended Tools
I tried my best to make this gluten free pumpkin madeleine recipe very easy and approachable. But you will need a few kitchen tools to successfully make this recipe.
- Digital Kitchen Scale: a digital kitchen scale is a must-have to make this recipe (or any of my recipes).
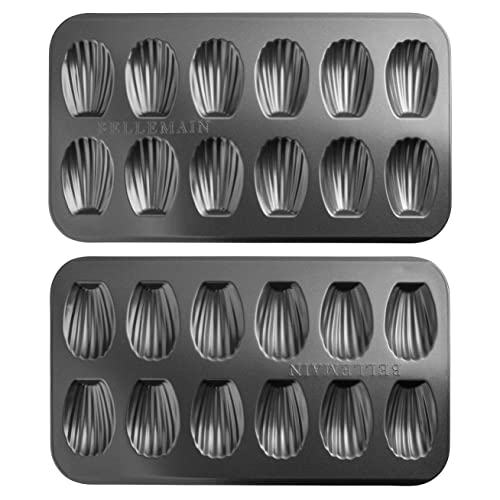
- Madeleine Pan: A madeleine pan is a baking mold designed specifically for making madeleines. It has individual shell-shaped cavities that give madeleines their signature scalloped pattern on one side and a domed, or “belly,” shape on the other. I recommend buying two pans. This will make baking madeleines a lot easier.
- Stand Mixer or Electric Handmixer: I like using an electric stand mixer fitted with the whisk (balloon) attachment.
- 1 Tablespoon Cookie Scoop: Using a 1 tablespoon cookie scoop is perfect for portioning out the madeleine batter. Using a scoop ensures consistency and helps avoid overfilling, which can lead to unevenly baked madeleines.
You will also need a pastry brush, a flexible spatula, and a cooling rack.

Gluten Free Pumpkin Madeleine Batter
The key to Pumpkin Madeleines batter is to ensure all the ingredients are at room temperature. I like to place the eggs in some warm water for 10-15 minutes before whisking them.
I like to whisk the eggs and sugar in the bowl of the stand mixer. Then just use the whisk attachment to fold in the pumpkin, dry ingredients and melted butter. You can also use a whisk or a flexible spatula for this.

- Step 1: In a small bowl, whisk or sift together the gluten-free flour, baking powder, pumpkin pie spice, ground cinnamon and kosher salt. Set aside until needed.

- Step 2: In a small saucepan melt the unsalted butter. Allow it to cool for a few minutes (this can also be done in a microwave safe bowl using the microwave). Set aside.

- Step 3: In the bowl of a stand mixer, combine the granulated sugar, room temperature large eggs and vanilla extract. At a medium high speed whisk the eggs and sugar together until the mixture becomes pale, thick, and nearly doubles in volume. This takes about 4 -5 minutes.

- Step 4: Turn off the mixer and remove the bowl from the stand mixer. Add the pumpkin puree to the whisked egg mixture and carefully whisk together. I use the whisk attachment from the mixer for this, but a regular whisk will work as well.

- Step 5: Add the sifted dry ingredients in two additions, gently folding them into the egg mixture with a whisk or the whisk attachment. Use a flexible spatula to scrape down the sides of the bowl, making sure no pockets of flour remain.

- Step 6: Slowly add the cooled, melted butter to the batter, folding it in with a flexible spatula or a whisk until fully incorporated (it may take a moment for the batter to absorb the butter).

- Step 7: Scrape down the sides of the bowl, then cover the gluten free pumpkin madeleine batter with plastic wrap.

- Step 8: Make sure to press the plastic wrap against the madeleine batter. Chill the batter in the fridge for at least 30 minutes (please don't skip this - a cold batter will rise taller and give the pumpkin madeleines their signature hump)
Baking Gluten Free Pumpkin Madeleines
Before baking pumpkin madeleines, it's important to prepare the pans. I like to do this while the batter is chilling.
My preferred method is to brush the pans with melted butter, which gives the madeleines a beautiful golden-brown color. While you can also use non-stick cooking spray or a combination of melted butter and flour, I found that the butter alone produces the best results. Using butter and a dusting of gluten-free flour can leave an odd aftertaste, so I recommend sticking with just melted butter for the best flavor and appearance.
Chilling the madeleine pans before baking helps the batter set more quickly when it hits the hot oven, promoting a better rise and a more defined hump.

- Step 1: Preheat the oven to 400°F.
- Step 2: Melt about 30 - 40 grams of unsalted butter and let it cool slightly. Use a pastry brush to coat each cavity of the madeleine pans with a thin layer of melted butter. Make sure to cover all the grooves for easy release and even browning.
- Step 3: Place the prepared madeleine pans in the freezer to help the butter set. This can improve the madeleines’ rise.

- Step 4: Once the oven is fully preheated, retrieve one prepared madeleine pan from the freezer and the gluten free pumpkin madeleine batter from the fridge.
- Step 5: Using a small cookie scoop (1-tablespoon scoop), place one scoop of madeleine batter into each cavity. Don't overfill the cavities - about one tablespoon of batter is plenty.

- Step 6: Place the pan in the preheated oven and bake for 6 minutes at 400°F. Then, without opening the oven door, drop the temperature to 365°F and continue baking for 4 more minutes, or until the edges are golden brown and the centers have puffed up with a dome. The pumpkin madeleines should spring back when gently pressed on top, and a toothpick inserted into the center should come out clean.
- Step 7: Remove the madeleine tin from the oven and place it on a cooling rack. Allow the pumpkin madeleines to cool in the pan for 2 minutes before removing them. I like to place the baked madeleines with their ridged side down to avoid smushing their bellies.

- Step 8: When baking the second pan of gluten free pumpkin madeleines, make sure to reheat the oven to 400°F and bake as directed. If you only have one madeleine pan, allow it to cool for a few minutes. Then wash it with warm soapy water, dry it completely, and prepare the pan as directed. Make sure the pan is COLD and chilled to ensure the Gluten Free Pumpkin Madeleines rise fully.
Serving & Storage
Gluten Free Pumpkin Madeleines are at their best when freshly baked - soft, tender, and still slightly warm from the oven. A light dusting of powdered sugar (or even a touch of cinnamon sugar) makes them extra festive. Enjoy them with a hot cup of coffee, tea, or apple cider for the perfect autumn treat.
If you have leftovers, store the madeleines in an airtight container at room temperature. They’ll stay moist and flavorful for a couple of days. For longer storage, pumpkin madeleines freeze beautifully: arrange them in a single layer on a baking sheet, freeze until firm, then transfer to an airtight container or freezer bag. They’ll keep for up to 1 month. To serve, let them thaw at room temperature or warm briefly in the oven to bring back their fresh-baked texture.
The unbaked pumpkin madeleine batter can also be kept in the fridge for up to 2 days - perfect for baking ahead of time. When ready, spoon the chilled batter into your prepared pans and bake. If it seems too thick after chilling, give it a gentle stir to loosen before filling the molds.
Pro Tips for Baking Pumpkin Madeleines
Mix Gently: When folding in the pumpkin purée, dry ingredients, and melted butter, be careful not to overmix. Too much mixing can deflate the batter and make the madeleines dense instead of light and tender.
Chill the Batter: Rest the pumpkin madeleine batter in the fridge for at least 30 minutes before baking. This helps the batter firm up, enhances the flavor of the spices, and ensures the classic rise and hump.
Butter & Chill the Pan: Brush the madeleine pan generously with melted butter, then chill or freeze the pan for a few minutes. This step not only gives the madeleines a beautiful golden edge but also makes them easier to release.
Scoop Evenly: A small cookie scoop is perfect for portioning the batter into the pan. Even scoops mean even baking and consistent domes.
Start Hot, Then Lower: For the signature rise, bake at a higher temperature (around 400°F) for the first few minutes, then reduce to 365°F to finish baking. This creates light, fluffy centers with golden, crisp edges.
Check for Doneness: Pumpkin adds moisture, so watch closely. The madeleines are ready when they spring back lightly to the touch and a toothpick comes out clean. Don’t overbake, or they can dry out.
Cool Briefly: Let the madeleines rest in the pan for just 1 - 2 minutes before transferring to a wire rack. This keeps them intact and prevents sticking.
Enjoy Fresh: Pumpkin madeleines are best served warm or the same day they’re baked. A dusting of powdered sugar - or cinnamon sugar p makes them extra festive.

Note about Salt in my Recipes
I use Diamond Kosher Crystal Salt in all of my recipes unless otherwise stated. If use use a different brand or kind of salt in your kitchen please adjust accordingly since some salts can be saltier. If you use Morton’s Kosher Salt please be aware that their salt granules are smaller in size, denser, and crunchier and twice as salty.
Baking in grams
I share my recipes in grams and by weight since baking by weight is the most accurate way to bake. Digital Scales are very affordable and easy to use. You can purchase them on Amazon for less than a set of measuring cups. For small amounts under 10 grams, I like to use this Precision Pocket Scale. Measuring cups are very inaccurate which can cause significant errors when it comes to gluten-free baking or baking in general. Especially since I bake with gluten-free flours which weigh differently than “regular” flours. I do provide some ingredients like spices and leavening agents in measuring spoons. To learn more about Baking with a digital scale, make sure to check out my post about Baking by weight.
Note about Ovens and Oven Temperatures
All my recipes are tested and developed with a conventional oven. I always bake my baked goods on the rack placed in the MIDDLE of my oven. This way the heat coming from the bottom will not burn my baked goods.
If you are baking with convection (fan-forced), please adjust the recipes accordingly. Convection oven can cause baked goods to dry out quickly and still be raw inside. Since takes at least 15-20 minutes for a standard American Oven to be fully preheated. I highly recommend investing in an Oven Thermometer.
Substitutions and Modifications
Any dietary or ingredient modifications/substitutions to this recipe may alter the end result in appearance and taste. I test my recipes several times as published in this post and The Gluten Free Austrian Blog is not responsible for the outcome of any recipe you find on our website.
More Gluten Free Pumpkin Recipes to try


📖 Recipe
Gluten Free Pumpkin Madeleines

Gluten Free Pumpkin Madeleines are a delicious fall twist on classic madeleines. Soft, tender, and lightly spiced with pumpkin, these elegant little cakes bake up with the signature madeleine hump. If you’re looking for a new fall baking recipe that feels special but is still easy to make, these pumpkin madeleines are it.
Ingredients
Gluten Free Pumpkin Madeleines
- 155 grams gluten free flour (containing xanthan gum)
- 1 teaspoon baking powder
- 1 teaspoon pumpkin pie spice
- ½ teaspoon ground cinnamon
- ½ teaspoon kosher salt
- 113 grams unsalted butter (can be cold)
- 2 large eggs, at room temperature
- 125 grams granulated sugar
- 1 teaspoon vanilla extract
- 100 grams pumpkin puree
Instructions
Gluten Free Pumpkin Madeleines Batter
- In a small bowl, whisk or sift together the gluten free flour, baking powder, pumpkin pie spice, cinnamon, and salt. Set aside.
- Melt the butter in a small saucepan (or in a microwave-safe bowl). Let it cool slightly.
- In the bowl of a stand mixer, beat the sugar, eggs, and vanilla on medium-high speed until pale, thick, and doubled in volume, about 4 - 5 minutes.
- Turn off the mixer and remove the bowl from the stand mixer. Add the pumpkin puree to the whisked egg mixture and carefully whisk together. I use the whisk attachment from the mixer for this, but a regular whisk will work as well.
- Add the dry ingredients in two additions, folding them in gently with a whisk or spatula. Scrape down the sides of the bowl to ensure no flour pockets remain.
- Slowly fold in the cooled melted butter until fully incorporated. The batter may take a moment to absorb the butter.
- Scrape down the bowl again, then press plastic wrap directly onto the surface of the batter.
- Chill the batter in the refrigerator for at least 30 minutes. Don’t skip this step - cold batter is key to getting the madeleines’ signature hump.
Baking Gluten Free Pumpkin Madeleines
- Preheat the oven to 400°F (200°C).
- Melt 30-40 grams of unsalted butter and let it cool slightly. Use a pastry brush to coat each cavity of the madeleine pans with a thin layer of melted butter, making sure to cover all grooves for easy release and even browning.
- Place the prepared madeleine pans in the freezer to help the butter set. This can help improve the madeleines' rise.
- Once the oven is fully preheated, retrieve one prepared madeleine pan from the freezer and the chilled pumpkin madeleine batter from the fridge.
- Using a small cookie scoop (about 1 tablespoon), place one scoop of batter into each cavity.
- Place the pan in the preheated oven and bake for 6 minutes at 400°F. Then, without opening the oven door, reduce the temperature to 365°F and bake for 3-4 more minutes, or until the edges are golden brown and the centers have puffed up into domes. The madeleines should spring back when gently pressed and a toothpick inserted into the center should come out clean.
- Remove the madeleine pan from the oven and place it on a cooling rack. Allow the madeleines to cool in the pan for 2 minutes before removing. I recommend placing the madeleines with the ridged side down to avoid smushing their bellies.
- For the second pan of madeleines, preheat the oven to 400°F again and bake as directed. If using only one pan, allow it to cool for a few minutes, wash it with warm soapy water, dry it completely, and prepare it as directed before baking the second batch.
- Dust the pumpkin madeleines with some powdered sugar and serve. Enjoy.
Notes
Gluten Free Flour: I preter using Bob's Red Mill 1-1 (Blue Bag) for this gluten free pumpkin madeleines recipe.
Chilling: Chilling the madeleine batter is key to achieving the beautiful, iconic rise and classic dome shape ( “belly” or “hump”).
Serving: Madeleines are best when freshly baked and still slightly warm. Dust them with powdered sugar and enjoy with a cup of coffee.
Storing Unbaked Madeleine Batter: Unbaked madeleine batter can be stored in the fridge for up to 2 days, making it a great make-ahead option. When you're ready to bake, simply scoop the chilled batter into the prepared pans and bake as usual.
Recommended Products
As an Amazon Associate and member of other affiliate programs, I earn from qualifying purchases.
Nutrition Information:
Yield:
24Serving Size:
1Amount Per Serving: Calories: 86
Calories are a guestimate and randomly generated.


Comments
No Comments