
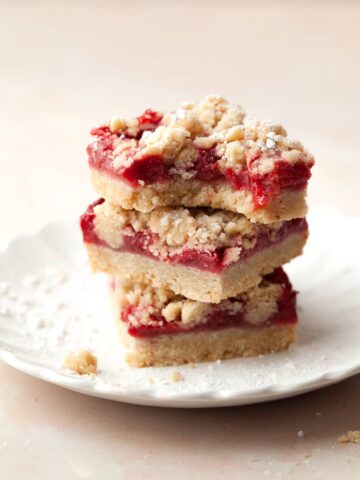
If you love brownies and anything pumpkin, then you will love these Gluten Free Pumpkin Cheesecake Brownies. Fudgy chocolate brownies are topped with a creamy, spiced pumpkin cheesecake layer, creating a dessert that’s rich, indulgent, and full of seasonal fall flavor. A fall must bake (even if you are skeptical about the chocolate pumpkin combo)

Jump to:
- Recipe Ingredient Notes
- Recipe Notes for Pumpkin Brownies
- Gluten Free Brownie Layer
- Gluten Free Pumpkin Cheesecake Layer
- Pumpkin Brownies Baking Instructions
- Tips for Slicing Pumpkin Cheesecake Brownies
- Storage & Freezing
- Note about Salt in my Recipes
- Baking in grams
- Note about Ovens and Oven Temperatures
- Substitutions and Modifications
- More Gluten Free Pumpkin Recipes to try
- 📖 Recipe
- 💬 Comments
Recipe Ingredient Notes
Gluten Free Flours: Brownies are one of the most forgiving treats to make gluten free. For these Pumpkin Cheesecake Brownies, I use own Gluten Free Flour Blend , which already includes xanthan gum. If you prefer, you can easily swap in your favorite blend, like Bob’s Red Mill 1-to-1. Just keep in mind if you’re mixing up your own blend, be sure to add ½ teaspoon of xanthan gum. Flours such as coconut flour or almond meal won’t work in this recipe.
Chocolate: Any high-quality dark chocolate with 60% cocoa or more will work beautifully. If you prefer a sweeter brownie, you can swap in semi-sweet chocolate for the brownie instead.
Dutch-Processed Cocoa Powder: I highly recommend using dutch processed cocoa in this recipe. Dutch-processed cocoa produces richer, fudgier chocolate flavor.
Instant Espresso: A small amount of instant espresso deepens the chocolate flavor in these brownies. It’s completely optional, but highly recommended. You’ll usually find it in the coffee aisle at the grocery store, either in single-serve packets or larger jars.
Canned Pumpkin: Be sure to grab 100% pure pumpkin, not pumpkin pie filling - the cans look similar and often sit side by side at the grocery store. While I love making things from scratch, canned pumpkin puree is a convenient (and reliable) choice for this recipe.
Cream Cheese: For the pumpkin cheesecake layer, I use a full-fat block/brick of cream cheese.
Pumpkin Spice: Pumpkin Pie Spice has become the classic fall blend, and you’ll find it in nearly every grocery store but it’s also easy to make your own. Mix 1 tablespoon of ground cinnamon, 1 teaspoon each of ground nutmeg and ginger, and ¼ teaspoon of ground cloves. Use what you need for the recipe and store the rest in an airtight container for future baking.

Recipe Notes for Pumpkin Brownies
- This recipe for Gluten Free Pumpkin Cheesecake Brownies has two layers: a gluten free brownie base and a pumpkin cheesecake topping. It’s easiest to prepare the brownie layer first and refrigerate it while making the cheesecake layer. This helps prevent the cheesecake from sinking and keeps the two layers distinct in the finished dessert.
- Use an 8x8-inch square pan for the best results. If you go with a 9x9-inch pan instead, just keep in mind the pumpkin brownies will be thinner, so shorten the baking time a bit.
- Make sure all your ingredients are at room temperature - especially the cream cheese for the pumpkin cheesecake layer.

Gluten Free Brownie Layer
I recommend using a stand mixer to make these Gluten Free Pumpkin Cheesecake Brownies, but an electric hand mixer works just as well.
Preheat the oven to 350°F and line a square 8" pan with parchment paper and set aside. Make sure to leave some overhang, which will help to remove the pumpkin cake from the pan.

- Step 1: In a small bowl, sift together the gluten free flour, dutch processed cocoa powder, and kosher salt. Set aside.

- Step 2: Combine the eggs (can be cold for the brownies), granulated sugar, and vanilla extract in the bowl of the stand mixer fitted with the whisk attachment.

- Step 3: Whip on medium-high until extremely thick and triple the volume, about 3-4 minutes.

- Step 4: While the eggs are whipping, combine the unsalted butter, instant espresso powder (if using) and dark chocolate in a microwave safe bowl. Microwave at 70% power for about 90 seconds, until the butter is melted. The heat of the melted butter will melt the chocolate.

- Step 5: With a heat-proof spatula stir together your melted butter-chocolate mixture. The butter and the chocolate should be "emulsified," which means they should have a smooth liquid texture. If the chocolate is not fully melted, stick the bowl in your microwave for 10-15 seconds.

- Step 6: When the egg-sugar mixture looks fluffy and thick, slow down the speed of your mixer to low and add the WARM melted chocolate-butter mixture. Mix until combined. I recommend stopping your mixer and scraping down the sides to make sure everything is combined well.

- Step 7: Once the wet ingredients are combined, turn the speed of your mixer to SLOW and add the dry ingredients all at once. Carefully mix until roughly combined. Turn off the mixer and with a flexible spatula fold the batter together, making sure everything is well combined.

- Step 8: Transfer the Gluten Free Brownie Batter to the prepared 8-inch baking pan. Smooth out the top with the back of a spoon or small offset knife. Place the brownie layer in the fridge while you prepare the pumpkin cheesecake layer.
Gluten Free Pumpkin Cheesecake Layer
Make sure all your ingredients for the pumpkin cheesecake layer are at room temperature. Cold cream cheese is stiff and difficult to blend smoothly, which can leave small lumps in the batter. Let cream cheese sit at room temperature for at least 30 - 60 minutes before using. For a quicker method, cut it into small cubes so it softens a bit quicker.

- Step 1: To the cleaned bowl of the stand mixer (please no leftover brownie batter!), add the room temperature cream cheese, granulated sugar, gluten free flour, kosher salt and vanilla extract. At a medium high speed cream the ingredients together until light and fluffy, about 2-3 minutes. Be sure to scrape down the sides of the bowl and the paddle attachment with a spatula.

- Step 2: Next, add the room temperature egg. Avoid overmixing once the egg is added. Overmixing can cause the cheesecake to rise too much, then deflate as it cools (and it may even crack).

- Step 3: Add the pumpkin purée, pumpkin spice, and cinnamon. Mix just until combined. Use a flexible spatula to scrape down the sides of the bowl, making sure the pumpkin is fully incorporated with the other ingredients.

- Step 4: Retrieve the brownie layer from the fridge and top with the pumpkin cheesecake layer. Use an offset spatula or the back of a spoon to spread it evenly, ensuring the filling reaches all the corners. Gently tap the back of your spoon against the sides of the pan - this helps release air bubbles that can cause cracks.
Pumpkin Brownies Baking Instructions

- Step 1: Place the gluten free pumpkin cheesecake brownies in the fully preheated oven and bake them at 350F for 10 minutes. After 10 minutes reduce the heat to 325F and continue baking the brownies for 22-25 minutes. The pumpkin cheesecake brownies are done when it is set around the edges but still slightly jiggly in the middle. Baking times can vary from oven to oven!

- Step 2: Turn off the oven but leave the gluten free pumpkin cheesecake brownies in the oven to cool for about least 30 minutes. I recommend cracking the door just a tiny bit. Allowing the cheesecake to cool in the oven allows for it to finish baking but since there is no sudden change of temperature there is less of a chance for it to crack.
- Step 3: Remove the cheesecake from the oven and allow to cool it completely before placing it in the fridge for at least 3 hours (Overnight works the best!) before cutting.
Tips for Slicing Pumpkin Cheesecake Brownies
Here are a few tips to make slicing of Gluten Free Pumpkin Brownies a bit easier:
- Chill Thoroughly: Ensure the gluten free pumpkin cheesecake brownies has been chilled for at least 4 hours, but overnight is ideal. A well-chilled cheesecake is firmer and easier to slice cleanly.
- Use a Sharp Knife: A long, sharp knife with a straight edge works best. A chef’s knife or slicing knife is ideal for this task.
- Warm the Knife: Dip the blade of the knife into hot water, then wipe it dry with a clean towel before each cut. The warmth helps the blade glide through the cheesecake and the brownie layer.
- Clean Between Slices: After each cut, wipe the blade with a warm, damp towel to remove any pumpkin cheesecake or brownie crumbs. This keeps the slices looking clean and professional.
- Cut Straight Down: Use a straight, downward motion rather than sawing back and forth. This keeps the layers intact and minimizes shifting of the toppings.
Storage & Freezing
Leftover Pumpkin Cheesecake Brownies can be stored in the fridge up to 5 days. Make sure to place them in an airtight container. If you want to store leftovers for a longer period, you can freeze them up to 2 months.
Just like freezing cookie dough, I recommend freezing the slices individually on a sheet tray (uncovered) first before transferring them to an airtight container. When you're ready to enjoy a slice thaw them at room temperature for 30–60 minutes or allow for them to thaw in the fridge overnight.

Note about Salt in my Recipes
I use Diamond Kosher Crystal Salt in all of my recipes unless otherwise stated. If use use a different brand or kind of salt in your kitchen please adjust accordingly since some salts can be saltier. If you use Morton’s Kosher Salt please be aware that their salt granules are smaller in size, denser, and crunchier and twice as salty.
Baking in grams
I share my recipes in grams and by weight since baking by weight is the most accurate way to bake. Digital Scales are very affordable and easy to use. You can purchase them on Amazon for less than a set of measuring cups. For small amounts under 10 grams, I like to use this Precision Pocket Scale. Measuring cups are very inaccurate which can cause significant errors when it comes to gluten-free baking or baking in general. Especially since I bake with gluten-free flours which weigh differently than “regular” flours. I do provide some ingredients like spices and leavening agents in measuring spoons. To learn more about Baking with a digital scale, make sure to check out my post about Baking by weight.
Note about Ovens and Oven Temperatures
All my recipes are tested and developed with a conventional oven. I always bake my baked goods on the rack placed in the MIDDLE of my oven. This way the heat coming from the bottom will not burn my baked goods.
If you are baking with convection (fan-forced), please adjust the recipes accordingly. Convection oven can cause baked goods to dry out quickly and still be raw inside. Since takes at least 15-20 minutes for a standard American Oven to be fully preheated. I highly recommend investing in an Oven Thermometer.
Substitutions and Modifications
Any dietary or ingredient modifications/substitutions to this recipe may alter the end result in appearance and taste. I test my recipes several times as published in this post and The Gluten Free Austrian Blog is not responsible for the outcome of any recipe you find on our website.
More Gluten Free Pumpkin Recipes to try


📖 Recipe
Gluten Free Pumpkin Cheesecake Brownies

If you love brownies and anything pumpkin, then you will love these Gluten Free Pumpkin Cheesecake Brownies. Fudgy chocolate brownies are topped with a creamy, spiced pumpkin cheesecake layer, creating a dessert that’s rich, indulgent, and full of seasonal fall flavor.
Ingredients
Gluten Free Brownie Layer
- 65 grams gluten free flour (containing xanthan gum)
- 20 grams dutch processed cocoa
- ¾ teaspoon kosher salt
- 113 grams unsalted butter
- 85 grams dark chocolate
- 1-2 teaspoons instant espresso (optional)
- 2 large eggs, can be cold
- 165 grams granulated sugar
- 1 teaspoon vanilla extract
Gluten Free Pumpkin Cheesecake Layer
- 225 grams full fat cream cheese, at room temperature
- 65 grams granulated sugar
- 1 teaspoon vanilla extract
- 1 teaspoon gluten free flour (around 5 grams)
- ½ teaspoon kosher salt
- 1 large egg, at room temperature
- 115 grams pumpkin puree
- 1 ½ teaspoon pumpkin pie spice (or more)
- ¾ teaspoon cinnamon
Instructions
Gluten Free Pumpkin Cheesecake Brownies
Preheat the oven to 350°F and line a square 8" pan with parchment paper and set aside. Make sure to leave some overhang, which will help to remove the pumpkin cake from the pan.
Gluten Free Brownie Layer
- In a small bowl, sift together the gluten free flour, dutch-processed cocoa powder, and kosher salt. Set aside.
- In the bowl of a stand mixer fitted with the whisk attachment, combine the eggs (cold is fine for the brownies), granulated sugar, and vanilla extract. Whip on medium-high speed until very thick and tripled in volume, about 3 - 4 minutes.
- While the eggs are whipping, combine the unsalted butter, dark chocolate, and instant espresso powder (if using) in a microwave-safe bowl. Microwave at 70% power for about 90 seconds, until the butter is melted. The heat from the butter will melt the chocolate.
- Stir the butter-chocolate mixture with a heatproof spatula until smooth and fully emulsified. If the chocolate isn’t completely melted, microwave for an additional 10–15 seconds.
- When the egg-sugar mixture is fluffy and thick, reduce the mixer speed to low and add the warm chocolate-butter mixture. Mix until just combined, stopping to scrape down the sides of the bowl as needed.
- Add the dry ingredients all at once on low speed. Mix carefully until roughly combined, then fold the batter together with a flexible spatula until fully incorporated.
- Transfer the brownie batter to a prepared 8x8-inch baking pan. Smooth the top with a spoon or offset spatula, then refrigerate while you prepare the pumpkin cheesecake layer.
Gluten Free Pumpkin Cheesecake Layer
- In the cleaned bowl of a stand mixer (make sure there’s no leftover brownie batter!), add the room-temperature cream cheese, granulated sugar, gluten free flour, kosher salt and vanilla extract.
- Beat on medium-high speed until light and fluffy, about 2–3 minutes. Scrape down the sides of the bowl and the paddle attachment with a spatula to ensure even mixing.
- Add the room-temperature egg and mix just until combined. Avoid overmixing, as this can cause the cheesecake to rise too much and then deflate while cooling, which may lead to cracks.
- Next, add the pumpkin purée, pumpkin spice, and cinnamon. Mix just until combined, then use a flexible spatula to scrape down the sides of the bowl, making sure the pumpkin is fully incorporated.
- Retrieve the brownie layer from the fridge and spread the pumpkin cheesecake mixture evenly on top using an offset spatula or the back of a spoon. Gently tap the pan on the counter to release any air bubbles, which helps prevent cracks in the cheesecake layer.
Baking Instructions
- Place the gluten free pumpkin cheesecake brownies in the fully preheated oven and bake them at 350F for 10 minutes. After 10 minutes reduce the heat to 325F and continue baking the brownies for 22-25 minutes. The pumpkin cheesecake brownies are done when it is set around the edges but still slightly jiggly in the middle. Baking times can vary from oven to oven!
- Turn off the oven but leave the gluten free pumpkin cheesecake brownies in the oven to cool for about least 30 minutes. I recommend cracking the door just a tiny bit. Allowing the cheesecake to cool in the oven allows for it to finish baking but since there is no sudden change of temperature there is less of a chance for it to crack
- Remove the cheesecake from the oven and allow to cool it completely before placing it in the fridge for at least 3 hours (Overnight works the best!) before cutting.
Recommended Products
As an Amazon Associate and member of other affiliate programs, I earn from qualifying purchases.
Nutrition Information:
Yield:
16Serving Size:
1Amount Per Serving: Calories: 223
Calories are a guestimate and randomly generated.


Susan says
I was hesitant - pumpkin and chocolate?? Glad I was brave and made them! Clear recipe as usual, I don’t have stand mixer but hand-held worked fine. Really one of the best brownie recipes out there, and the pumpkin layer is lovely. The combo was new to me, by the second bite I was sold. Even better the next day. May become my signature fall treat!
Daniela says
Love reading this Susan. I know many people are hesitant about the pumpkin chocolate combo. So glad you have it a try. And I fully support this becoming your signature fall treat.