

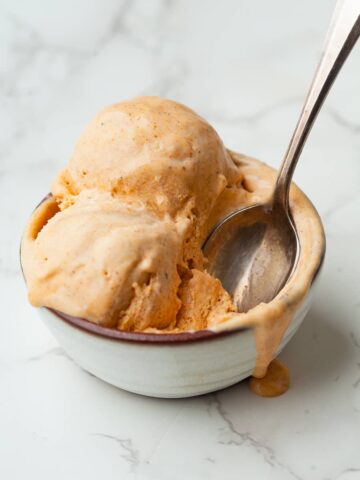
Warm, cozy, and full of holiday flavor, this Gluten Free Eggnog Custard is a simple, festive holiday dessert. Spiced with nutmeg and cinnamon, it captures all the classic eggnog flavors. Top with a dollop of homemade eggnog whipped cream for the ultimate holiday indulgence.

Recipe Ingredient Notes
Eggnog: Use a full-fat, dairy-based eggnog for the best texture in this Gluten Free Eggnog Custard Recipe. A rich, creamy eggnog helps the custard set properly and gives it that classic holiday flavor. Avoid reduced-fat or non-dairy versions, which tend to be too thin and won’t create the same smooth, silky custard.
Eggs: Whole eggs give custard its structure and signature silky texture. The whites help the custard set gently, while the rich yolks add body and a smooth, creamy mouthfeel. Using whole eggs creates a stable custard that thickens evenly without becoming dense or heavy.
Rum: You can use light rum, dark rum, or even bourbon in this eggnog custard. I prefer Captain Morgan Spiced Rum for its warm, aromatic flavor. Like most major rum brands, it’s naturally gluten free since it’s made from sugar cane, yeast, water, and spices. Spiced rum adds a cozy holiday note, but if rum isn’t your favorite, you can easily swap in a gluten-free whiskey, brandy or bourbon for a slightly different flavor that still complements the custard beautifully.
Rum Extract: If you prefer a non-alcoholic option - or just want to enhance the rum flavor - rum extract adds that warm, buttery note without the alcohol. A little goes a long way, so start small and adjust to taste. As a guide, about ½ teaspoon of rum extract equals roughly 2 tablespoons of rum.
Nutmeg & Cinnamon: Nutmeg adds cozy sweetness, and cinnamon gives a gentle warmth. Together, they make the custard smell and taste extra festive.

Tips for making Eggnog Custard
- Use full fat eggnog: Rich, creamy eggnog gives the custard a silky texture and deep flavor. Avoid “lite” or non-dairy versions - they’re too thin to set properly.
- Temper the eggs carefully: Slowly whisking the warm eggnog into the egg mixture prevents curdling and ensures a smooth custard. Take your time with this step.
- Strain for velvety texture: Pour the custard through a fine-mesh strainer before baking to remove any tiny bits of cooked egg.
- Use a water bath: Baking the custard in a water bath helps it cook gently and evenly, preventing cracks or overcooked edges.
- Don’t overbake: The custard should be set around the edges and slightly jiggly in the center when done. It will continue to set as it cools.
- Cool gradually: Let the custards sit in the water bath for 10 minutes after baking before removing them. This prevents sudden temperature changes that can cause cracking.
- Chill before serving: Refrigerate for at least 1 hour (or up to 2 days) to fully set and develop flavor.
- Optional: remove bubbles: A small kitchen torch can help eliminate air bubbles for a smooth top.
How to make Baked Eggnog Custard
This recipe for baked eggnog custard makes enough for four 6–8 oz ramekins. I like using 6 oz mini coffee mugs - they’re just so cute! If you divide the custard into smaller ramekins, the baking time will be shorter, so keep that in mind when planning.
The custard is baked in a water bath, which helps it cook evenly, stay silky smooth, and prevents cracks from forming in the oven.

- Step 1: Preheat your oven to 325°F. Arrange four 6‑oz ramekins in a baking dish tall enough to hold water halfway up the sides of the ramekins. I like using an 8×8‑inch baking pan.

- Step 2: In a small saucepan, combine the eggnog, ground cinnamon, and nutmeg. Whisk to blend, then heat over medium heat until the mixture just begins to simmer. Watch it carefully - don’t let it boil; it only needs to be warmed through.

- Step 3: In the meantime, combine the granulated sugar, large eggs, kosher salt, vanilla extract and rum in a heat-proof bowl.

- Step 4: Whisk the ingredients together until they are fully combined and smooth.

- Step 5: Slowly pour the warm eggnog into the egg mixture a little at a time, whisking constantly. This gradual process, called tempering, gently warms the eggs so they blend smoothly with the hot liquid without curdling.

- Step 6: Place a fine-mesh strainer over a pitcher and pour the custard mixture through it. Straining removes any tiny bits of cooked egg, ensuring a smooth, velvety custard.

- Step 7: Divide the gluten-free eggnog custard among the prepared ramekins, filling each about ¾ full. Leave a little space at the top.

- Step 8: This is optional: If you have a small kitchen torch, you can use it to gently remove any air bubbles from the custard’s surface. Hold the flame a few inches above and sweep it steadily across the top. This smooths the custard without cooking it further.

- Step 9: Place the baking dish in the oven, then carefully pour hot water into the dish until it reaches about halfway up the sides of the ramekins. Pour slowly to avoid splashing.

- Step 10: Bake the eggnog custard at 325°F for about 35 - 40 minutes. The custard should be set around the edges but still slightly jiggly in the center. If you gently tap the side of the ramekin, the middle should wobble like Jell-O, not slosh like liquid.
Keep in mind that baking times may vary depending on your oven and the size of the ramekins you’re using.

- Step 11: Carefully remove the baking dish from the oven and place it on a cooling rack. Let the custards sit in the still-hot water bath for 10 minutes to cool gradually.

- Step 12: Lift the ramekins out of the water bath and let the gluten free eggnog custards cool to room temperature. Then refrigerate for at least one hour - or up to overnight or two days - to chill the custards completely.
Serving Ideas
This Gluten Free Eggnog Custard tastes best when fully chilled. Refrigerate for at least 1 hour, or up to 2 days, so it sets completely. I like to serve the individual eggnog custards directly in the ramekins I baked them in.
- A dollop of whipped cream: Garnish with lightly sweetened or spiced whipped cream for extra richness. For a festive twist, whisk in a pinch of nutmeg or cinnamon before whipping. A dollop of Eggnog Whipped Cream would be delicious with this dessert.
- Brûléed eggnog custard: For a special presentation, sprinkle a thin layer of sugar over the chilled custard and caramelize it with a kitchen torch to create a crisp, golden top - just like a classic crème brûlée.
- Cookies or crumbles: Crumble gluten free gingersnaps, shortbread, or speculaas over the custard for texture and a festive touch. For extra flair, add whipped cream first, then sprinkle the crumbles on top.
Storage & Freezing
Cool completely first: After baking, let the baked eggnog custards cool to room temperature in the water bath, then remove them from the bath.
Refrigerate: Cover each ramekin with plastic wrap or a reusable lid. Refrigerate for at least an hour before serving. Custard can be kept in the fridge for up to 5 days. Don’t cover the custard while it’s still warm, as this can cause condensation on top. Let it cool first.
Freezing: Eggnog custard doesn’t freeze very well, as the texture can become grainy after thawing. It’s best enjoyed fresh.

Note about Salt in my Recipes
I use Diamond Kosher Crystal Salt in all of my recipes unless otherwise stated. If use use a different brand or kind of salt in your kitchen please adjust accordingly since some salts can be saltier. If you use Morton’s Kosher Salt please be aware that their salt granules are smaller in size, denser, and crunchier and twice as salty.
Baking in grams
I share my recipes in grams and by weight since baking by weight is the most accurate way to bake. Digital Scales are very affordable and easy to use. You can purchase them on Amazon for less than a set of measuring cups. For small amounts under 10 grams, I like to use this Precision Pocket Scale. Measuring cups are very inaccurate which can cause significant errors when it comes to gluten-free baking or baking in general. Especially since I bake with gluten-free flours which weigh differently than “regular” flours. I do provide some ingredients like spices and leavening agents in measuring spoons. To learn more about Baking with a digital scale, make sure to check out my post about Baking by weight.
Note about Ovens and Oven Temperatures
All my recipes are tested and developed with a conventional oven. I always bake my baked goods on the rack placed in the MIDDLE of my oven. This way the heat coming from the bottom will not burn my baked goods.
If you are baking with convection (fan-forced), please adjust the recipes accordingly. Convection oven can cause baked goods to dry out quickly and still be raw inside. Since takes at least 15-20 minutes for a standard American Oven to be fully preheated. I highly recommend investing in an Oven Thermometer.
Substitutions and Modifications
Any dietary or ingredient modifications/substitutions to this recipe may alter the end result in appearance and taste. I test my recipes several times as published in this post and The Gluten Free Austrian Blog is not responsible for the outcome of any recipe you find on our website.

More Gluten Free Desserts to try


📖 Recipe
Gluten Free Eggnog Custard

Warm, festive, and easy to make, this Gluten Free Eggnog Custard is the perfect holiday dessert. Made with simple ingredients and spiced with nutmeg and cinnamon, it captures all the classic eggnog flavors in a silky baked custard. Top with eggnog whipped cream for a cozy Christmas treat everyone will love. Save this recipe for your holiday baking!
Ingredients
Gluten Free Eggnog Custard
- 480 grams eggnog (See Note)
- ¼ teaspoon ground cinnamon
- ¼ teaspoon ground nutmeg
- 3 large eggs, can be cold
- 65 grams granulated sugar
- ¼ teaspoon kosher salt
- 25 grams rum (or ½ teaspoon rum extract)
- 1 teaspoon vanilla
Instructions
How to Make Eggnog Custard
I like to bake these in 6-oz ramekins (or cute little coffee cups if you want something more festive). If you use smaller dishes or divide the custard into more portions, the baking time will decrease - so just keep an eye on it.
- Preheat oven to 325°F. Place four 6-ounce ramekins in a baking dish tall enough to hold water halfway up the sides (I use an 8x8 pan).
- Add eggnog, ground cinnamon, and nutmeg to a small saucepan and simmer until just starting to simmer. Do not boil.
- In a heat-proof bowl, combine the sugar, eggs, rum (or rum extract), kosher salt and vanilla. Whisk until smooth and fully combined.
- Slowly pour the warm eggnog into the egg mixture, a little at a time, whisking constantly to temper the eggs.
- Pour the custard through a fine-mesh strainer into a pitcher to remove any cooked bits, ensuring a smooth texture.
- Divide the custard evenly among the ramekins. Leave a little space at the top (about ¼ inch) so the custard can expand slightly without spilling.
- Optional: Use a kitchen torch to gently remove air bubbles from the surface, moving the flame in a sweeping motion.
- Place the baking dish in the oven. Carefully pour hot water into the pan until it reaches halfway up the ramekins.
- Bake for 35 - 40 minutes, until the edges are set but the centers still jiggle slightly when tapped. (Baking times may vary by oven and ramekin size.)
- Remove the baking dish from the oven and place it on a cooling rack. Let the custards sit in the water bath for 10 minutes to cool gradually.
- Lift the ramekins out of the water bath and allow them to cool to room temperature. Refrigerate for at least 1 hour, or up to 5 days, before serving.
Notes
Eggnog: Use a full-fat, dairy-based eggnog for the best texture in this Gluten Free Eggnog Custard Recipe. A rich, creamy eggnog helps the custard set properly and gives it that classic holiday flavor. Avoid reduced-fat or non-dairy versions, which tend to be too thin and won’t create the same smooth, silky custard.
Baking Time: Keep in mind that baking times may vary depending on your oven and the size of the ramekins you’re using.
Make Head: The baked eggnog custard can be stored in the fridge for about 4-5 days. Making it a great make ahead dessert option for the holidays
Recommended Products
As an Amazon Associate and member of other affiliate programs, I earn from qualifying purchases.

Nutrition Information:
Yield:
4Serving Size:
1Amount Per Serving: Calories: 245
Calories are a guestimate and randomly generated.

Heather says
Amazing! I made this for my family’s early Christmas Eve celebration, and it was a big hit. I added a creme brulee topping and people said it was the best créme brûlée they’d ever had. The egg nog custard was very easy to make and so festive. Would definitely recommend!
Daniela says
Thank you so much Heather for the kind words. Love that it was such a big hit!
Patricia says
Absolutely delicious! First time making custard but is was surprisingly easy. This will be my forever indulgence! Thank you!