
There’s something magical about gluten free potato gnocchi. This beloved Italian dish transforms just a handful of simple ingredients like potatoes and gluten free flour into soft, pillowy dumplings. Whether they’re served in a rich tomato sauce or simply tossed with brown butter and sage, gnocchi offer a comforting and satisfying meal.

Jump to:
- Recipe Ingredient Notes
- Tools needed to make Gluten Free Gnocchi
- What are Gnocchi?
- How to make Gluten Free Gnocchi Dough
- How to shape Potato Gnocchi
- How to cook Gluten Free Potato Gnocchi
- How to serve Potato Gnocchi
- Storage & Freezing
- FAQ - Gluten Free Gnocchi
- Note about Salt in my Recipes
- Baking in grams
- Note about Ovens and Oven Temperatures
- Substitutions and Modifications
- More Gluten Free Savory Recipes to try
- 📖 Recipe
- 💬 Comments
Recipe Ingredient Notes
Potatoes: Starchy potatoes like Russets or Yukon Golds work best for potato gnocchi. Russet Potatoes high starch and low moisture content make them ideal for light and fluffy gnocchi. They hold together well without needing too much flour, which keeps the gnocchi from becoming dense. Yukon Gold Potatoes are slightly waxier than Russets, Yukon Golds have a creamy texture and buttery flavor. They’re a good choice if you prefer gnocchi with a slightly richer taste and a bit more moisture.
Avoid waxy potatoes (like red potatoes), as they are too moist and can make the gnocchi heavy and sticky.
Gluten Free Flour: I prefer making potato gnocchi with a flour blend like King Arthur Measure for Measure, Bob's Red Mill 1-1 (blue bag) or my own gluten free flour. This does not mean other brands will not work in this recipe. I just have not tested them in this application. Just make sure it is a blend of different gluten-free flours and starches and does contain xanthan gum.
Egg Yolk: Adding an egg yolk to gnocchi dough helps improve its texture and binding. Without it, the gluten free gnocchi may become too delicate, potentially falling apart during cooking. It also provides a bit of richness.
Nutmeg: I love adding a pinch of freshly grated nutmeg to potato gnocchi. It enhances the flavor of the potatoes without overpowering them. I prefer grating my nutmeg with a microplane when it comes to savory recipes but ground nutmeg from the store works just as well. Freshly grated nutmeg does have a unique warmth.

Tools needed to make Gluten Free Gnocchi
Making gluten free potato gnocchi at home can be straightforward with some practice, and it doesn’t require many special tools. Here’s what you’ll need:
- Potato ricer: A potato ricer or a food mill (Flottle Lotte in Austria) to rice the potatoes finely. A masher can also work, but be gentle to avoid overworking the potatoes.
- Mixing bowl: You will need a mixing bowl to mix the riced potatoes with the gluten free flour, egg yolk, nutmeg, and kosher salt to form the gluten free gnocchi dough.
- Bench Scraper or Knife: To cut the dough into portions and shape the gnocchi.
- Fork (Optional): For creating the classic ridges on each piece, which help sauces cling better. You can also use a gnocchi board, but a fork works just as well.
- Large Pot: For boiling the gnocchi once they’re shaped.
- Slotted Spoon: To remove the gnocchi from the pot when they float to the top, signaling they’re done.
What are Gnocchi?
Gnocchi (pronounced "NYOH-kee") are small, soft dumplings that originate from Italy. They are traditionally made from potatoes, flour, and sometimes egg, which helps bind the ingredients together. Gnocchi can be shaped into various forms, but they are often rolled into small pieces and then indented with a fork to create ridges. This helps the dumplings hold sauces better.
There are many variations of gnocchi, including those made with ricotta cheese, semolina, or other ingredients, but potato gnocchi is the most common. They are typically boiled until they float to the surface, indicating that they are done, and can be served with a variety of sauces, from simple brown butter and sage to rich tomato or cream sauces.

How to make Gluten Free Gnocchi Dough
First off, make sure to boil/steam the potatoes' skin ON. This way, they will absorb less water while cooking. The amount of flour used can vary slightly depending on the type of potato used. Start by adding a little less flour and add more as needed. The dough should be soft but easy to work with.
- Start by washing and baking/steaming the potatoes with their skin on. I like to use my Instant Pot for this or you can also bake the potatoes in the oven. To bake the potatoes, pierce them several times with a fork and then place them in a preheated 400°F oven. Place the potatoes directly on the middle rack and bake until they are very tender when pierced with a paring knife. This can take up to one hour depending on their size. To steam the potatoes in the instant pot I use the manual setting and steam the pierced, skin on potatoes for around 16 minutes (for medium sized potatoes) and then allow a natural release for 8-10 minutes depending on their size.
- Let the potatoes cool down a bit until they are cool enough to handle. Peel the potatoes. Then push them through a potato ricer into a large bowl or rice them with the food mill. Make sure there are no lumps! Don't use a food processor or blender - that will cause the potato dough to be gummy and sticky. You should have roughly 500 grams of riced potatoes. (Always weigh them after ricing them)

- Sprinkle the gluten free flour and koshers salt evenly over the riced potatoes. Add a pinch of freshly grated nutmeg here, if desired.
- Make a well in the center of the flour and potatoes, then add the egg yolk.
- With a fork or a spatula mix the ingredients together until a rough dough forms.

- Transfer the rough looking gluten free potato dough to a lightly floured work surface. Quickly knead the mixture with your hands into a smooth dough. If the mixture appears too sticky, add a little bit more flour.
- Place the dough back into the mixing bowl and cover it with a clean kitchen towel. Allow the dough to rest for 5-10 minutes. I found during my recipe testing that a short rest (10 minutes max) helps with the consistency of the dough and makes it easier to roll and shape.

How to shape Potato Gnocchi
Shaping potato gnocchi is simple once you get the hang of it. If you like you can use a gnocchi board, but a fork works just as well.
- Start by lining a sheet pan with parchment paper and lightly dust it with some additional gluten free flour.
- Dive the gluten free potato gnocchi dough into smaller portions and roll into a log shape, about ½ inch thick. Try to roll the dough as even as possible.
- Use a knife to cut the rope into ¾-inch pieces. These will be your gnocchi. Little pillows of heaven.
- If you like you can also add some texture to the gnocchi using a fork. Hold a fork in one hand with the tines of a fork facing down. Take each piece of gnocchi, press it lightly onto a fork with your thumb, and gently roll it down. This will create ridges on one side and a slight indentation on the other, helping the sauce cling better to each piece (Image 3 below) Another way to add some texture to gnocchi is by shaping each piece into a small ball and pressing it down with a fork (Image 4 below)
- Once you have all potato gnocchi shaped you can either cook them right away, store them in the fridge overnight (on the sheet tray with a lid!) or freeze them up to 2 months.

How to cook Gluten Free Potato Gnocchi
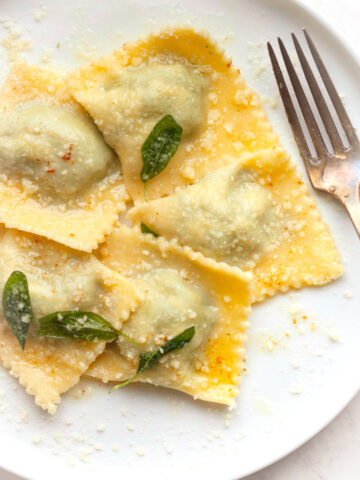
The gluten free potato gnocchi shown in this blog post are pan fried after they have been cooked and then finished with brown butter and crispy sage.
- Bring a large pot of salted water to a gentle boil. Avoid a rolling boil, as gnocchi are delicate and can break apart in vigorously boiling water.
- Add the gnocchi to the pot in batches, giving each piece a gentle stir to prevent sticking. The gnocchi will sink at first, but they’re done once they float to the surface, usually within 1-2 minutes. I recommend cooking the dumplings in smaller batches. This way the pot doesn't overcrowd. Cooking times depend on the size and thickness of the gnocchi.
- As each gnocchi batch floats, use a slotted spoon to lift them out and transfer them to a lightly oiled plate or directly into your sauce of choice.
- For extra flavor and a bit of crispiness, heat a skillet with a little olive oil or butter over medium-high heat. Add the boiled gnocchi and sauté for 2-3 minutes until golden and slightly crisp on the outside.

How to serve Potato Gnocchi
Gluten Free Potato gnocchi are versatile and can be served in many delicious ways! Here are some popular ideas:
With Butter and Sage: In a large skillet, melt the butter over medium heat. Cook until the butter turns golden brown and releases a nutty aroma, about 3–5 minutes. Be careful not to let it burn. Add the sage leaves and cook, swirling the pan occasionally, until they crisp up. Meanwhile, in a separate pan, sauté the boiled gluten free gnocchi until crispy. Once they’re golden, add them to the skillet with the brown butter and crispy sage. Season with kosher salt and freshly ground black pepper to taste.
In a Tomato Sauce: Toss the cooked gnocchi with a classic marinara or tomato basil sauce. Finish with freshly grated Parmesan and basil leaves for a comforting Italian-style dish.
With Pesto: Mix gnocchi with your favorite pesto. The pesto pairs well with the pillowy gnocchi, and a sprinkle of grated Parmesan makes it even better.
Baked with Cheese: Layer gnocchi in a baking dish with marinara or gluten free béchamel sauce, sprinkle with mozzarella and Parmesan, and bake until bubbly and golden for a gnocchi gratin.
With Vegetables and Olive Oil: Sauté gnocchi with seasonal vegetables like cherry tomatoes, spinach, zucchini, or peas in olive oil, and finish with fresh herbs for a light, fresh meal.

Storage & Freezing
Fresh, uncooked gluten free gnocchi can be stored in the refrigerator for about 2-3 days. To keep them fresh, place them in an airtight container or cover them tightly with plastic wrap. Be sure to dust them with a little flour to prevent sticking before storing. If you don’t plan to use them within that timeframe, freezing is the best option for longer storage.
To freeze gnocchi, place them in a single layer on a baking sheet lined with parchment paper. Make sure they aren’t touching each other. Put the baking sheet in the freezer for about 1-2 hours, or until the gnocchi are frozen solid. This prevents them from clumping together. Once frozen, transfer the gnocchi to an airtight container or a resealable plastic bag. You can store them for up to 2-3 months.
While freezing gnocchi is easy, the cooking from frozen part threw me a few curveballs during testing this recipe. I did not enjoy the taste of the boiled gnocchi after them being frozen. They became very mushy and sticky. So I found the best way to cook frozen gluten free gnocchi is actually sauteeing them at a low temperature in some olive oil in a large skillet. This way they don't become mushy and turn into little heavenly pillows. If you happen to own an air fryer (I don't) it also works wonderfully to reheat frozen gnocchi.
FAQ - Gluten Free Gnocchi
Yes, you can use a box grater to rice potatoes. Just grate the cooked potatoes using the largest holes to achieve a fine, fluffy texture suitable for gnocchi.
Gnocchi are ready when they float to the surface of the boiling water. This typically takes about 1-2 minutes. Once they float, remove them with a slotted spoon.
Fresh potato gnocchi should be boiled to cook them properly. Boiling allows them to cook through evenly and achieve the desired soft texture. After boiling, you can also sauté them for added flavor and a crispy exterior if you like.

Note about Salt in my Recipes
I use Diamond Kosher Crystal Salt in all of my recipes unless otherwise stated. If use use a different brand or kind of salt in your kitchen please adjust accordingly since some salts can be saltier. If you use Morton’s Kosher Salt please be aware that their salt granules are smaller in size, denser, and crunchier and twice as salty.
Baking in grams
I share my recipes in grams and by weight since baking by weight is the most accurate way to bake. Digital Scales are very affordable and easy to use. You can purchase them on Amazon for less than a set of measuring cups. For small amounts under 10 grams, I like to use this Precision Pocket Scale. Measuring cups are very inaccurate which can cause significant errors when it comes to gluten-free baking or baking in general. Especially since I bake with gluten-free flours which weigh differently than “regular” flours. I do provide some ingredients like spices and leavening agents in measuring spoons. To learn more about Baking with a digital scale, make sure to check out my post about Baking by weight.
Note about Ovens and Oven Temperatures
All my recipes are tested and developed with a conventional oven. I always bake my baked goods on the rack placed in the MIDDLE of my oven. This way the heat coming from the bottom will not burn my baked goods.
If you are baking with convection (fan-forced), please adjust the recipes accordingly. Convection oven can cause baked goods to dry out quickly and still be raw inside. Since takes at least 15-20 minutes for a standard American Oven to be fully preheated. I highly recommend investing in an Oven Thermometer.
Substitutions and Modifications
Any dietary or ingredient modifications/substitutions to this recipe may alter the end result in appearance and taste. I test my recipes several times as published in this post and The Gluten Free Austrian Blog is not responsible for the outcome of any recipe you find on our website.
More Gluten Free Savory Recipes to try


📖 Recipe
Gluten Free Potato Gnocchi

Learn how to make delicious potato gnocchi from scratch! Soft, pillowy dumplings perfect with any sauce for a comforting Italian meal.
Ingredients
Gluten Free Potato Gnocchi
- 700 grams starchy potatoes, preferably russet or yukon gold (SEE NOTE)
- 100 grams gluten free multi purpose flour
- 1 large egg yolk
- ½ teaspoon (2 grams) kosher salt
- a pinch of nutmeg (optional)
- additional gluten free flour for shaping
Instructions
Gluten Free Gnocchi Dough
First off, make sure to boil/steam the potatoes' skin ON. This way, they will absorb less water while cooking. The amount of flour used can vary slightly depending on the type of potato used. Start by adding a little less flour and add more as needed. The dough should be soft but easy to work with.
- Wash and bake or steam the potatoes with the skin on. I prefer using my Instant Pot, but you can also bake them in the oven. For baking, pierce the potatoes several times with a fork and place them directly on the middle rack of a preheated 400°F oven. Bake until very tender when pierced with a paring knife, which can take up to an hour depending on their size. For steaming in the Instant Pot, use the manual setting to steam pierced, skin-on potatoes for about 16 minutes for medium-sized ones, then allow a natural release for 8-10 minutes, depending on their size.
- Once the potatoes are cool enough to handle, peel them and pass them through a potato ricer into a large bowl, or use a food mill. Ensure there are no lumps—avoid using a food processor or blender, as this will make the dough gummy and sticky. You should have roughly 500 grams of riced potatoes, so always weigh them after ricing
- Sprinkle the gluten-free flour and kosher salt evenly over the riced potatoes, and add a pinch of freshly grated nutmeg if desired.
- Make a well in the center of the flour and potatoes, then add the egg yolk.
- Using a fork or spatula, mix the ingredients until a rough dough forms.
- Transfer the mixture to a lightly floured work surface and quickly knead it into a smooth dough. If the dough appears too sticky, add a little more flour.
- Return the dough to the mixing bowl and cover it with a clean kitchen towel. Allow it to rest for 5-10 minutes; I found that a short rest helps improve the dough's consistency, making it easier to roll and shape.
How to shape Potato Gnocchi
Shaping potato gnocchi is simple once you get the hang of it. While a gnocchi board is helpful, a fork works just as well.
- Start by lining a sheet pan with parchment paper and lightly dusting it with gluten-free flour.
- Divide the gluten-free potato gnocchi dough into smaller portions and roll each portion into a log shape, about ½ inch thick. Aim for even thickness as you roll.
- Use a knife to cut the log into ¾-inch pieces, which will be your gnocchi—little pillows of heaven.
- To add texture, hold a fork with the tines facing down and press each piece of gnocchi lightly onto the fork with your thumb, then gently roll it down. This creates ridges on one side and a slight indentation on the other, helping the sauce cling better. Alternatively, you can shape each piece into a small ball and press it down with a fork for added texture.
- Once you have all your potato gnocchi shaped, you can cook them immediately, store them in the fridge overnight (covered on the sheet tray), or freeze them for up to 2 months.
How to cook Gluten Free Potato Gnocchi
- Bring a large pot of salted water to a gentle boil. Avoid a rolling boil, as gnocchi are delicate and can break apart in vigorously boiling water.
- Add the gnocchi to the pot in batches, giving each piece a gentle stir to prevent sticking. The gnocchi will sink at first but are done once they float to the surface, usually within 1-2 minutes. Cooking in smaller batches is recommended to prevent overcrowding, as cooking times can vary based on the size and thickness of the gnocchi.
- As each batch floats, use a slotted spoon to lift them out and transfer them to a lightly oiled plate or directly into your sauce of choice.
- For extra flavor and a bit of crispiness, heat a skillet with a little olive oil or butter over medium-high heat. Add the boiled gnocchi and sauté for 2-3 minutes until golden and slightly crisp on the outside.
Notes
Potatoes: Starchy potatoes like Russets or Yukon Golds work best for potato gnocchi. You should have roughly 500 grams of riced potatoes. (I always weigh them after ricing them). I always cook one extra potato just in case one is past its prime.
Recommended Products
As an Amazon Associate and member of other affiliate programs, I earn from qualifying purchases.
-
 NEEGLEN Gnocchi Board & Gnocchi Pasta Maker – Natural Beechwood Pasta Board for Perfect Homemade Pasta – Ideal Gift for Pasta Lovers
 -
PriorityChef Large 15oz Potato Ricer, Heavy Duty Stainless Steel Potato Masher and Ricer Kitchen Tool, Press and Mash Kitchen Gadget For Perfect Mashed Potatoes - Everytime


Nutrition Information:
Yield:
4Serving Size:
1Amount Per Serving: Calories: 408
Calories are a guestimate and randomly generated.


Sarah says
Hello, thank you for such a thoughtful & thorough explanation for this recipe! I noticed that you mention Bob's Red Mill 1:1 flour is a good flour to use but you also say to use a flour that doesn't have xanthan gum. Bob's Red Mill has xanthan gum in it. Would this flour still be ok to use? Thank you
Daniela says
I am not sure where you read that the flour should not contain xanthan gum. I actually wrote the complete opposite in the recipe ingredient notes: Just make sure it is a blend of different gluten-free flours and starches and does contain xanthan gum.
Britta says
Best ever! Making these on repeat!
Daniela says
This makes me so happy to read!
Sandy says
I haven't tried these yet but will soon. I have been looking for a good dumpling recipe for chicken and dumplings, store bought gluten free baking mix is just too grainy and doesn't taste good. Do you have any recommendations for a good recipe/flour blend to use?
Daniela says
Hello, I do not at this point
Trud says
Can the gnocchi be made and then frozen for future use?
Daniela says
While it is technially possible to do this, I found the texture is not the same once frozen and cooked from frozen
Erin Hallock says
I'm anxious to try this! I love your recipes, especially your no knead focaccia and Butter Crunch Cookies (just made them today - amazing!). Would you recommend using the Caputo Fiorglut flour to make your potato gnocchi? If so, would the recipe change at all? Thanks!
Daniela says
So happy to read you enjoyed the focaccia and the butter crunch cookies. As using Caputo in this recipe, I wouldn't because it's really expensive. I use something more affordable here like Bob's or King Arthur.