
Whether you enjoy it warm with ice cream or by itself, this gluten-free peach cobbler is like a cozy, homemade treat that brings comfort and happiness. Juicy peaches are tossed with fresh blueberries, brown sugar, and freshly grated ginger, then topped with homemade gluten-free buttermilk biscuits. Once baked to perfection and served with a generous scoop of vanilla ice cream it is what I would consider heaven on a plate.
Cobblers are not something I grew up with in Austria so this was a "new to me" dessert when I first moved to the US. Over the years it has become one of my favorite summertime desserts. Easy to make and never disappoints.

Jump to:
- Recipe Ingredient Notes
- Recommended Tools to make a Gluten Free Peach Cobbler
- What is a Cobbler?
- How to make Gluten Free Buttermilk Biscuits
- Prepare the filling for Gluten Free Peach Cobbler
- How to bake a Peach Cobbler
- How to serve Gluten Free Peach Cobbler
- Storage & Freezing
- Substitutions
- FAQ - Gluten Free Peach Cobbler
- Note about Salt in my Recipes
- Baking in grams
- Note about Ovens and Oven Temperatures
- Substitutions and Modifications
- More Gluten Free Recipes to try
- 📖 Recipe
- 💬 Comments
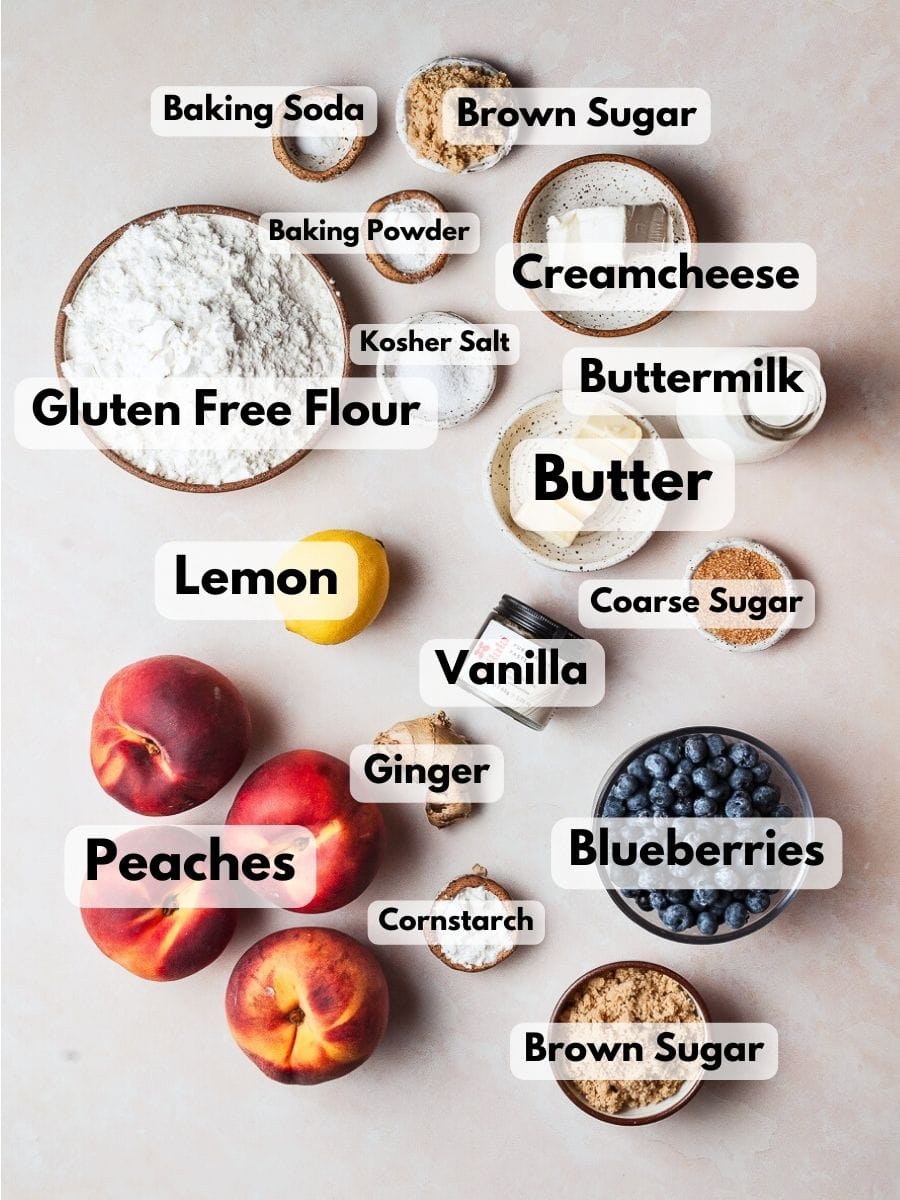
Recipe Ingredient Notes
Gluten Free Flour: The best gluten-free flour blend I can recommend to make the cream cheese biscuits for gluten-free peach cobbler is Cup4Cup. The addition of cornstarch creates a lighter crumb and therefore allows the biscuits to rise. If you are in Europe, I recommend using Schär Mix Pâtisserie. If you do not have access to Cup4Cup, you can tweak a blend like Bob’s Red Mill with this Homemade Biscuit Flour blend. I can not guarantee it will be as nice and flaky as Cup4Cup.
Homemade Biscuit Flour Blend
– 250 g of your gluten-free flour blend containing xanthan gum such as Bob’s Red Mill
– 75 g of cornstarch
– 1 teaspoon of dry non-fat milk powder (whole milk powder works as well)
Combine all ingredients and mix together with a whisk. The non-fat milk powder will provide browning but is also an emulsifier.
Buttermilk: I've tried using both buttermilk and a homemade version of buttermilk (milk combined with apple cider vinegar or lemon juice). The biscuits made with genuine buttermilk rose significantly higher and boasted a superior flavor compared to those made with the homemade alternative. In a pinch, one can use Kefir instead of buttermilk.
Cream Cheese: Cream Cheese not only gives the biscuits a little tang but also keeps the buttermilk biscuits moist and gives them the perfect texture. I use full-fat blocks/bricks of cream cheese. My brand of choice if Philadelphia which is gluten-free according to the Kraft-Heinz website. I always recommend checking the packaging or the manufacturer’s website to ensure the products used are celiac-safe.
Peaches: Look for peaches that are ripe but not too squishy. Ripe peaches should have a sweet, fragrant aroma. If they lack fragrance, they may not be fully ripe. If you like, you can add some blueberries, raspberries, or even some pitted cherries to the gluten-free cobbler filling.
Fresh Ginger: I love using fresh ginger with fresh peaches. This is an optional ingredient and the cobbler recipe can be made with ground ginger. You can find fresh ginger root in the produce department of well-stocked grocery stores. At times, the roots might appear quite large, but it's perfectly fine to snap off just the amount you need – about 1-2 inches for this delicious gluten free peach cobbler recipe.
Recommended Tools to make a Gluten Free Peach Cobbler
To successfully make Gluten Free Peach Cobbler, you'll need a few kitchen tools. Most of them are available on Amazon, but you probably already have them in your kitchen.
For the Gluten Free Buttermilk Biscuits, you will need a large mixing bowl which you can totally re-use to make the Peach Cobbler Filling. You will need a microplane or zester for the lemon zest and the freshly grated ginger.
I use a very well-seasoned 10" cast iron skillet to bake the Peach Cobbler. If you don't own a cast iron skillet, any oven-safe skillet will work. You may also use a casserole dish or a cake pan. I don't recommend a glass dish since they can break so easily. If your cast iron pan is not well seasoned, it may give your baked end products a metallic aftertaste.
You will also need a digital kitchen scale, a pairing knife, a cutting board, and a pastry brush.
What is a Cobbler?
A cobbler is a beloved dessert where a fruit filling is topped with a biscuit-like or cake-like batter. This combo is baked until the topping turns golden brown and the fruit filling bubbles and cooks. Cobblers, cherished in many cultures, especially in the United States, are known for their rustic, comforting qualities.
The name "cobbler" likely comes from how the dessert's topping resembles the uneven stones of cobblestone streets. You can make cobblers with various fruits, like peaches, berries, apples, cherries, and more.
Cobblers come in different styles:
Traditional Cobbler: Here, a fruit filling—often sweetened and sometimes spiced—is topped with dollops or drops of biscuit dough. During baking, the dough puffs up and expands, creating a charming, uneven appearance.
Biscuit-Topped Cobbler: In this version, the topping is more like biscuit dough. Roll out the dough and place it on the fruit filling, resulting in a tidier, biscuit-like layer once baked. This recipe for Gluten Free Peach Cobbler is a biscuit-topped cobbler.
Drop Biscuit Cobbler: Similar to the traditional style, but instead of rolling out the dough, you drop spoonfuls of biscuit dough onto the fruit filling, giving it a more rustic look.
Cakey Cobbler: This type involves pouring a cake-like batter over the fruit filling. As it bakes, the batter transforms into a moist, cakey layer.
Grunt or Slump: These are cobbler variations where the biscuit dough or batter is simmered on the stovetop or baked until slightly doughy, resulting in a softer, pudding-like texture.
People typically enjoy warm cobblers, either on their own or with ice cream, whipped cream, or a drizzle of custard sauce. The choice of fruit and the type of topping can vary based on personal preferences and regional influences. In essence, cobblers are a delightful, comforting dessert that celebrates the simplicity and deliciousness of baked fruit and dough.
How to make Gluten Free Buttermilk Biscuits
Before you start make sure the unsalted butter, cream cheese, and buttermilk are as cold as possible. If you like you can cut or grate the butter ahead of time and stick it in the freezer for 10-15 minutes. Line a sheet tray with parchment paper and set it aside.
Step 1: Line a sheet tray with parchment paper and set it aside.
Step 2: Combine the dry ingredients in a large bowl. Cut the cold butter and cream cheese into small chunks and with your hands or a pastry blender, work it into the dry ingredients until they resemble the size of peas.
Step 3: Add the buttermilk to the flour mixture and with a flexible spatula stir everything together until the flour has been completely absorbed. The mixture will look shaggy.

Step 4: Transfer the gluten free biscuit dough onto a parchment-lined sheet tray. With your hands, push it together in a rectangular/square shape, around ¾ – 1″ thick. If your dough is sticky, feel free to sprinkle it with some additional flour (1 tablespoon or so).
Step 5: Cut the dough in half and place the two halves on top of each other. Gently press them together and reshape them into a square/rectangular shape. Turn the dough 90° (quarter turn), cut it in half, and stack again. Repeat this one more time for a total of three stacks. If your dough has become sticky because of a warm kitchen or warm hands place it in the fridge for 5-10 minutes. When you stack the dough, the butter and cream cheese form layers on top of each other. These layers ensure the gluten free buttermilk biscuits will be flaky and tender.

Step 6: Pat out the dough in a rectangular around ¾″ thick. Place the uncut biscuit dough in your fridge for at least 10 minutes. This gives the butter and cream cheese in the dough to chill down again and will ensure light and flaky gluten-free biscuits. Chilling the dough also makes them easier to cut.
Step 7: Once the dough has chilled for 10 minutes, gently press it out to your desired thickness. The typical thickness is around ½ to ¾ inch (1.3 to 1.9 cm). I went with ½ inch for my biscuits so I would get at least 7-8 biscuits for my gluten-free peach cobbler.

Step 8: Dip the edge of your biscuit cutter or cookie cutter into flour to prevent sticking. Press the cutter straight down into the rolled-out dough. Avoid twisting the cutter, as this can seal the edges of the biscuits and prevent proper rising. I use a 2 ½" round cookie cutter which gave me 8 gluten-free buttermilk biscuits. You may also use a larger cutter or a smaller one. It's up to you. Place the cutout biscuits on the prepared baking sheets.
Step 9: Once you've cut out as many biscuits as you can from the initial rolling, you might have some scraps of dough left. Gently gather these scraps, press them together, and pat out the dough again. Cut out more biscuits until you've used up all the dough.
Step 10: Place the sheet tray with the cutout biscuits in the freezer while you prepare the peach cobbler filling. At this point, you can freeze the gluten-free buttermilk biscuits for up to 2 weeks.

Prepare the filling for Gluten Free Peach Cobbler
The filling for the gluten free peach cobbler is pretty straightforward. I love adding some blueberries to the mix for some color. If you use frozen peaches or frozen blueberries, there is no need to thaw them before making the filling.
Step 1: Start by cutting the peaches in half all the way around and twist the halves in opposite directions to loosen the pit. Pull the peach halves apart and remove the pit. Most fresh peaches sold in the U.S. are freestone peaches, making the pit easy to remove. However, if you have clingstone peaches, you may need to use a spoon to dig out the pit.
Step 2: Once the pit is removed, place the peach halves with the cut side down on a cutting board and slice them into ¼-inch slices. Try to keep them on the thinner side so they will cook faster in the oven.

Step 3: Add the blueberries (if using), the zest and juice from one lemon along with the freshly grated ginger to the fresh fruit. The easiest way to grate fresh ginger is using a Microplane grater. With a pairing knife carefully remove the peel of the knob of ginger and grate the amount needed. I use around 1 inch of fresh ginger.
Step 4: Add the brown sugar, corn starch, a pinch of kosher salt, and vanilla extract, and give the sliced peaches a good stir.
Step 5: Transfer the peach filling to the prepared baking dish. I use a 10" cast iron skillet. There is no need to spray the baking dish with nonstick baking spray. The fruit may sit at room temperature or be refrigerated for a few hours before baking.

How to bake a Peach Cobbler
Once the peach cobbler filling is prepared and the gluten-free biscuits are ready to go, it's time to bake this easy gluten-free peach cobbler.
Step 1: Start by preheating the oven to 400F.
Step 2: Once the oven is fully preheated, retrieve the skillet with the peach filling and the gluten-free buttermilk biscuits. Get a small bowl of extra buttermilk and some coarse sugar.
Step 3: Arrange the biscuits on top of the fruit filling. Depending on how big you cut them you should fit 7-8 biscuits on top of the peaches.
Step 4: With a pastry brush, brush each biscuit with buttermilk and sprinkle them with a generous amount of coarse sugar.
Step 5: Bake the peach cobbler at 400F for 10 minutes. Then, without opening the door, reduce the temperature to 350F. Continue baking at 350F for 35-40 minutes until the peach filling is bubbly, reaches 200F internal temperature in the MIDDLE and the biscuits are golden brown. Since the biscuit topping can quickly brown, I recommend tenting the cobbler with aluminum foil after 20 minutes. This way the gluten-free buttermilk biscuits stay moist and won't dry out. Please be aware that the cooking time can vary from oven to oven.
Step 6: Once the gluten free cobbler is ready, carefully remove the baking dish from the oven and place it on a cooling rack. Allow the cobbler to cool for at least 15 minutes before serving (some people say 30 minutes or longer but who really wants to wait that long?).

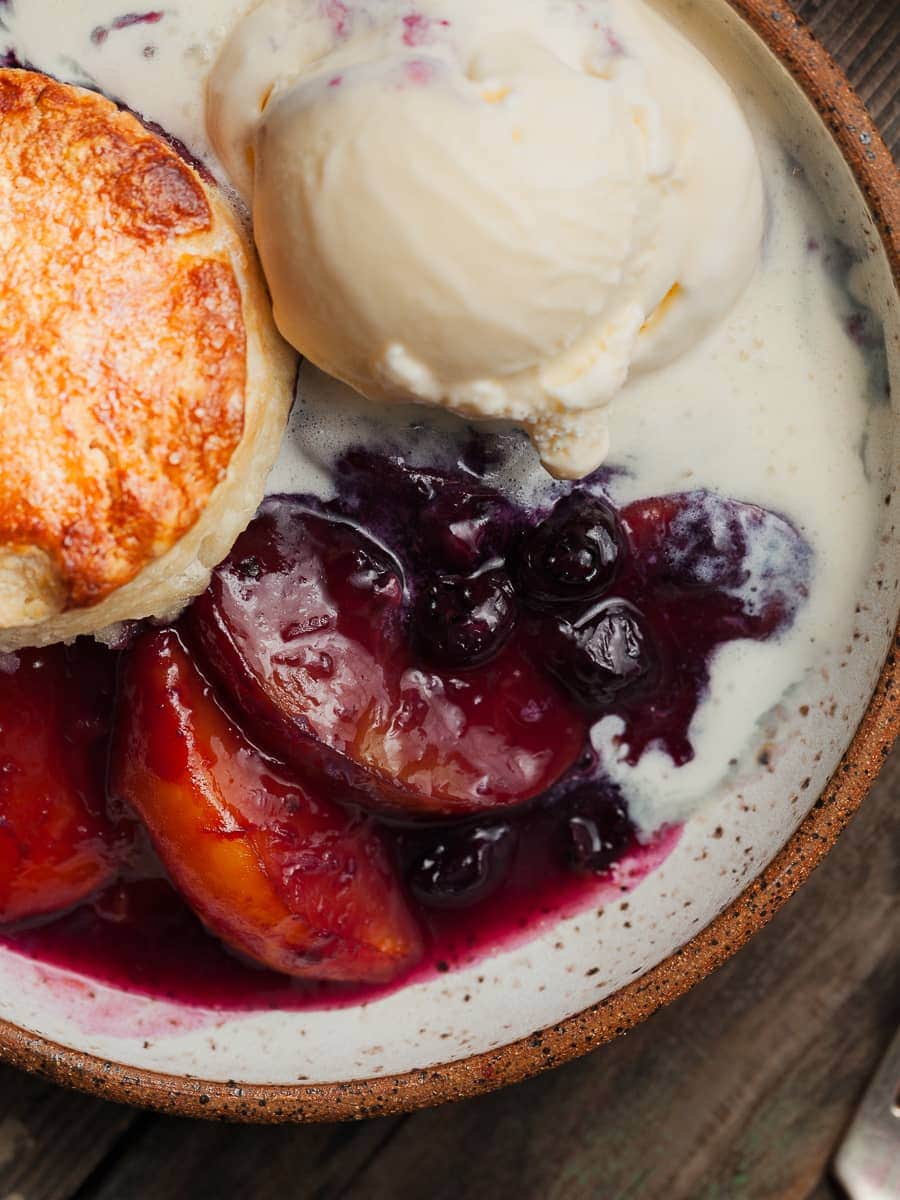
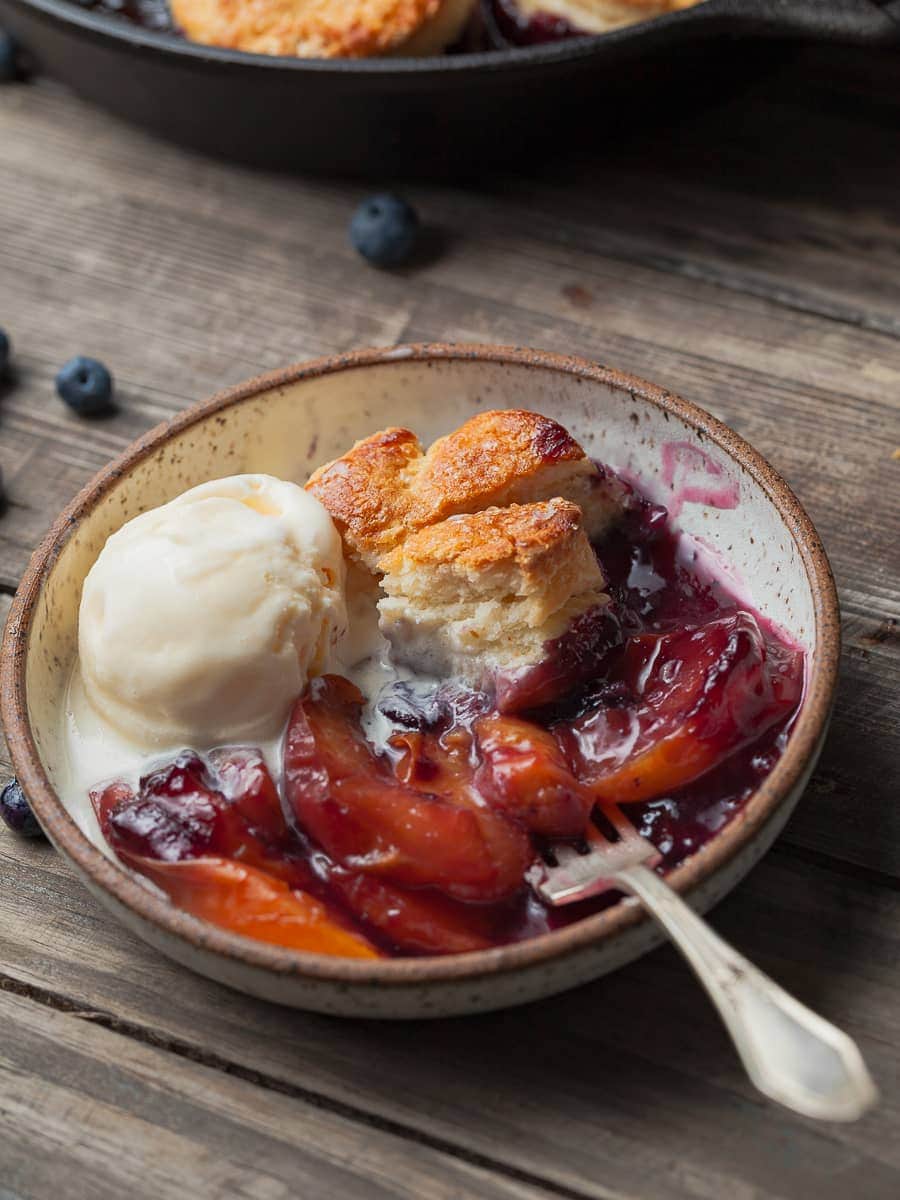
How to serve Gluten Free Peach Cobbler
Cool Before Serving: While a peach cobbler is best served warm, allow for it to cool down a bit after baking. This prevents burns and lets the juices thicken. The warmth enhances the flavors and textures of the dessert.
Scoop onto Plates: Use a big spoon to dish out the peach cobbler onto individual plates. Get a good amount of the peach mixture and of course a gluten-free buttermilk biscuit.
Add Ice Cream or Whipped Cream: To make it even better, add a scoop of vanilla ice cream on top. The warm cobbler and cold ice cream go together perfectly. Or, try a spoonful of whipped cream for a lighter option that still tastes great with the cobbler.
Garnish (Optional): If you'd like, you can garnish the dessert with a sprinkle of cinnamon, nutmeg, or a few fresh mint leaves for a pop of color and added flavor.
Storage & Freezing
Storing leftover peach cobbler properly will help maintain its freshness and flavor. Here's how to store it:
Cool Down: Allow the peach cobbler to cool completely before storing. Leaving it out to cool for about an hour at room temperature is a good idea.
Divide and Conquer: If you have a large batch, consider dividing the cobbler into individual portions. This way, you can easily reheat and enjoy single servings without having to reheat the entire dish.
Refrigeration: Place the leftover peach cobbler in an airtight container or cover it tightly with plastic wrap or aluminum foil. Then, store it in the refrigerator. Proper sealing prevents the cobbler from absorbing unwanted odors and moisture from the fridge. If the cobbler was baked in a cast iron pan, I recommend transferring it to a different dish for storage.
Use Within a Few Days: Leftover peach cobbler should be consumed within 3-4 days to ensure it remains safe to eat and maintains its quality.
Reheating: When you're ready to enjoy the leftover cobbler, you can reheat it. To prevent the biscuit topping from becoming soggy, it's best to reheat individual servings in the oven or toaster oven at a low to medium temperature (around 325°F or 160°C). You can also use a microwave, but the cobbler topping might lose some of its crispiness.
Serve Fresh: After reheating, serve the peach cobbler warm. You can add a scoop of ice cream or a dollop of whipped cream again if you like.
Remember that the quality of the cobbler may slightly change after refrigeration and reheating. The texture might be a bit different, but the flavors should still be enjoyable. If you're concerned about having leftovers that you might not consume within a few days, you can also consider freezing individual portions. Frozen cobbler can be reheated directly from the freezer, but it might take a bit longer in the oven. Personally, I have not tried freezing leftover cobbler since I never had any leftovers.
Substitutions
Fruit: If peaches aren't your thing or they are not in season, feel free to substitute them with a different fruit like mixed berries, cherries, nectarines, plums, or even apples. Or try a combo of fruits. A personal favorite is peaches and cherries. If you opt to use frozen fruit, there is no need to thaw it before using it. Use a total of 900 grams of fruit to make this cobbler.
Dairy: Since this recipe for Gluten Free Buttermilk Biscuits does contain a lot of dairy, I recommend using my Gluten Free Sour Cream Biscuit Recipe instead. Replace the butter with vegan butter and the sour cream with a dairy-free product.
Spices: If you would like to change things up a bit, feel free to mix up the spices. A few drops (less than ⅛th of a teaspoon) of almond extract pairs very well with peaches or cherries. Ground cinnamon or freshly grated nutmeg for go very well with apples or pears.
Biscuit Topping: Not in the mood for biscuits? Replace them with a streusel topping to make a gluten-free peach crisp. Check out my Gluten Free Pecan Streusel Recipe. You will need a double recipe for a 10" skillet.
FAQ - Gluten Free Peach Cobbler
Yes, you can absolutely cook peaches with the peel on. In fact, leaving the peel on can add both flavor and color to your dishes. The peel becomes softer as the peaches cook, and many people find it perfectly enjoyable.
Since the biscuit topping can quickly brown, I recommend tenting the cobbler with aluminum foil after 20 minutes. This way the gluten-free buttermilk biscuits stay moist and won't dry out.
While a peach cobbler is best served warm, allow for it to cool down for at least 15 minutes. This prevents burns and lets the juices thicken.
Note about Salt in my Recipes
I use Diamond Kosher Crystal Salt in all of my recipes unless otherwise stated. If use use a different brand or kind of salt in your kitchen please adjust accordingly since some salts can be saltier. If you use Morton’s Kosher Salt please be aware that their salt granules are smaller in size, denser, and crunchier and twice as salty.
Baking in grams
I share my recipes in grams and by weight since baking by weight is the most accurate way to bake. Digital Scales are very affordable and easy to use. You can purchase them on Amazon for less than a set of measuring cups. For small amounts under 10 grams, I like to use this Precision Pocket Scale. Measuring cups are very inaccurate which can cause significant errors when it comes to gluten-free baking or baking in general. Especially since I bake with gluten-free flours which weigh differently than “regular” flours. I do provide some ingredients like spices and leavening agents in measuring spoons. To learn more about Baking with a digital scale, make sure to check out my post about Baking by weight.
Note about Ovens and Oven Temperatures
All my recipes are tested and developed with a conventional oven. I always bake my baked goods on the rack placed in the MIDDLE of my oven. This way the heat coming from the bottom will not burn my baked goods.
If you are baking with convection (fan-forced), please adjust the recipes accordingly. Convection oven can cause baked goods to dry out quickly and still be raw inside. Since takes at least 15-20 minutes for a standard American Oven to be fully preheated. I highly recommend investing in an Oven Thermometer.
Substitutions and Modifications
Any dietary or ingredient modifications/substitutions to this recipe may alter the end result in appearance and taste. I test my recipes several times as published in this post and The Gluten Free Austrian Blog is not responsible for the outcome of any recipe you find on our website.

More Gluten Free Recipes to try


📖 Recipe
Gluten Free Peach Cobbler

Whether you enjoy it warm with ice cream or by itself, this gluten-free peach cobbler is like a cozy, homemade treat that brings comfort and happiness. Juicy peaches are tossed with fresh blueberries, brown sugar, and freshly grated ginger, then topped with homemade gluten-free buttermilk biscuits. Once baked to perfection and served with a generous scoop of vanilla ice cream it is what I would consider heaven on a plate.
Ingredients
Gluten Free Buttermilk Biscuits
- 320 grams Cup4Cup Mulitpurpose flour (*see Note!)
- 25 grams light brown sugar
- 2 teaspoons baking powder
- ½ teaspoon baking soda
- ½ teaspoon kosher salt (2 grams)
- 60 grams unsalted butter, COLD
- 60 grams full fat cream cheese, COLD
- 180 grams buttermilk, COLD
Peach Cobbler Filling
- 700 grams peaches, sliced (weight after slicing)
- 250 grams blueberries
- 75 grams brown sugar
- 15 grams cornstarch
- 1 teaspoon freshly grated ginger, from 1" fresh ginger root
- Zest and Juice from 1 small lemon
- 1 teaspoon vanilla extract
- pinch of kosher salt
For Baking
- extra buttermilk for biscuits
- coarse sugar as needed
For Serving
- Vanilla Ice Cream
Instructions
How to make Gluten Free Buttermilk Biscuits
- Combine gluten free flour, sugar, baking powder, baking soda, and kosher salt in a large bowl and mix them together.
- Cut the cold butter and cream cheese into small chunks and with your hands or a pastry cutter, work it into the dry ingredients until they resemble the size of peas.
- Add the cold buttermilk and with a sturdy spatula mix it together. Do not worry about overmixing. It looks very dry in the beginning but the more you mix it, the more it will start to look like a dough.
- Transfer your dough to a parchment-lined sheet tray and with your hands, push it together in a rectangular/square shape - you want this around ¾ - 1" thick. If your dough is sticky, feel free to sprinkle it with some additional flour (1 tablespoon or so)
- Cut the dough in half and place the two halves on top of each other. Gently press them together and reshape them into a square/rectangular shape. Turn the dough 90° (quarter turn), cut it in half, and stack again. Repeat this one more time for a total of three stacks. If your dough has become sticky because of a warm kitchen or warm hands place it in the fridge for 5-10 minutes.
- Pat out the dough in a rectangular around ¾″ thick. Place the uncut biscuit dough in your fridge for at least 10 minutes.
- Once the dough has chilled for 10 minutes, gently press it out to your desired thickness. The typical thickness is around ½ to ¾ inch (1.3 to 1.9 cm). I went with ½ inch for my biscuits so I would get at least 7-8 biscuits for my gluten-free peach cobbler.
- Dip the edge of your biscuit cutter or cookie cutter into flour to prevent sticking. Press the cutter straight down into the rolled-out dough. Avoid twisting the cutter, as this can seal the edges of the biscuits and prevent proper rising. I use a 2 ½" round cookie cutter.
- Once you've cut out as many biscuits as you can from the initial rolling, gently gather the dough scraps, press them together, and pat out the dough again. Cut out more biscuits until you've used up all the dough.
- Place the sheet tray with the cutout biscuits in the freezer while you prepare the peach cobbler filling. At this point, you can freeze the gluten-free buttermilk biscuits for up to 2 weeks.
Peach Cobbler Filling
- Start by cutting the peaches in half all the way around and twisting the halves in opposite directions to loosen the pit. Pull the peach halves apart and remove the pit. Place the peach halves with the cut side down on a cutting board and slice them into ¼-inch slices. Try to keep them on the thinner side so they will cook faster in the oven.
- Add the zest and juice from one lemon along with the freshly grated ginger to the fresh fruit.
- Add the brown sugar, cornstarch, a pinch of kosher salt, and vanilla extract, and give the sliced peaches a good stir.
- Transfer the peach filling to the prepared baking dish. I use a 10" cast iron skillet. There is no need to spray the baking dish with nonstick baking spray.
How to bake a Gluten Free Peach Cobbler
- Start by preheating the oven to 400F.
- Once the oven is fully preheated, retrieve the skillet with the peach filling and the gluten-free buttermilk biscuits. Get a small bowl of extra buttermilk and some coarse sugar.
- Arrange the biscuits on the surface of the fruit filling. Depending on their size, you should be able to fit 7-8 biscuits neatly on the peaches.
- Using a pastry brush, coat each biscuit with a layer of buttermilk and generously sprinkle them with coarse sugar.
- Bake the peach cobbler at 400F for 10 minutes. Then, without opening the door, reduce the temperature to 350F. Continue baking at 350F for 35-40 minutes until the peach filling is bubbly, reaches 200F internal temperature in the center of the skillet and the biscuits are golden brown. Since the biscuit topping can quickly brown, I recommend tenting the cobbler with aluminum foil after 20 minutes. This way the gluten-free buttermilk biscuits stay moist and won't dry out. Please be aware that the cooking time can vary from oven to oven.
- Once the gluten free cobbler is ready, carefully remove the baking dish from the oven and place it on a cooling rack. Allow the cobbler to cool for at least 15 minutes before serving.
Serving
While a peach cobbler is best served warm, allow for it to cool down a bit after baking. Use a big spoon to dish out the peach cobbler onto individual plates. Get a good amount of the peach mixture and of course a gluten-free buttermilk biscuit. Add a scoop of vanilla ice cream on top and serve.
Notes
Gluten Free Flour: I recommend using Cup4Cup to make the Gluten Free Biscuits
Peaches: Make sure to weigh the sliced peaches after de-pitting them and slicing them. I used 5 medium sized peaches
Blueberries: If you would like to make an all peach peach cobbler, replace the 250 grams of blueberries with 250 grams of sliced peaches using a total of 900 grams of peaches.
Ginger: fresh ginger can be replaced with ½ - ¾ teaspoon of ground ginger
Cast Iron Skillet: I use a very well-seasoned 10" cast iron skillet . If you don't own a cast iron skillet, any oven-safe skillet will work. You may also use a casserole dish or a cake pan. I don't recommend a glass dish since they can break so easily. If your cast iron pan is not well seasoned, it may give your baked end products a metallic aftertaste.
Baking Time: Make sure to cook the peach cobbler until the center of the skillet reaches 200F. Baking Times can vary from oven to oven
Recommended Products
As an Amazon Associate and member of other affiliate programs, I earn from qualifying purchases.


Nutrition Information:
Yield:
8Serving Size:
1Amount Per Serving: Calories: 420
Calories are a guestimate and randomly generated.


Lesley A. says
Just made this today and it came out great. The biscuits are a little complicated but not difficult, as the instructions are very clear. For the berries we used mostly blackberries and a little bit of blueberries—great combo with the peaches.
Daniela says
Thank you so much, Lesley. Yes, my Biscuits are bit more labor intensive but I hope they are worth it
Lesley A. says
Oh most definitely worth it. Love your recipes.
Kathy Santersero says
I’ve been searching for a drop biscuit style gf peach cobbler - will one of your other biscuit recipes suit as a topping for this recipe?
Daniela says
None of my biscuits are drop biscuits.