
These Gluten Free Peanut Butter Blossoms are soft, chewy, and crowned with a chocolate kiss that makes them impossible to resist. This classic Christmas cookie recipe is perfect for the holidays - or any day you need a little sweet magic.

Jump to:
- Recipe Ingredient Notes
- History of Hershey’s Kisses
- History of Peanut Butter Blossoms
- Gluten Free Peanut Butter Blossoms Dough
- Baking Instructions
- How to store Peanut Butter Blossoms
- Variations of Peanut Butter Blossoms
- Note about Salt in my Recipes
- Baking in grams
- Note about Ovens and Oven Temperatures
- Substitutions and Modifications
- More Gluten Free Christmas Cookies
- 📖 Recipe
- 💬 Comments
Recipe Ingredient Notes
Gluten Free Flour: I tested this Gluten Free Peanut Butter Blossom Recipe with King Arthur Measure for Measure, my own gluten-free flour blend, and Bob’s Red Mill 1-to-1. All three worked beautifully, but the cookies made with King Arthur Measure for Measure stayed soft the longest. Each of these blends contains xanthan gum.
Peanut Butter: While I love natural peanut butter for snacking, I recommend using one with a bit of added oil or stabilizers for baking. It helps the dough come together smoothly and hold its shape. My go-to brands for baking are Jif or Skippy. You can use crunchy peanut butter if you like a little extra texture, but it may make the dough slightly harder to roll and shape.
Brown Sugar: Brown sugar not only adds a rich, caramel-like flavor but also helps keep these peanut butter blossoms soft and chewy. The natural molasses in brown sugar attracts and holds moisture, giving the cookies that tender, melt-in-your-mouth texture. This makes Peanut Butter Blossoms so irresistible - even a day or two after baking.
Hershey Kisses: Introduced in 1907, Hershey’s Kisses are bite-sized chocolate candies shaped like little chocolate drops. Originally hand-wrapped by factory workers until 1921, they became instantly recognizable thanks to the signature paper plume trademarked in 1924. Hershey’s Kisses come in a variety of flavors and fillings. But for classic Peanut Butter Blossoms, I stick with Hershey’s Milk Chocolate Kisses, which are, of course, gluten free. Dark Chocolate or Special Dark would also be delicious alternatives. Always check the packaging if you’re trying a new flavor- some, like Cookies ’n Creme, are not gluten-free.

History of Hershey’s Kisses
Hershey’s Kisses were first introduced in 1907 by the Hershey Chocolate Company in Pennsylvania. These small, teardrop-shaped chocolates quickly became a favorite thanks to their convenient size and signature foil wrapping. In the early days, each Kiss was hand-wrapped by factory workers, a process that continued until 1921, when Hershey introduced a machine that could wrap the chocolates automatically.
The famous paper plume, or “Niggly Wiggly” as it was originally called, was added in 1924 and trademarked that same year, making the Hershey’s Kiss instantly recognizable. Over the decades, the brand has expanded beyond its original milk chocolate flavor to include varieties like dark chocolate, almond, caramel, and seasonal limited editions.
Today, more than 70 million Hershey’s Kisses are produced each day in Hershey, Pennsylvania - still carrying that little paper plume that’s become a sweet symbol of American chocolate history.
History of Peanut Butter Blossoms
Peanut Butter Blossoms are one of those cookies that feel like they’ve always been part of the holidays, but they actually have a pretty specific origin story. The recipe was created in 1957 by Freda Smith of Gibsonburg, Ohio. She originally entered them in the Pillsbury Bake-Off under the name “Peanut Butter Kisses.”
Freda’s idea was simple but brilliant - instead of rolling peanut butter cookie dough in sugar and baking as usual, she pressed a Hershey’s Kiss into the center while the cookies were still warm. The heat from the cookie softened the chocolate just enough to create that iconic swirl shape on top.
Her cookies didn’t win the grand prize that year, but they were so popular that Pillsbury published the recipe, and it quickly became a holiday classic across America. Today, Peanut Butter Blossoms are a Christmas cookie tray essential - soft, nutty, and perfectly topped with a little chocolate kiss.

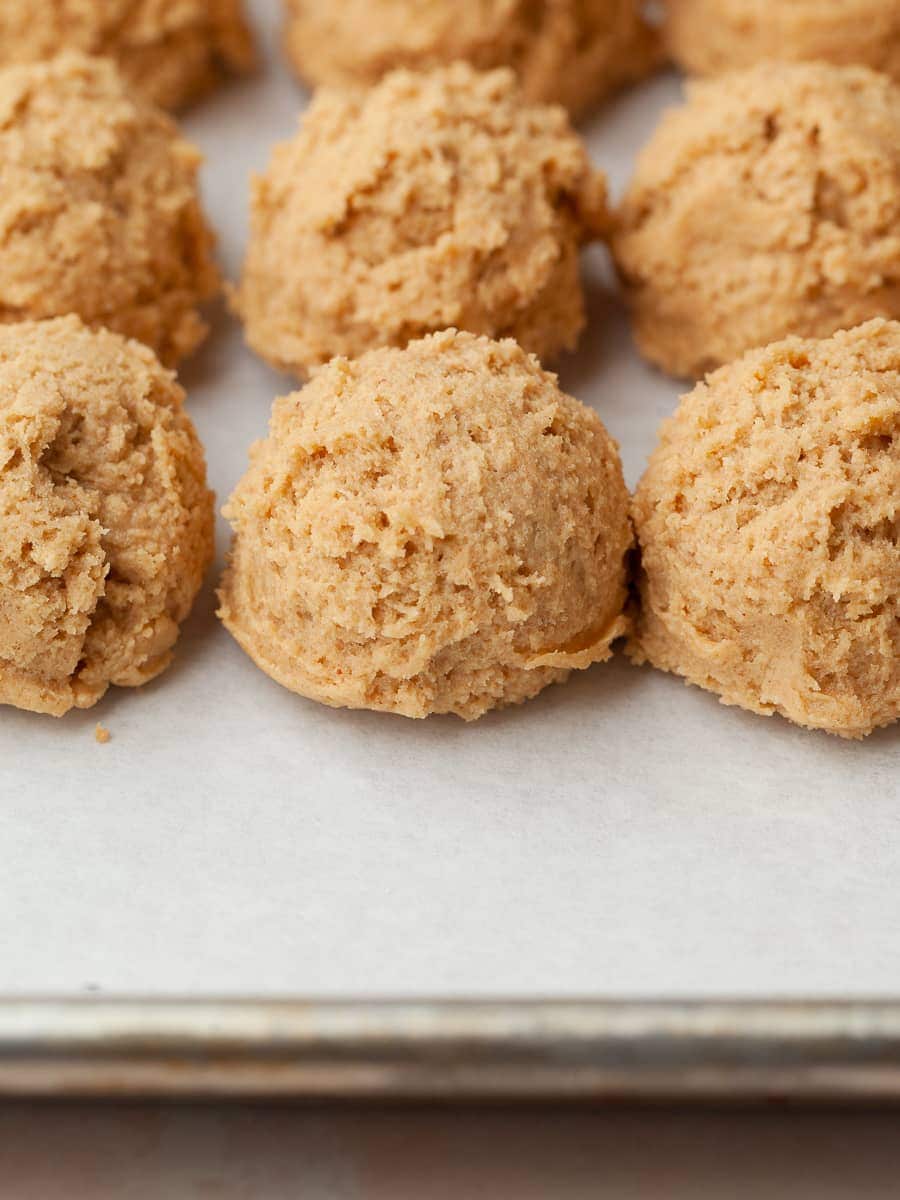
Gluten Free Peanut Butter Blossoms Dough
The dough for gluten free peanut butter blossoms comes together in a jiffy. Make sure the unsalted butter and the large egg are at room temperature before you start.

- Step 1: In a small bowl, combine the gluten free multi purpose flour, baking soda and kosher salt. Stir the dry ingredients together and set aside.

- Step 2: In the bowl of the stand mixer, combine the creamy peanut butter, unsalted butter, light brown sugar and granulated sugar.

- Step 3: Using the paddle attachment, cream on medium speed for 2–3 minutes until the mixture is light and fluffy. About halfway through, stop to scrape down the sides of the bowl and the paddle to make sure everything is evenly incorporated.

- Step 4: Next, add the room-temperature egg and a generous teaspoon of pure vanilla extract. Mix for about a minute, until the batter is smooth, glossy, and fully combined.

- Step 5: Add the dry ingredients to the wet ingredients and mix until just combined. Be sure to scrape down the sides of the bowl so everything is evenly incorporated.

- Step 6: Cover the bowl with plastic wrap - or transfer the gluten free peanut butter blossoms cookie dough to an airtight container - and refrigerate for about 30 minutes. Chilling the dough makes it easier to scoop and helps the cookies hold their shape during baking.
Baking Instructions
Using a small cookie scoop (about 1 tablespoon of dough), you’ll get around 32-36 peanut butter kiss cookies - depending, of course, on how much dough “disappeared” before baking.
- Step 1:Preheat the oven to 350 degrees and line two baking sheets with parchment paper. Set them aside.
- Step 2: Using a small cookie scoop, portion the peanut butter cookie dough into equal-sized scoops. I like to portion out the gluten free cookie dough first, then bake the cookies in batches.

- Step 3: Roll each scoop into a ball with clean hands. If the dough feels too sticky to handle, place the scooped dough balls back in the refrigerator for about 10 minutes before rolling.
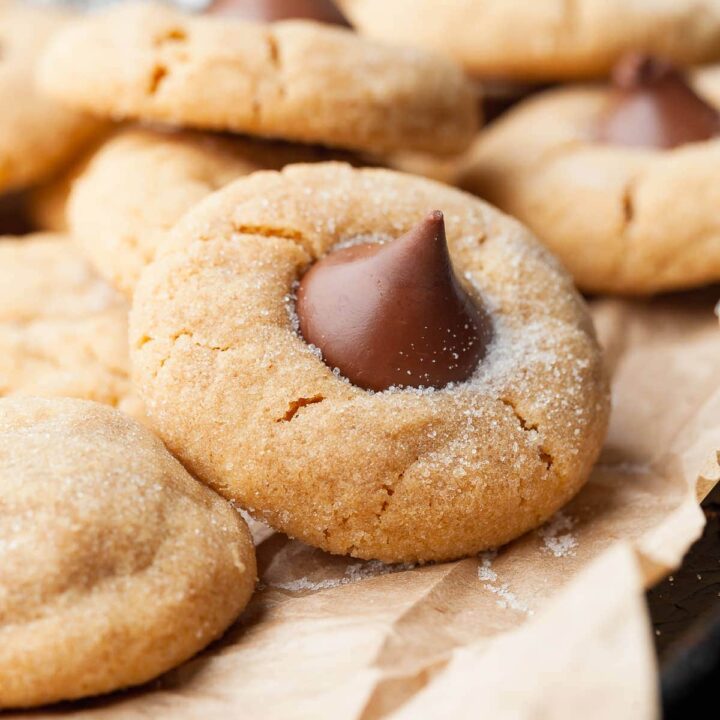
- Step 4:Add some granulated sugar to a small bowl. Roll each cookie dough ball in the sugar to coat.

- Step 5: Arrange 8 of the cookie dough balls on the sheet tray. If you like top each cookie dough with a bit of chai spiced sugar.

- Step 6: Bake cookies at 350°F, one tray at a time, for 8-9 minutes, or until the cookies are puffy and the edges are just set.
- Step 7: While the peanut butter cookies are baking, unwrap the Hershey Kisses.
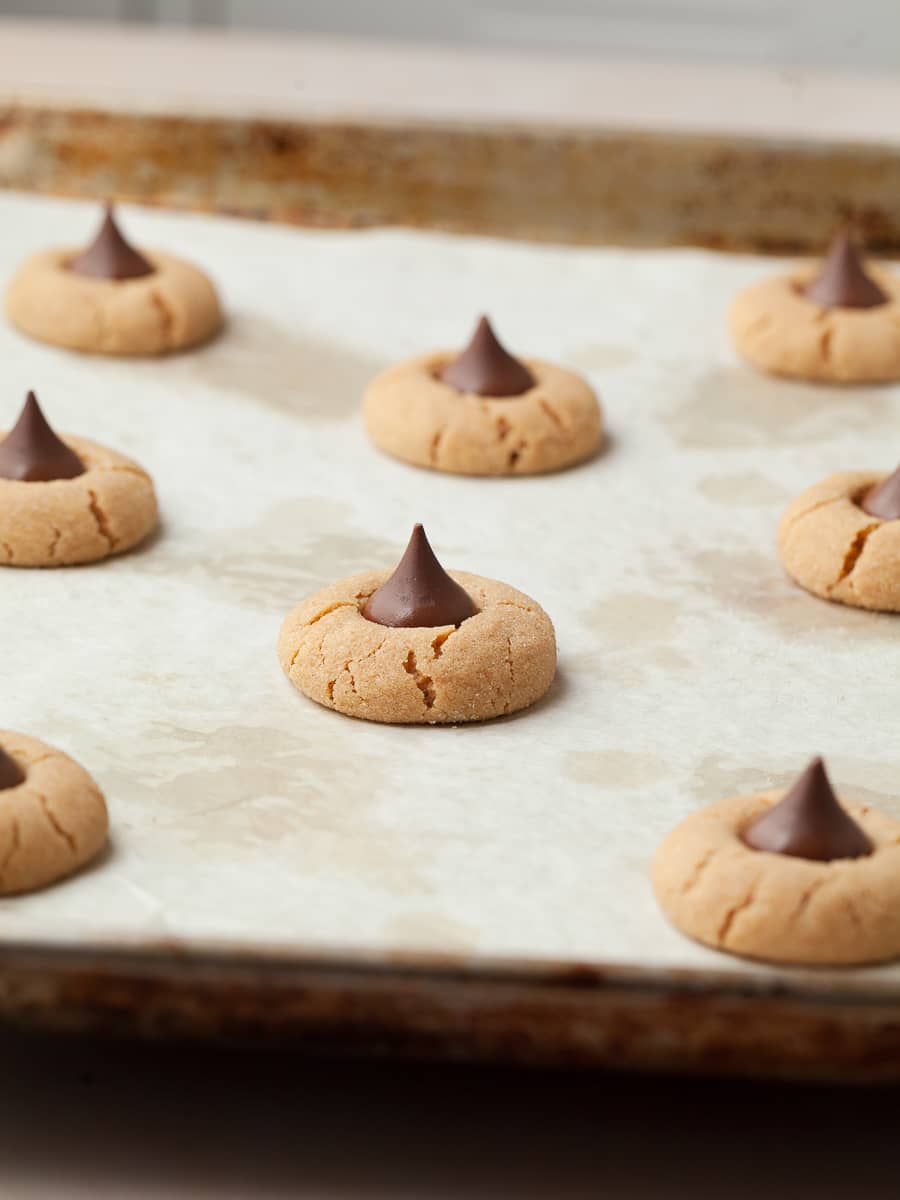
- Step 8: Gently press a Hershey’s Kiss into the center of each hot gluten free peanut butter cookie. Pressing before baking can cause the chocolate to melt too much.

- Step 9: Allow the Gluten Free Peanut Butter Blossoms to cool on the sheet tray for 5 minutes before transferring to a cooling rack to finish cooling.
How to store Peanut Butter Blossoms
Store the fully cooled Gluten Free Peanut Butter Blossoms in an airtight container at room temperature for 3 - 5 days. Clearly, they do last longer than this but they won't be as soft anymore after a few days of sitting at room temperature.
You can also freeze the dough to bake later. Scoop the dough into balls and roll them into balls. Do not roll them in sugar before freezing. Arrange the dough balls in a single layer on a parchment-lined baking sheet and freeze until solid. Then transfer them to a freezer-safe bag or container for up to 3 months.
To bake, remove the cookie dough from the freezer and arrange them on a parchment-lined baking sheet. Let the dough sit at room temperature for 30 - 45 minutes while preheating your oven. When ready, roll the dough balls in granulated sugar and bake as directed.
Variations of Peanut Butter Blossoms
Not a fan of Hershey’s Kisses? Try swapping them with Mini Peanut Butter Cups for the ultimate peanut butter-on-peanut-butter combo, or use any mini candy bars you have on hand - just check their labels to be sure they’re gluten-free.
These gluten free peanut butter cookies are also wonderful on their own. Soft, chewy, and packed with rich peanut butter flavor, they don’t even need the chocolate to shine.

Note about Salt in my Recipes
I use Diamond Kosher Crystal Salt in all of my recipes unless otherwise stated. If use use a different brand or kind of salt in your kitchen please adjust accordingly since some salts can be saltier. If you use Morton’s Kosher Salt please be aware that their salt granules are smaller in size, denser, and crunchier and twice as salty.
Baking in grams
I share my recipes in grams and by weight since baking by weight is the most accurate way to bake. Digital Scales are very affordable and easy to use. You can purchase them on Amazon for less than a set of measuring cups. For small amounts under 10 grams, I like to use this Precision Pocket Scale. Measuring cups are very inaccurate which can cause significant errors when it comes to gluten-free baking or baking in general. Especially since I bake with gluten-free flours which weigh differently than “regular” flours. I do provide some ingredients like spices and leavening agents in measuring spoons. To learn more about Baking with a digital scale, make sure to check out my post about Baking by weight.
Note about Ovens and Oven Temperatures
All my recipes are tested and developed with a conventional oven. I always bake my baked goods on the rack placed in the MIDDLE of my oven. This way the heat coming from the bottom will not burn my baked goods.
If you are baking with convection (fan-forced), please adjust the recipes accordingly. Convection oven can cause baked goods to dry out quickly and still be raw inside. Since takes at least 15-20 minutes for a standard American Oven to be fully preheated. I highly recommend investing in an Oven Thermometer.
Substitutions and Modifications
Any dietary or ingredient modifications/substitutions to this recipe may alter the end result in appearance and taste. I test my recipes several times as published in this post and The Gluten Free Austrian Blog is not responsible for the outcome of any recipe you find on our website.
More Gluten Free Christmas Cookies


📖 Recipe
Gluten Free Peanut Butter Blossoms
These Gluten Free Peanut Butter Blossoms are soft, chewy, and crowned with a chocolate kiss that makes them impossible to resist. This classic Christmas cookie recipe is perfect for the holidays - or any day you need a little sweet magic.
Ingredients
Gluten Free Peanut Butter Blossoms
- 160 grams gluten free multi purpose flour (containing xanthan)
- ¾ teaspoon kosher salt
- ½ teaspoon baking soda
- 113 grams unsalted butter, at room temperature
- 185 grams creamy peanut butter
- 100 grams light brown sugar
- 60 grams granulated sugar
- 1 large egg, at room temperature
- 1 teaspoon vanilla extract
For Baking
- 50 grams granulated sugar for rolling
- around 36 Hershey Kisses
Instructions
Gluten Free Peanut Butter Blossoms Dough
- In a small bowl, combine the gluten free multi purpose flour, baking soda and kosher salt. Stir the dry ingredients together and set aside.
- In the bowl of the stand mixer, combine the creamy peanut butter, unsalted butter, light brown sugar and granulated sugar.
- Using the paddle attachment, cream on medium speed for 2–3 minutes until the mixture is light and fluffy. About halfway through, stop to scrape down the sides of the bowl and the paddle to make sure everything is evenly incorporated.
- Next, add the room-temperature egg and a generous teaspoon of pure vanilla extract. Mix for about a minute, until the batter is smooth, glossy, and fully combined.
- Add the dry ingredients to the wet ingredients and mix until just combined. Be sure to scrape down the sides of the bowl so everything is evenly incorporated.
- Cover the bowl with plastic wrap - or transfer the gluten free peanut butter blossoms cookie dough to an airtight container - and refrigerate for about 30 minutes. Chilling the dough makes it easier to scoop and helps the cookies hold their shape during baking.
Baking Instructions
Using a small cookie scoop (about 1 tablespoon), this recipe makes roughly 32–36 Peanut Butter Blossoms—depending on how much dough “disappears” before baking.
- Preheat your oven to 350°F and line two baking sheets with parchment paper. Set aside.
- Using a small cookie scoop, portion the peanut butter cookie dough into equal-sized balls. I like to portion out all the dough first and then bake in batches.
- Roll each scoop into a smooth ball with clean hands. If the dough is too sticky, chill the scooped balls in the refrigerator for about 10 minutes before rolling.
- Pour some granulated sugar into a small bowl. Roll each cookie dough ball in the sugar to coat evenly.
- Arrange 8 cookie dough balls on a prepared baking sheet. If desired, sprinkle a bit of chai-spiced sugar on top for extra flavor.
- Bake one tray at a time at 350°F for 8–9 minutes, or until the cookies are puffed and the edges are just set.
- While the cookies are baking, unwrap the Hershey’s Kisses.
- Press a Hershey’s Kiss gently into the center of each hot cookie. Pressing before baking can cause the chocolate to melt too much.
- Let the Gluten Free Peanut Butter Blossoms cool on the baking sheet for 5 minutes, then transfer to a wire rack to cool completely.
Notes
Make Ahead: You can prepare the peanut butter blossom dough up to 2 days in advance. Store it tightly covered in the refrigerator until ready to bake. If it feels too firm after chilling, let it sit at room temperature for about 15–20 minutes before scooping and rolling.
Recommended Products
As an Amazon Associate and member of other affiliate programs, I earn from qualifying purchases.

Nutrition Information:
Yield:
36Serving Size:
1Amount Per Serving: Calories: 94
Calories are a guestimate and randomly generated.


Sugar says
I made these for my holiday cookie platter- they are just perfect. I like to sprinkle a little flaky salt under the kiss:)
Daniela says
This sounds perfect with the sprinkle of salt
Kelley says
Made these for the holiday and they turned out delicious!