
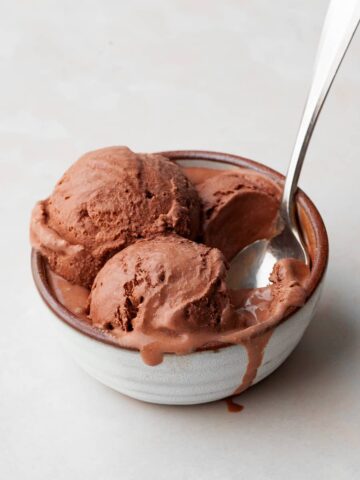
If you want an easy, no-bake fall dessert that still feels a little fancy, this Gluten Free Pumpkin Mousse is it. Light, creamy, and perfectly spiced, it’s perfect for Thanksgiving, a dinner party dessert, or anytime you want a pumpkin treat without a lot of fuss. Spoon it into glasses, top with a little whipped cream or crushed cookies, and you’re done - simple, delicious, and totally crowd-pleasing.

Recipe Ingredient Notes
Canned Pumpkin: Be sure to reach for a can of 100% pure pumpkin, not pumpkin pie filling. The labels can look confusingly alike, and they’re often stacked right next to each other on the grocery store shelf. While I do love roasting and puréeing pumpkin from scratch when time allows, canned pumpkin purée is my go-to here - it’s reliable, perfectly smooth, and saves you a whole lot of prep work.
Cream Cheese: This Pumpkin Mousse recipe calls for a full-fat block of cream cheese - the kind that comes in blocks. It gives the mousse richness and structure without being heavy. If you are on a dairy-free diet, a dairy-free alternative should work just as well in this recipe.
Heavy Cream: Homemade whipped cream is what makes this mousse light and airy. For dairy-free brands like Silk, So Delicious, or Califia Farms, make plant-based whipping creams (usually coconut- or almond-based) that whip up just like the real thing
Spices: I use a combination of pumpkin pie spice, ground cinnamon, and ground ginger in this recipe. I like the balance of warmth and spice this combo brings, but feel free to adjust to your own taste.

How to make Pumpkin Mousse
Make sure your cream cheese is fully at room temperature before mixing it into the pumpkin base. Cold cream cheese won’t blend smoothly and can leave little lumps, while softened cream cheese gives you that perfectly creamy mousse texture.
I love serving this mousse in small glasses for an elegant touch. These modern glasses from CB2 are my favorite. They make even the simplest dessert look elegant and special. Small Mason Jars would make a cute presentation as well.

- Step 1: Add the cold heavy whipping cream, powdered sugar, and vanilla extract to the clean bowl of a stand mixer. Using the whisk attachment, whip the cream until medium peaks form. Be careful not to overwhip -this can make the cream grainy. Transfer the whipped cream to a separate bowl and refrigerate while you prepare the mousse base.

- Step 2: Place the room-temperature cream cheese and granulated sugar into the stand mixer bowl (no need to wash it). Using the paddle attachment, cream together the sugar and cream cheese until completely smooth, about 1–2 minutes. Make sure no lumps remain.

- Step 3: Add the canned pumpkin purée and spices to the cream cheese mixture.

- Step 4: Mix on low speed (pumpkin can splash) until fully combined, scraping down the bowl and paddle with a rubber spatula as needed. Taste the mixture and adjust the spices if desired.

- Step 5: Retrieve the whipped cream from the fridge. Gently fold about ⅓ of it into the pumpkin mixture to lighten the base, then carefully fold in the remaining whipped cream until no streaks remain. Avoid stirring too vigorously, which can deflate the pumpkin mousse.

- Step 6: Using a portion scoop (I like a large cookie scoop), divide the pumpkin mousse evenly into 4 glasses for generous servings. If you’d prefer smaller portions, simply divide it into 6 glasses instead. After scooping the mousse into the glasses, gently tap the base of each one against the palm of your hand. This simple trick helps the mousse settle evenly and smooths out the surface for a clean, polished look.
- Step 7: Cover the glasses with plastic wrap and refrigerate for at least 2 hours before serving. It can be stored in the fridge for up to 2 days, and the pumpkin flavor will become more pronounced the longer it rests.

Serving Ideas for Pumpkin Mousse
While this gluten free pumpkin mousse is delicious on its own, it's a little blah to look at. I like to top it with a dollop of sweetened whipped cream and garnish it some candied pumpkin seeds. To make candied pumpkin seeds, follow my recipe for Candied Cocoa Nibs and just replace the cocoa nibs with pumpkin seeds (I only made half a batch because I can't be trusted around them). A few crushed cinnamon spiced pecans would also make a delicious topping or just a sprinkle of pumpkin spice or ground cinnamon.
Another delicious way to serve this pumpkin mousse is to layer it in glasses with some homemade graham cracker crumbs or crumbled up gluten free shortbread cookies. Almost like pumpkin cheesecake-type parfaits.
Storing and Freezing
Store any leftover pumpkin mousse you may have in the refrigerator for up to 2 days (3 days tops). The mousse may lose a bit of its light, airy texture over time, but it will still be delicious and full of pumpkin flavor.
Avoid freezing the mousse, as the texture can become watery or grainy once thawed - and let’s be honest, no one likes that.

Note about Salt in my Recipes
I use Diamond Kosher Crystal Salt in all of my recipes unless otherwise stated. If use use a different brand or kind of salt in your kitchen please adjust accordingly since some salts can be saltier. If you use Morton’s Kosher Salt please be aware that their salt granules are smaller in size, denser, and crunchier and twice as salty.
Baking in grams
I share my recipes in grams and by weight since baking by weight is the most accurate way to bake. Digital Scales are very affordable and easy to use. You can purchase them on Amazon for less than a set of measuring cups. For small amounts under 10 grams, I like to use this Precision Pocket Scale. Measuring cups are very inaccurate which can cause significant errors when it comes to gluten-free baking or baking in general. Especially since I bake with gluten-free flours which weigh differently than “regular” flours. I do provide some ingredients like spices and leavening agents in measuring spoons. To learn more about Baking with a digital scale, make sure to check out my post about Baking by weight.
Note about Ovens and Oven Temperatures
All my recipes are tested and developed with a conventional oven. I always bake my baked goods on the rack placed in the MIDDLE of my oven. This way the heat coming from the bottom will not burn my baked goods.
If you are baking with convection (fan-forced), please adjust the recipes accordingly. Convection oven can cause baked goods to dry out quickly and still be raw inside. Since takes at least 15-20 minutes for a standard American Oven to be fully preheated. I highly recommend investing in an Oven Thermometer.
Substitutions and Modifications
Any dietary or ingredient modifications/substitutions to this recipe may alter the end result in appearance and taste. I test my recipes several times as published in this post and The Gluten Free Austrian Blog is not responsible for the outcome of any recipe you find on our website.
More Gluten Free Pumpkin Desserts


📖 Recipe
Gluten Free Pumpkin Mousse

If you want an easy, no-bake fall dessert that still feels a little fancy, this Gluten-Free Pumpkin Mousse is it. Light, creamy, and perfectly spiced, it’s ideal for Thanksgiving, a dinner party, or anytime you want a fuss-free pumpkin treat. Spoon into glasses, top with whipped cream or crushed cookies, and you’re done - simple, delicious, and crowd-pleasing.
Ingredients
Gluten Free Pumpkin Mousse
- 125 grams heavy cream, cold
- 20 grams powdered sugar
- 1 teaspoon vanilla extract
- 115 grams cream cheese, at room temperature
- 35 grams granulated sugar
- 225 grams pumpkin puree
- 1 teaspoon pumpkin pie spice
- ½ teaspoon ground cinnamon
- ¼ teaspoon ground ginger
- ½ teaspoon kosher salt
For serving
- Sweetened whipped cream
- crushed cookies, candied nuts, a dusting of pumpkin pie spice
Instructions
- Add cold heavy whipping cream, powdered sugar, and vanilla extract to a clean stand mixer bowl. Whip with the whisk attachment until medium peaks form. Transfer to a separate bowl and chill while preparing the mousse.
- In the same bowl, combine room-temperature cream cheese and granulated sugar. Using the paddle attachment, beat until smooth and lump-free, about 1–2 minutes.
- Add canned pumpkin puree and spices, mixing on low speed to avoid splashing. Scrape down the sides and paddle to ensure even mixing. Taste and adjust spices if desired.
- Gently fold the chilled whipped cream into the pumpkin mixture in thirds, preserving the light, airy texture. Avoid overmixing.
- Using a portion scoop (I like a large cookie scoop), divide the pumpkin mousse evenly into 4 glasses for generous servings. If you’d prefer smaller portions, simply divide it into 6 glasses instead.
- After scooping the mousse into the glasses, gently (!!!) tap the base of each one against the palm of your hand. This simple trick helps the mousse settle evenly and smooths out the surface for a clean, polished look.
- Cover the glasses with plastic wrap and refrigerate for at least 2 hours before serving. It can be stored in the fridge for up to 2 days, and the pumpkin flavor will become more pronounced the longer it rests.
Pumpkin Cheesecake Mousse
Serving & Topping Ideas:
- Top with a dollop of sweetened whipped cream and candied pumpkin seeds. (Tip: Use my Candied Cocoa Nibs recipe, swapping cocoa nibs for pumpkin seeds - half a batch is plenty!)
- Sprinkle with crushed cinnamon-spiced pecans or a dash of pumpkin pie spice or ground cinnamon.
- For a fun twist, layer the mousse with gluten-free graham cracker crumbs or crumbled shortbread cookies for pumpkin cheesecake–style parfaits.
Notes
Dairy Free: If you are on a dairy-free diet, dairy-free alternatives for cream cheese and heavy cream should work just as well in this recipe.
Nutrition Information:
Yield:
4Serving Size:
1Amount Per Serving: Calories: 370
Calories are a guestimate and randomly generated.


Comments
No Comments